HMXCC1-G2 User’s Manual
94
Chapter 7 Failover for Database Replication
2) The HMXCC1 master unit and slave unit must be connected to same network segment of the same user network and the
same network segment of the same device network in which the user network and the device network are independent to each
other.
Installation Steps
1) Connect the HMXCC1 master unit to the system and power it on. Open a browser of a PC connected to the same user
network as the two HMXCC1 units. In the browser of the PC, input the factory default management interface login IP address
(https://192.168.1.200:5008). Input the factory default Administrator username (admin) and password (adminpass) to log in
the management interface.
2) After login, change the network settings of the master unit. In the management interface, go to
System
>
Networks
, clicking
<
Configure
> button at the page bottom to open Network Settings page. Input the user network IP as 192.168.1.
201
for the
master unit. Input the device network IP as 169.254.3.
2
. The rest settings use the default. Click the <
Submit
> button and skip
rebooting. Continue the following steps.
3) Go to
System
>
Replication
. On the page bottom, click the <
Configure the Replication Mode
> button to open the Replication
Settings and set this unit as Master. Click the <
Submit
> button and reboot the master unit.
4) After the HMXCC1 master reboots successfully, input the new management interface login IP address
(https://192.168.1.
201
:5008) to log in the master unit management interface.
5) Connect the HMXCC1 slave unit to the system and power it on. Open a browser and key in the factory default management
interface login IP address (https://192.168.1.200:5008). Log in the management interface with Administrator username (admin)
and password (adminpass).
6) Go to
System
>
Networks
, click the <
Configure
> button. Change the slave unit user IP address to 192.168.1.
202
and its device
IP to 169.254.3.
3
.
7) Go to
System
>
Replication
. On the bottom, click the <
Configure the Replication Mode
> button to open the Replication
Settings and set this unit as Slave. Fill in the Master IP Address on User LAN as 192.168.1.
201
. Reboot the slave unit and input
the new management interface login IP address (https://192.168.1.
202
:5008) to log in slave unit management interface.
Steps to set up IP Address of the Master Unit
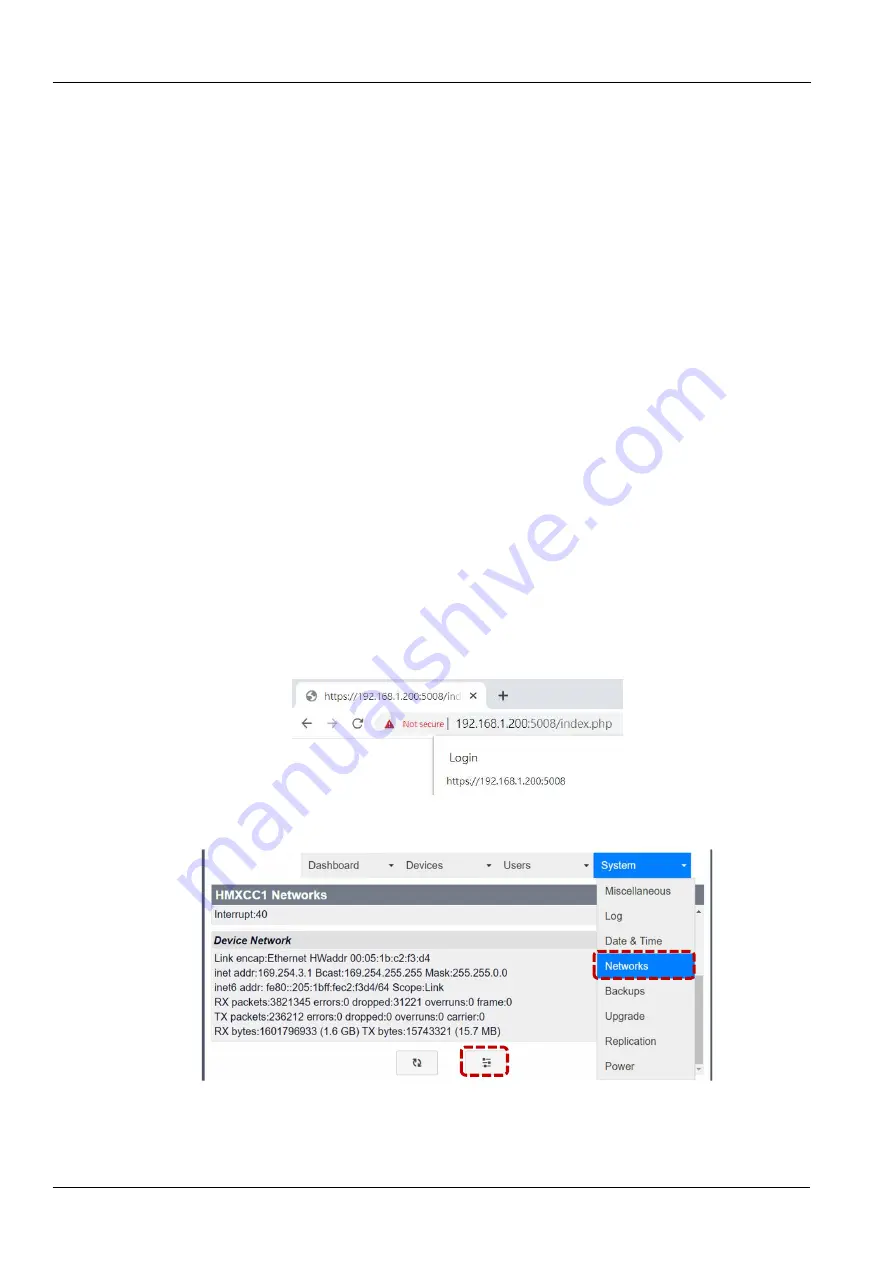
a. Log in the master unit management interface with factory default management interface login IP address
(https://192.168.1.200:5008).
Figure 7-2
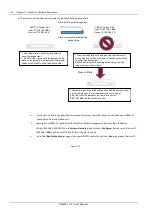
b. Go to
System
>
Networks
, click the <
Configure
> button.
Figure 7-3
c. Input Master unit User IP as 192.168.1.
201
and Device IP as 169.254.3.
2
. Click the <
Submit
> button, skip rebooting and
continue the following steps.
Summary of Contents for Avocent HMXCC1-G2
Page 1: ...Avocent HMXCC1 G2 User s Manual EN V2 0 April 2022...
Page 2: ......
Page 6: ...8 5 120 8 6 121...
Page 11: ...HMXCC1 G2 5 4 1 4 1 1 4 1 4 1 2 4 2 4 2 4 2 1 4 3...
Page 28: ...HMXCC1 G2 22 HMXCC1 IP KVM 5 3 5 4 5 5...
Page 30: ...HMXCC1 G2 24 HMXCC1 IP KVM 5 6 5 2 1 Detected Devices 5 7 HMXCC1 Device Network HMXCC1...
Page 31: ...HMXCC1 G2 HMXCC1 IP KVM 25 5 8 5 9...
Page 32: ...HMXCC1 G2 26 HMXCC1 IP KVM 5 10 5 2 2 User Connections 5 11 5 5 I O V A U R I...
Page 33: ...HMXCC1 G2 HMXCC1 IP KVM 27 5 12 5 13 5 2 3 Group Connections 5 14...
Page 34: ...HMXCC1 G2 28 HMXCC1 IP KVM 5 15 5 2 4 TX Preview...
Page 35: ...HMXCC1 G2 HMXCC1 IP KVM 29 5 16 IP KVM 5 17 5 3 Devices...
Page 36: ...HMXCC1 G2 30 HMXCC1 IP KVM 5 18 5 3 1 Receivers 5 19 HMXCC1 MAC 5 20...
Page 37: ...HMXCC1 G2 HMXCC1 IP KVM 31 5 21 5 22...
Page 38: ...HMXCC1 G2 32 HMXCC1 IP KVM 5 3 2 Transmitters 5 23 HMXCC1 MAC 5 24...
Page 39: ...HMXCC1 G2 HMXCC1 IP KVM 33 5 25 1 1 2 2 TX 1 1 2...
Page 40: ...HMXCC1 G2 34 HMXCC1 IP KVM 5 26 3 TX 1 5 27...
Page 43: ...HMXCC1 G2 HMXCC1 IP KVM 37 e SG TX1 5 32 f SG TX1 TX 1 TX 2 TX 3 TX 1 TX 2 TX 3 SG TX1 5 33...
Page 45: ...HMXCC1 G2 HMXCC1 IP KVM 39 5 35 c HG RX1 RX A RX B RX C RX A RX B RX C RX A...
Page 46: ...HMXCC1 G2 40 HMXCC1 IP KVM 5 36 d HG RX2 RX D RX E RX RX RX e HG TX1...
Page 47: ...HMXCC1 G2 HMXCC1 IP KVM 41 5 37 f HG TX1 TX 1 TX 2 TX 3 TX 1 TX 2 TX 3 TX 1...
Page 53: ...HMXCC1 G2 HMXCC1 IP KVM 47 5 46 c MR DEMO RX A RX 0 0 RX B 1 0 RX C 2 0 RX D 0 1 RX E 1 1 5 47...
Page 54: ...HMXCC1 G2 48 HMXCC1 IP KVM 5 48 d RX A 5 49...
Page 58: ...HMXCC1 G2 52 HMXCC1 IP KVM 5 55 c VW DEMO 2 2 5 56...
Page 61: ...HMXCC1 G2 HMXCC1 IP KVM 55 5 61 5 62 5 63 5 3 5 Monitors 5 64...
Page 62: ...HMXCC1 G2 56 HMXCC1 IP KVM HMXCC1 EDID HMXCC1 EDID ID HMXCC1 EDID EDID EDID 5 65 5 66...
Page 63: ...HMXCC1 G2 HMXCC1 IP KVM 57 5 67 EDID Scroll Lock Scroll Lock M EDID 5 68...
Page 64: ...HMXCC1 G2 58 HMXCC1 IP KVM 5 3 6 Firmware 5 69 HMXCC1 TX RX bin HMXCC1 5 3 7 Upgrade 5 70...
Page 65: ...HMXCC1 G2 HMXCC1 IP KVM 59 5 71 TX RX TX RX 15 Flash 5 72 5 73...
Page 66: ...HMXCC1 G2 60 HMXCC1 IP KVM 5 74 5 75 5 76...
Page 67: ...HMXCC1 G2 HMXCC1 IP KVM 61 5 77 5 78 IP KVM 5 79...
Page 68: ...HMXCC1 G2 62 HMXCC1 IP KVM 5 80 5 4 Users 5 81 5 4 1 List 5 82...
Page 69: ...HMXCC1 G2 HMXCC1 IP KVM 63 5 83 5 84 OSD 5 85...
Page 70: ...HMXCC1 G2 64 HMXCC1 IP KVM 5 86 5 87 5 88...
Page 71: ...HMXCC1 G2 HMXCC1 IP KVM 65 5 4 2 Groups 5 89 TX RX TX RX 5 90 5 91...
Page 72: ...HMXCC1 G2 66 HMXCC1 IP KVM 5 92 5 93 5 94 TX RX...
Page 74: ...HMXCC1 G2 68 HMXCC1 IP KVM 5 98 LDAP 5 99 LDAP IP KVM 5 100...
Page 75: ...HMXCC1 G2 HMXCC1 IP KVM 69 5 5 System 5 101 5 5 1 Miscellaneous 5 102 HMXCC1 HMXCC1 HMXCC1...
Page 76: ...HMXCC1 G2 70 HMXCC1 IP KVM 5 5 2 Log 5 103 5 104 5 105...
Page 77: ...HMXCC1 G2 HMXCC1 IP KVM 71 5 106 5 5 3 Date Time 5 107 HMXCC1 NTP 5 108...
Page 79: ...HMXCC1 G2 HMXCC1 IP KVM 73 5 111 IP IP 5 112...
Page 81: ...HMXCC1 G2 HMXCC1 IP KVM 75 5 115 HMXCC1 HMXCC1 HMXCC1 IP 5 116 IP IP...
Page 82: ...HMXCC1 G2 76 HMXCC1 IP KVM 5 117 IP hmxcc log txt gz 5 118 HMXCC1...
Page 83: ...HMXCC1 G2 HMXCC1 IP KVM 77 5 119 5 120...
Page 86: ...HMXCC1 G2 80 HMXCC1 IP KVM 5 125 5 126 IP IP 192 168 1 201 IP 169 254 3 2...
Page 88: ...HMXCC1 G2 82 HMXCC1 IP KVM IP 5 129 IP https 192 168 1 202 5008 HMXCC1...
Page 90: ...HMXCC1 G2 84 HMXCC1 IP KVM 5 131...
Page 91: ...HMXCC1 G2 85 6 1 1 6 1 6 2 2...
Page 92: ...HMXCC1 G2 86 6 3 hmxcc backup master xxxxxx sql gz hmxcc log master xxxxxx txt gz 3 6 4...
Page 93: ...HMXCC1 G2 87 a hmxcc backup xxxxxx sql gz b c 4 a hmxcc log xxxxxx txt gz 6 5 b...
Page 94: ...HMXCC1 G2 88 6 6 5 a 6 7 b...
Page 97: ...HMXCC1 G2 91 6 12 TX1 TX2 TX3 TX4 6 13 RX1 RX2 RX3 RX4 6 14...
Page 100: ...HMXCC1 G2 94 6 20 TxGroupA TxGroupB User1 User2 User3 User4 4 User1 User2 User3 User4 6 21...
Page 102: ...HMXCC1 G2 96 6 24 GroupA User1 User2 6 25 GroupA RxGroupA 6 26 GroupA TxGroupA...
Page 111: ...HMXCC1 G2 105 7 3 c 7 4 d IP 192 168 1 201 IP 169 254 3 2...
Page 112: ...HMXCC1 G2 106 7 5 e...
Page 113: ...HMXCC1 G2 107 7 6 f IP https 192 168 1 201 5008 7 7 IP a IP https 192 168 1 200 5008...
Page 114: ...HMXCC1 G2 108 7 8 b 7 9 c IP 192 168 1 202 IP 169 254 3 3...
Page 115: ...HMXCC1 G2 109 7 10 d IP 192 168 1 201...
Page 116: ...HMXCC1 G2 110 7 11 e IP https 192 168 1 202 5008 7 12...
Page 117: ...HMXCC1 G2 111 7 1 2 1 HMXCC1 8 LED LED 7 13 LED 7 1 LED 2 LED LED...
Page 118: ...HMXCC1 G2 112 7 14 7 2 HMXCC1 HMXCC1 HMXCC1 HMXCC1 HMXCC1 HMXCC1 HMXCC1...
Page 119: ...HMXCC1 G2 113 7 15 7 2 1 HMXCC1 1 7 16 2 IP...
Page 120: ...HMXCC1 G2 114 7 17 7 18 1 HMXCC1 PC 2 3 PC hmxcc backup xxxxxx sql gz a...
Page 122: ...HMXCC1 G2 116 7 2 2 HMXCC1 7 21...
Page 123: ...HMXCC1 G2 117 7 22 1 2 IP 192 168 1 202 IP 169 254 3 3 3 IP 192 168 1 201 4 HMXCC1...
Page 128: ...HMXCC1 G2 User s Manual...
Page 238: ...HMXCC1 G2 User s Manual This page is intentionally left blank...
Page 240: ...HMXCC1 G2 User s Manual...


