Vertiv™ NetSure™ A50B50 DC Power Retrofit Installation and User Instructions
16
1.
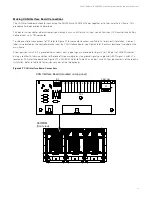
Ensure that NCU contains configuration file or refer to the Configuration File Part Number Label on the side of the NCU for
the Configuration Part Number (see Figure 3.9).
Figure 3.9
NCU Configuration Label Location
2.
If not already done, connect an approved grounding strap to your wrist. Attach the other end to a suitable ground.
3.
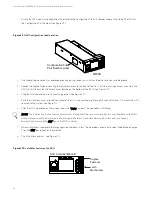
Loosen the captive fastener securing the latch mechanism to the front of the NCU. Pull the latch mechanism away from the
NCU (this will retract the latch mechanism located on the bottom of the NCU). See Figure 3.10.
4.
Slide the NCU completely into its mounting position. See Figure 3.11.
5.
Push the latch mechanism into the front panel of the NCU, and secure by tightening the captive fastener. This locks the NCU
securely to the system. See Figure 3.11.
6.
After the NCU is powered on, the display shows the “Vertiv” screen. The controller is initializing.
NOTE:
The initialization routine takes several minutes. During that time various alarm indicators may illuminate on the NCU
front panel and an audible alarm may sound. Disregard all alarms. An audible alarm can be silenced at any time by
momentarily depressing the
ENT
key on the NCU controller.
7.
When initialization is complete, the language screen appears. Press the up or down arrow key to select the desired language.
Press the ENT key to confirm the selection.
8.
The Main Menu displays. See Figure 3.12.
Figure 3.10
Latch Mechanism on the NCU
M830B
Configuration File
Part Number Label
Captive
Fastener
Latch
Mechanism
NCU Controller M830B
ENT
ESC


