background image

12

20306755

30ILDV Series Gas Fireplace Insert

VENTING INSTALLATION 

VENTING CONFIGURATIONS

FP1924 
inlet exhaust reline 
9/08 

Exhaust

Inlet

Recommended block-off 

plate (noncombustible 

metal). Prevents odors from 

chimney entering room.

UL 127 Solid 

Fuel Z.C Fire-

box

Figure 8

Inlet and Exhaust Reline

NOTE:

 You may use either reline configuration with a masonry 

or zero-clearance fireplace.

FP1924

3" (75 mm) Exhaust 

UL 1777 Gas Liner 3" (75 mm) 

Inlet

Termination Kits (Refer to Page 12)

Summary of Contents for 30ILDVNV

Page 1: ...intenance can cause injury or property damage Refer to this manual For assistance or additional information consult a qualified installer service agency or the gas supplier Thisappliancemaybeinstalledinanaftermarket permanently located manufactured home USA only or mobile home where not prohibited by local codes This appliance is for use only with the type of gas indicated on the rating plate This...

Page 2: ...ce Requirements 9 Venting Installation 10 Venting Requirements 10 Installation Precautions 10 Altitude Considerations 11 Venting Configurations 12 Manifold Removal and Installation 13 Insert Installation 14 Check Gas Type 14 Install Gas to Insert Location 14 Installation Items Needed 14 Check Gas Pressure 16 Electrical Installation 16 Electrical Wiring 16 Remote Wall Mounted Switch 17 Hand Held Re...

Page 3: ...ARBON MONOXIDE POISONING Early signs of carbon monoxide poisoning are similar to the flu with headaches dizziness and or nausea If you have these signs the fire place may not have been installed properly Get fresh air at once Have the fireplace inspected and serviced by a qualified service person Some people are more affected by carbon monoxide than others These include pregnant women people with ...

Page 4: ...33 2014 STANDARDS A manufactured home USA only or mobile home OEM installation must conform with the Manufactured Home Construction and Safety Standard Title 24 CFR Part 3280 or when such a standard is not applicable the Standard for Manufactured Home Installations ANSI NCSBCS A225 1 or Standard for Gas Equipped Rec reational Vehicles and Mobile Housing CSA Z240 4 Nous recommandons que nos apparei...

Page 5: ... ON OFF Switch OFF Pilot ON Knob HI LO Knob Piezo Gas Shut Off Valve GAS PRESSURES GAS SPECIFICATIONS ORIFICE SIZE NOTE The ILDV Series fireplace inserts work without any electrical supply The blower must be attached to 110 120V AC Natural Gas Propane LP Inlet Minimum 4 5 w c 11 0 w c Inlet Maximum 10 5 w c 13 0 w c Manifold Pressure 3 5 w c 10 0 w c Model Fuel Max Input BTU h Min Input BTU h Orif...

Page 6: ... L C D F E 0511 ILDV dims 9 08 A B Figure 2 ILDV Fireplace Insert Dimensions REF 30ILDV A 251 4 641 MM B 163 16 411 MM C 145 8 372 MM D 281 8 714 MM E 203 4 527 MM F 61 4 159 MM G 203 16 513 MM H 97 8 251 MM I 4 102 MM J 23 16 56 MM K 75 8 194 MM L 3 76 MM INSERT DIMENSIONS ...

Page 7: ...ed in a bedroom Refer to National Fuel Gas CodeANSI Z233 1 NFPA54 current edition the Uniform Mechanical Code current edi tion and Local Building Codes for specific installation requirements IMPORTANT Your direct vent insert was designed to be installed in an existing wood burning fireplace The location and clearances are subject to local building codes INSERT APPLICATIONS Before installing the ga...

Page 8: ...onsidered a mantel and must meet the mantel requirements listed in this manual FP1947 Figure 3 Mantel Clearances NOTE Side clearance to com bustibles is 10 254 mm from opening whether it is side wall or mantel legs HEARTH REQUIREMENTS The insert must be installed on a noncombustible hearth extending a minimum of 12 from the fireplace opening local codes may require a larger hearth The hearth must ...

Page 9: ...ction noises during the start up or cool down cycle Similar noises are found with your furnace heat exchanger or car engine It is not unusual for your insert to give off some odor the first time it is burned This is due to the curing of the paint and any undetected oil from the manufacturing process Please ensure that your room is well ventilated OPEN ALL WINDOWS DURING INITIAL BURN OFF CURING PHA...

Page 10: ...arranty VENTING REQUIREMENTS The exhaust vent must reline the entire length of chimney and terminate above chimney top Vent must meet all vent manufacturer s requirements when installed Make sure you have the following before installing unit 3 and 3 UL 1777 Listed gas liner for air inlet and exhaust Vertical Terminations kits HEDV32T812 HEDV32T1212 HEDVRT AI31TK33A FP1922 vent requirements Maximum...

Page 11: ...o resize orifice for use at high altitude contact your dealer High Temp Silicone FP1923 exhaust pipe 9 08 3 and 3 UL 1777 Gas Liner Apply high temperature silicone to lines on both ends and secure with two 2 screws Termination Kit Refer to Page 12 Figure 7 Connecting Vent Pipe to Heater FP1923 WARNING Failure to adjust air shutter properly may lead to improper combustion which can create a safety ...

Page 12: ...let Recommended block off plate noncombustible metal Prevents odors from chimney entering room UL 127 Solid Fuel Z C Fire box Figure 8 Inlet and Exhaust Reline NOTE You may use either reline configuration with a masonry or zero clearance fireplace FP1924 3 75 mm Exhaust UL 1777 Gas Liner 3 75 mm Inlet Termination Kits Refer to Page 12 ...

Page 13: ...igure 10 Figure 9 Remove Manifold and Attach to Flex Vent FP1960 manifold assembly 9 08 Gasket Manifold Baffle Assembly FP1960 Front View Side View Flex Vent Figure 10 Baffle Assembly and Adjustment FP1961 baffle adjustment 9 08 Loosen Four 4 Screws to Adjust Bottom View Closed Position Bottom View Open Position FP1961 30ILDV Baffle Plate 30ILDV Adjust for extended vertical applications 4 Feed exh...

Page 14: ...e You must reduce incoming gas pressure to between 11 and 13 inches of water If you do not reduce incoming gas pressure burner system regula tor damage could occur Install external regulator with the vent pointing down as shown in Figure 11 Pointing the vent down protects it from freezing rain or sleet FP1930 external regulator 9 08 External Regual tor Vent Pointing Down 100 gal min Propane LP Sup...

Page 15: ...ine Supplied with Appliance Tee Joint Pipe Nipple Cap Figure 12 Gas Connection Amanual shut off valve is factory installed upstream of the appliance Union tee and plugged 1 8 NPT pressure tapping point should be installed upstream of the appliance Figure 12 CAUTION Use pipe joint sealant that is resistant to liquid petroleum LP gas CAUTION Apply pipe joint sealant lightly to threads This will prev...

Page 16: ...to reseal Do not over torque Check test points for gas leaks with a soap and water solution or an electronic gas leak detector FP1932 valve regulator with knobs Pressure Test IN Pressure Test OUT HI LO Knob Pilot Adjustment Screw FP1932 Figure 13 Gas Pressure Check at Gas Valve ELECTRICAL WIRING This insert will work without any electrical supply Elec tricity is only needed to operate blower Verif...

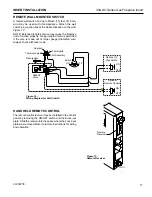
Page 17: ...eck with local code PILOT HI LO ON OFF FP1933 wall switch wiring Figure 14 Wiring Diagram for Wall Switch Sparker Thermocouple Piezo Igniter Thermopile Pilot Assembly Switch Millivolt Valve TH TP TH TP ON OFF Optional 15 Wall Switch Optional Remote Control ON OFF ON OFF HAND HELD REMOTE CONTROL The remote control receiver may be installed in the control panel by removing the ON OFF switch and the ...

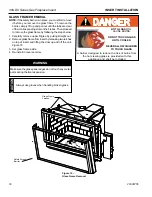
Page 18: ...install in reverse order Always use gloves when handling broken glass CAUTION WARNING Make sure the glass panel edges do not touch any metal parts during thermal expansion DANGER HOT GLASS WILL CAUSE BURNS DO NOT TOUCH GLASS UNTIL COOLED NEVER ALLOW CHILDREN TO TOUCH GLASS Un panneau vitré chaud peut causer des brûlures Laissez refroidir le panneau vitré avant d y toucher Ne laisser jamais les enf...

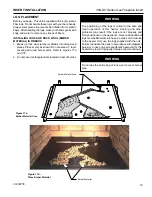
Page 19: ...ts located at rear of burner LG536 ILDV Ember Material Figure 17b Place Ember Material FP1968 ember material area 9 08 Ember Material Area Figure 17a Ember Material Area WARNING Do not use the entire bag of rock wool to cover burner area WARNING The positioning of the logs is critical to the safe and clean operation of this heater Sooting and other problems may result if the logs are not properly ...

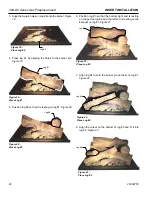
Page 20: ... and fit it into log 4 Figure 23 3 Align the two pin holes on Log 6 onto the burner Figure 18 4 Place log 1 by aligning the holes to the burner pin Figure 19 5 Position log 2 so that it is resting on log 1 Figure 20 LG538 ILDV log 1 9 08 Log 1 Figure 19 Place Log 1 LG539 ILDV log 2 9 08 Log 2 Figure 20 Place Log 2 LG537 ILDV log 6 9 08 Log 6 Figure 18 Place Log 6 LG540 ILDV log 3 9 08 Log 3 Figure...

Page 21: ...and attach with screws provided 3 Re attach glass door assembly 4 Attach filigree to face by gently pushing into place FP1934 insert surrounds Figure 25a Beveled Surround Figure 25b Cast Surround FP1934 FP1962 install surround 9 08 Insert Facing Filigree Floral Shown Safety Barrier Screen Glass Door Assembly FP1962 Figure 24 Install Surround INSERT INSTALLATION ...

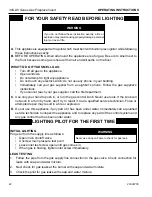
Page 22: ...lified service technician Force or attempted repair may result in a fire or explosion D Do not use this appliance if any part of it has been under water Immediately call a qualified service technician to inspect the appliance and to replace any part of the control system and any gas control that has been under water FOR YOUR SAFETY READ BEFORE LIGHTING LIGHTING PILOT FOR THE FIRST TIME INITIAL LIG...

Page 23: ...s supply line connection to the gas valve Burner connections Field made joints gas shutoff valve Pilot Factory made joints Each joint or connection All joints on valve and control body LIGHTING PILOT FOR THE FIRST TIME WARNING Never check for gas leak with open flame WARNING If using a soap and water solution to test for leaks DO NOT spray solution onto control body WARNING If the knob does not po...

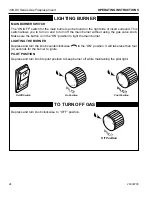
Page 24: ...itch allows you to turn on and to turn off the main burner without using the gas valve knob Make sure the button is in the ON position to light the main burner LIGHTING THE BURNER Depress and turn the knob counterclockwise to the ON position It will take less than four 4 seconds for the burner to ignite PILOT POSITION Depress and turn knob to pilot position to keep burner off while maintaining the...

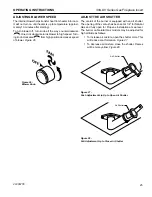
Page 25: ...lames will be more yellow Figure 28 FP1940 air shutter part open Air Shutter Figure 27 Push Adjustment Lip Up to Open Air Shutter FP1941 air shutter fully open Air Shutter Figure 28 Pull Adjustment Lip to Close Air Shutter FP1939 fan control knob ADJUSTING BLOWER SPEED The internal blower helps transfer heat from heater into room It will not turn on until heater is up to temperature approxi mately...

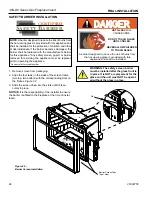
Page 26: ...lots on the firebox Figure 29 3 Slide the screen down into the slots until it fits se curely in place NOTICE It is the responsibility of the installer to ensure the barrier is affixed to the fireplace at the time of instal lation DANGER HOT GLASS WILL CAUSE BURNS DO NOT TOUCH GLASS UNTIL COOLED NEVER ALLOW CHILDREN TO TOUCH GLASS Un panneau vitré chaud peut causer des brûlures Laissez refroidir le...

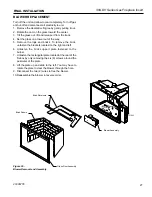
Page 27: ...nd bricks To remove the brick unfasten the brackets located on the right and left 6 Unfasten the brick support plate fastened to the burner 7 Unfasten the rectangular plate located at the rear of the firebox by only removing the six 6 screws around the perimeter of the plate 8 Lift the plate up and slide to the left You may have to rotate the plate to clear the blower through the hole 9 Disconnect...

Page 28: ...20ILDV 30ILDV 40ILDV Blower 1 53D2196 56D2196 56D2196 Parts not shown Disc Bracket 1 39D0098 39D0098 39D0098 Blower Snap Disc 1 26D2870 26D2870 26D2870 Speed Control 1 26D0746 26D0746 26D0746 Wire Assembly 34 1 83D0521 83D0521 83D0521 Wire Assembly 16 2 83D0522 83D0522 83D0522 Power Cord 1 26D0619 26D0619 26D0619 Label all wires prior to disconnection when servicing controls Wiring errors can caus...

Page 29: ...he glass The initial paint curing of the appliance can also leave a slight film on the glass This is a temporary problem CLEANING and MAINTENANCE LG535 ILDV log flame 9 08 Figure 31 Typical Burner Flame LG535 FP1943 pilot flame Thermocouple Thermopile FP1943 Figure 32 Typical Pilot Flame You should clean the glass after the first two weeks of use After that you should clean the glass no more than ...

Page 30: ...nt from main burner and pilot 5 Carefully replace log set and embers in their correct positions Refer to Pages 19 21 6 Replace door 7 Relight pilot Refer to Page 22 8 Turn on main burners WARNING Allow logs to cool completely before cleaning Logs reach high temperatures Make sure clearances to combustibles leave enough room for maintenance and service Carefully reassemble and reseal insert properl...

Page 31: ... If exces sive sooting is found heater must be adjusted Contact dealer where you bought heater FP1943 pilot flame Thermocouple Thermopile FP1943 Figure 34 Before taking unit apart check pilot flame Flame should touch thermo couple and thermopile FP1944 check burner ports 9 08 Check Burner Ports FP1944 Figure 35 Check Burner Ports and Burners 4 Clean burner and burner ports Figure 35 5 Replace log ...

Page 32: ...stay lit 1 Defective thermocouple Loose thermocouple 1 Check for proper connection of thermocouple to rear of valve 2 Air in gas line 2 Bleed line Contact dealer 3 No gas 3 Check shutoff valve and gas supply LPG tank Burner will not light when valve and burner switch are both on 1 Defective switch 1 Check switch connections Jump wires at switch 2 Defective thermopile 2 Check connections to valve C...

Page 33: ...33 20306755 30ILDV Series Gas Fireplace Insert REPLACEMENT PARTS 12 13 24 6 1 2 3 4 5 7 10 11 14 15 17 18 19 20 22 16 23 21 23 25 26 27 28 0511 ILDV parts 9 08 8 9 29 ...

Page 34: ...T VENTURI 1 45D0032 45D0032 19 PIEZO IGNITOR 1 14D0503 14D0503 20 ON OFF WIRE HARNESS 1 48D0163 48D0163 21 UNION 1 26D4500 26D4500 22 ELBOW 1 27D7307 27D7307 23 FITTING 2 27D7026 27D7026 24 DISK BRACKET 1 26D3320 26D3320 25 LEFT BRICK LINER 1 83D1052 83D1052 26 REAR BRICK LINER 1 83D1053 83D1053 27 RIGHT BRICK LINER 1 83D1051 83D1051 28 GLASS DOOR ASSEMBLY 1 83D1252K 83D1252K 29 SAFETY SCREEN BARR...

Page 35: ... Texture LF30BT 2 Assembly Louver Iron Age LF30IA 3 Floral Filigree Black Texture FF30BT 3 Floral Filigree Iron Age FF30IA Beveled Surround Black Texture IL30BSBT Colonial Surround Black Texture IL30CSBT Beveled Surround Iron Age IL30BSIA Colonial Surround Iron Age IL30CSIA ON OFF Remotes RCB RCMT RCBE WMTD Thermostat Remotes RCST RCT RCSTE WWTD Full Function Remotes RSCTEBA RCSITEA Wall Switch MV...

Page 36: ...36 20306755 30ILDV Series Gas Fireplace Insert This page intentionally left blank ...

Page 37: ...37 20306755 30ILDV Series Gas Fireplace Insert This page intentionally left blank ...

Page 38: ...h the above requirements provided however that during said thirty 30 day period a battery operated carbon monoxide detector with an alarm shall be installed 2 Approved Carbon Monoxide Detectors Each carbon MASSACHUSETTS RESIDENTS ONLY monoxide detector as required in accordance with the above provisions shall comply with NFPA 720 and be ANSI UL 2034 listed and IAS certified 3 Signage A metal or pl...

Page 39: ...ll also be void if the appliance is not operated and maintained according to the operating instructions supplied with the appliance and does not extend to 1 firebox burner assembly damage by accident neglect misuse abuse alterations negligence of others including the installation thereof by unqualified installers 2 the costs of removal re installation or transportation of defective parts on the ap...

Page 40: ...nergétique de foyer au gaz Énerguide Selon CSA P 4 1 09 149 Cleveland Drive Paris Kentucky 40361 www vermontcastingsgroup com EFFICIENCY RATINGS MODEL ENERGUIDE RATINGS FIREPLACE EFFICIENCY PERCENTAGE Steady State Fan OFF Fan ON D O E AFUE PERCENTAGE 30ILDVNV 71 9 76 5 77 5 65 9 30ILDVPV 83 7 88 6 89 6 68 5 ...

Reviews: