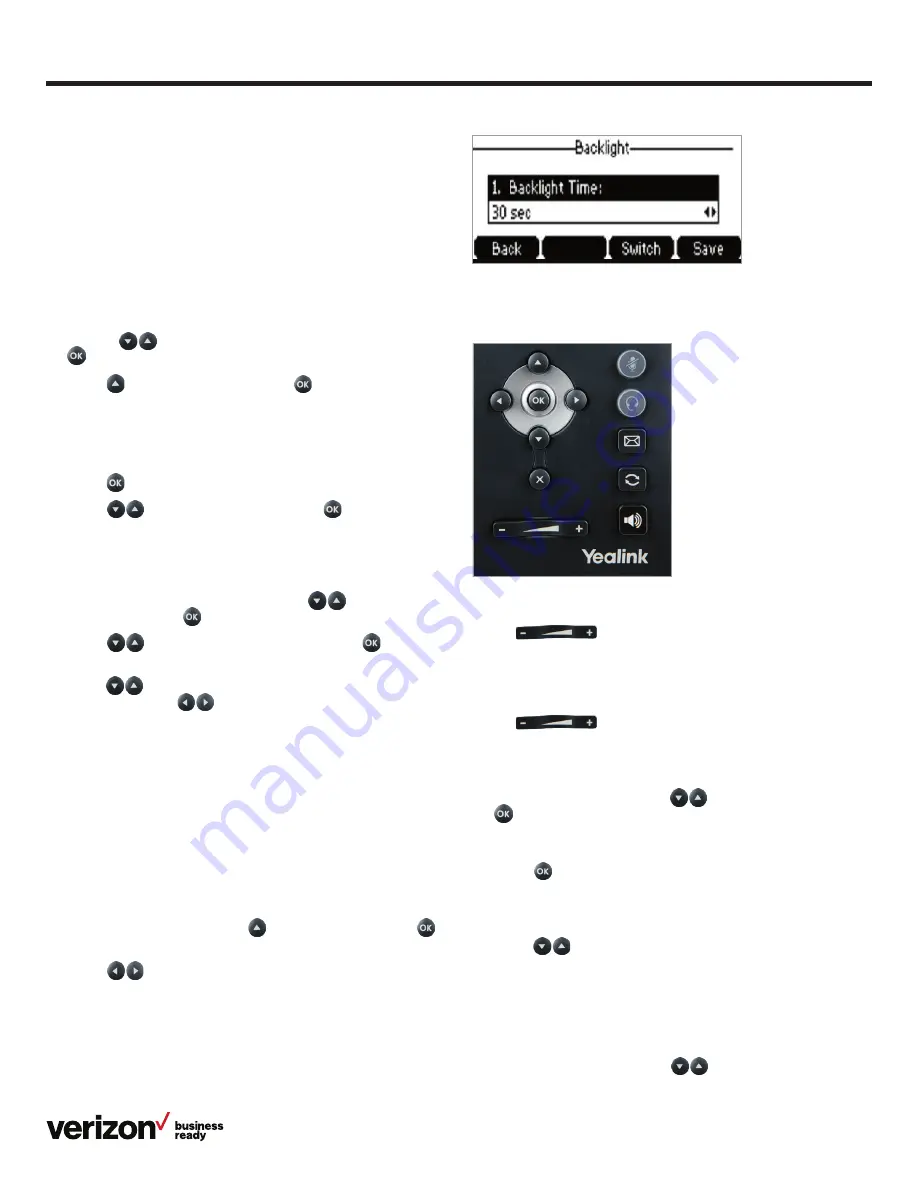
background image

8

User guide


Sound settings


Call volume

Press  

  on the phone console to adjust the volume 

of the receiver when you are on a call (using the handset, 
speakerphone or headset).

Ringer volume

Press  

  on the phone console to adjust the volume 

of the ringer when the phone is idle. 

Ringtones 

1.  From Sound settings, scroll 

 to Ringtone and press 

 to select  

2.  Highlight the desired line

3.  Press 

, then select the desired ringtone and press

 Save


If there are multiple lines on the desk phone, you can elect 

to assign one ringtone for all lines by selecting 

Common 

AES 

or assign a different ringtone for each line 

4.  Scroll 

 to preview ringtone options and press the 

Save 

soft key to select 

Keypad tones (key tones)

Keypad tones, or key tones, give you the option of hearing sounds 

each time you depress a key on the keypad. To activate key tones:

1.  From Sound settings, scroll 

 to Key tones and 

highlight it to select it 

2.  Use the 

Switch

 soft key to enable or disable Key tones, and 

press the 

Save

 soft key to accept the changes

Time and date

Time and date are displayed in the middle of the status bar. You 

can also set your preferred formats for displaying time and date 

in the Time & Date settings screen. The phone is defaulted to 

SNTP so as to synchronize the time zone with the provided  

911 address.

To navigate to the Time & Date settings screen:

1.  Press the 

Menu 

soft key to open the main menu 

2.  Select

 Settings

3.  Use the 

keys to navigate to Basic settings and press 

to select

4.  Scroll 

 to Time & Date and press 

 to select

To configure the time zone to synchronize with the 

address entered in the Admin Portal (SNTP):

1.  From the Basic settings screen, highlight Time & Date and 

press 


2.  Scroll 

to SNTP settings and press 

 to select

3.  Press the

 Save 

soft key to accept the changes

To set time and date format preferences:

1.  From the Basic settings screen, scroll 

 to Time & Date 

Format and press 

to select

2.  Scroll 

 to Time & Date Format and press 

to select 

your preferred formats

3.  Scroll 

to select 

Hour

Clock

 or 

Date

 format. To change 

the format, press 

 to find, highlight and select desired 

format. Press the 

Save

 soft key to accept the changes

Display settings

To change backlight duration: 

You can set the time duration for the backlight of your desk 

phone as Always ON, Always OFF or several other options.  

For example, you can have your display switch to low-light 

mode after a period of inactivity. You can also turn off the 

backlight completely when inactive. To set backlight levels and 

duration of inactivity before switching to low light or turning the 

backlight off: 

1.  From Display settings, scroll 

 to Backlight and press 

to select 

2.  Scroll 

 to Backlight Active Time and select one of the 

following to choose your preferred time: 

Always ON, Always 

OFF, 15 sec, 30 sec, 60 sec, 120 sec, 300 sec, 600 sec or 

1800 sec

3.  Press 

Save

Summary of Contents for One Talk T41S

Page 1: ...User guide vzw com support one talk One Talk T41S IP desk phone user guide...

Page 2: ...ge preferences 7 Time and date 8 Display settings 8 Sound settings 8 Line keys 9 Speed dial configuration of a line key 9 Intercom key setup 9 Using the Intercom key 9 Voice Mail setup 10 Basic call f...

Page 3: ...21 Accessibility features 21 For hearing impaired users 21 For vision impaired and blind users 22 For mobility impaired users 22 Compatible accessories 22 Important customer information 23 WEEE warnin...

Page 4: ...e internet port on the phone and the port on the wall or on your PoE capable switch hub device Startup After your phone is powered on the system boots up and performs the following steps Dynamic Host...

Page 5: ...er soft key 4 Scroll to Wi Fi and press Enter 5 Press the Switch soft key to turn Wi Fi on 6 Press the Save soft key The phone will automatically search for available wireless Wi Fi networks in your a...

Page 6: ...plays info about calls messages soft keys time date and other relevant data such as Caller ID Call duration Icons Missed call and second incoming caller information Prompt text 2 Power indicator LED I...

Page 7: ...een The call is placed on hold from current device Off The line is inactive Customizing your desk phone About Basic settings Setup and preference options for the following can be found in the Basic se...

Page 8: ...the Time Date settings screen 1 Press the Menu soft key to open the main menu 2 Select Settings 3 Use the keys to navigate to Basic settings and press to select 4 Scroll to Time Date and press to sele...

Page 9: ...1 From the Home screen press the Intercom soft key 2 Enter the target extension for Intercom then press the Send soft key Line keys Your T41S comes with nine configurable line keys You can use them t...

Page 10: ...e to trigger your Call Forwarding preferences You can also activate Do Not Disturb mode to turn off ringing and automatically ignore calls by pressing the DND soft key Ignore a call Press Ignore durin...

Page 11: ...or to select the desired call then press the Resume soft key Mute unmute your phone s microphone Press during a call Redial 1 Press to enter the placed call list 2 Press or to select the desired entr...

Page 12: ...ccess to the same features that are available on your own desk phone line Call Barge Any bridged line or other device that shares a number with you can use the Call Barge feature to join a call in pro...

Page 13: ...tion callers will hear music To park a call 1 While on an active call press the Park soft key The user will hear a message stating Please dial the number where you want to park your call followed by o...

Page 14: ...er or extension to which you want to transfer the call 3 Press the Direct soft key to complete the transfer 2 Enter the appropriate 10 digit number or the extension number followed by 3 Press to park...

Page 15: ...tact numbers in the corresponding fields 5 Use the key to enter other information work number mobile number etc 6 Press the Add soft key to accept the change Call History Call History maintains a list...

Page 16: ...em To search for a contact 1 Press the Directory soft key 2 Select All Contacts 3 Press the Search soft key 4 Use the keypad to enter name To edit a contact 1 Press the Directory soft key when the pho...

Page 17: ...irectory soft key 2 Select Add Group 3 Using the keypad enter a group name 4 Use the key to scroll to and select a ringtone to assign to the group if desired 5 Once you are finished editing select Add...

Page 18: ...2 Select the desired contact group 3 Press the Option soft key and then select Delete from the prompt list 4 Press the soft key to confirm the deletion or the Cancel soft key to cancel To assign a con...

Page 19: ...key to confirm Voice Mail To retrieve Voice Mail messages Press the message button on the desk phone console System status troubleshooting and other settings To check phone status 1 Press the Menu sof...

Page 20: ...boot and press 2 Select Reset to factory settings and press To reboot the phone 1 From Advanced Settings scroll to Reset Reboot and press to select 2 Press the OK soft key to confirm Note Alternativel...

Page 21: ...djustable ringtone and volume Choice of a variety of ringtones Volume of the ringer can also be changed to suit needs Adjustable call volume While on a call raise or lower the volume of the voice on t...

Page 22: ...nated when activated providing alerts when a feature is enabled For mobility impaired users Feature Description Dedicated headset jack that enables the auto answer function Headset can be set up to ta...

Page 23: ...hnology CO LTD All rights reserved No parts of this publication may be reproduced or transmitted in any form or by any means electronic or mechanical photocopying recording or otherwise for any purpos...

Page 24: ...by Yealink Network Technology CO LTD declares that this phone is in conformity with the essential requirements and other relevant provisions of the CE FCC You can find the CE and FCC information from...

Page 25: ...ine Duration Back Edit OK Option Detail Add to Contact Add to Blacklist Delete All Cancel OK Call Detail Name Work Number Mobile Number Other Number Account Ring Group Back ABC Save Add Group Enter Na...

Page 26: ...sages Firmware More Exit Enter More Network Phone Accounts Back Enter Network IPv4 IP Mode MAC Accounts Line 1 Line 2 Phone Product Name Hardware Firmware Config Version Prod ID MAC Device Cert Basic...

Page 27: ...o locate specific menu items Feature Settings Call Forward Anonymous Call Rejection Forward to Voicemail Start Troubleshooting Trace Back Enter Call Forward Always Forward Busy Forward No Answer Forwa...

Reviews: