background image

1.Warnings and warnings


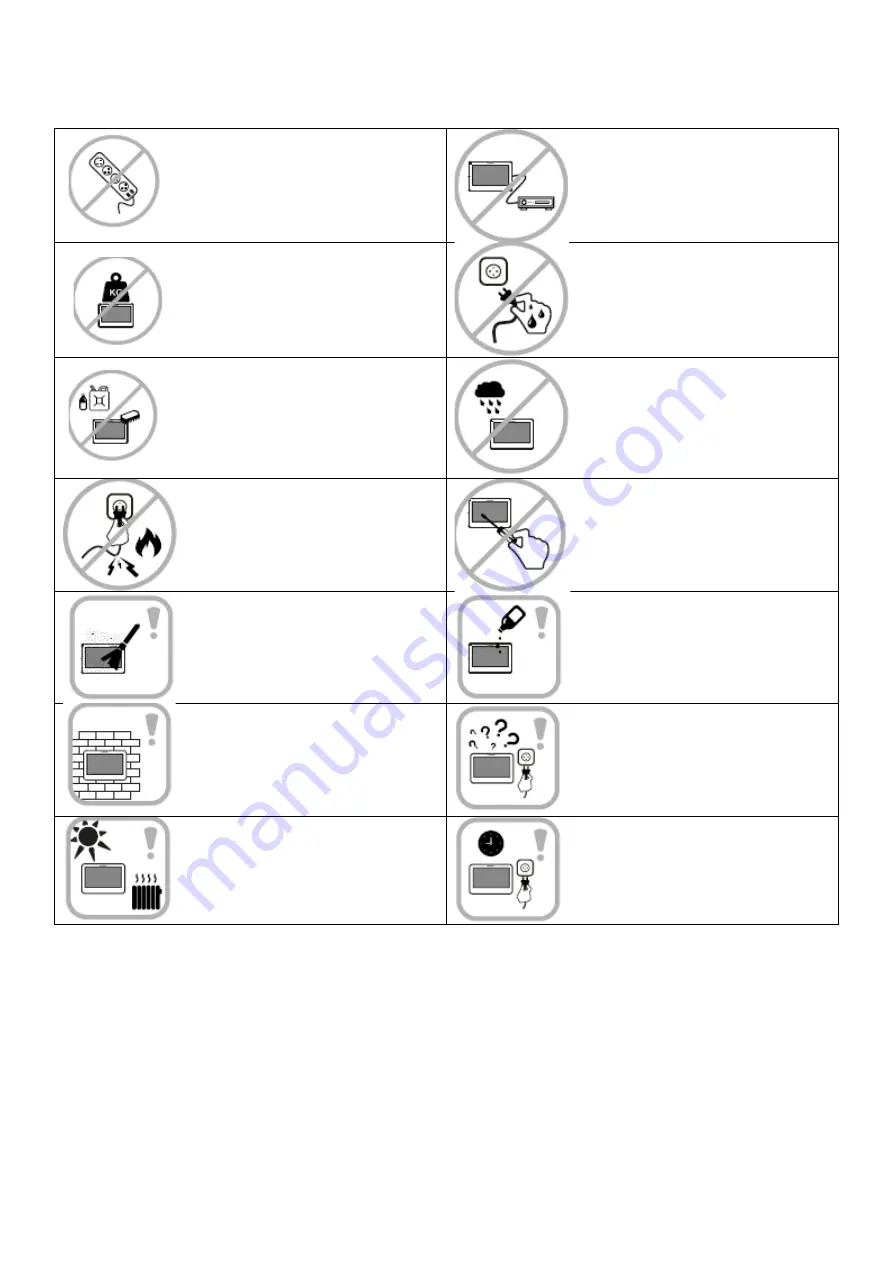
Do not use multiple extension cords to 

power the device.  Otherwise, an elevated 

temperature and a risk of fire may be 

generated.


Do not connect the device to other 

devices, otherwise it may become 

permanently damaged.


Do not place, place heavy objects on the 

device

.


Do not connect the power cord to the 

socket with wet or wet hands, there is a 

risk of injury to the power supply. 

current.


Do not use water or chemicals to clean the 

outside of the device from dirt. Use a dry 

cloth to prevent damage

.


Do not install the device in a humid 

environment. Failure to comply with 

the prescribed operating conditions 

may result in damage fromthe device, 

injury to the property.


orfire.


Do not bend or unplug the power cord 

from the mains by force. If it is damaged, 

there is a risk of fire or electric shock.


Do not dismantle, repair or modify the 

device yourself. Otherwise, there may 

be a fire, injury to the el. current or 

permanent damage to the device.


Ensure that dust or other solid particles 

and impurities do not accumulate on 

the surface of the device.


Prevent foreign particles and substances 

from entering the device.


Install the device on a flat and stable 

surface.


If the device is not working properly, 

immediately disconnect the power from 

the mains.


Do not install the device in places 

exposed to direct sunlight and near heat 

sources.


If you do not use the device for a long 

time, disconnect it from the power 

supply.


Summary of Contents for Veria 8276B

Page 1: ...VERIA User s guide Videophone Model Veria 8276B Please read this manual carefully before use and keep it in case of further need...

Page 2: ...System settings 13 19 Setting the password 13 20 Password protection list input stations 13 21 Setting the address of the room 14 22 Set the monitor name 14 23 Setting the name of the entry station 1...

Page 3: ...conditions may result in damage fromthe device injury to the property orfire Do not bend or unplug the power cord from the mains by force If it is damaged there is a risk of fire or electric shock Do...

Page 4: ...2 Features and description of the device Name 1 Speaker 2 Lcd 3 Microphone 4 Button menu 5 SD Card Slot 6 Back button 7 Left button 8 Right button 9 Call button 10 Track button 11 Open button...

Page 5: ...ents and contact your dealer immediately Package contents Monitor Wall mount Terminals Screw M3x20mm 2pcs Dowle 2pcs Power adapter 5 Installation Note For trouble free videophone operation please obse...

Page 6: ...specification N O Item Content 1 Display Colour 7 LCD 800 x 400 2 Intercom type Hands free 2 Connection 2 wire 4 Sound distortion Less than 3 5 Frequency response 400 3 5K 6 Wire length Maximum 200 me...

Page 7: ...ntacts 1 Power contact DC24V 1A Max 2 SW1SwitchNo To adjust the contact of the2 wirebus Setting Set the last monitor on the2 wirebus to set the SW1 to the ON position Other SWmonitorsto off position 3...

Page 8: ...6 Connectivity options 230V 24V DC adapter 1 1xmonitor 1x access station...

Page 9: ......

Page 10: ...2x monitor 1x entry station 4x monitor 2x entry station 5x monitor 1x entry station...

Page 11: ...stedon the screen Icon Function Accept Hang Volume Buy Photograph Buy Video Unlock gate or door View or hide icons on the screen Press to answer the call and talk to the visitor After the call is over...

Page 12: ...Call history Press the recent icon in the call menu to view historie Press from the list of anycall to makea call 4 Favorites Pressing andsubduingany call in history will appear on the screen The icon...

Page 13: ...on on themain menuto go tothe videolist and press the selected video to start it by pressing the icon or viewing theprevious or subsequent video recording Pressing anddeleting theselectedphotoor video...

Page 14: ...ote 1 The DVR only records video recording without sound 2 A minimum 2G SD card is required to support DVR function 16 GB recommended or 32 GB SD card 3 If motion is detected it is recorded at normal...

Page 15: ...ps restart the monitor and go to settings After restarting the monitor a password is not required for the first entry into the settings Go to the Password Protection menu and set your password as need...

Page 16: ...tton address is not set in the same way as the address of the target monitor the monitor can monitor the input station but the input station cannot call the monitor 28 Private equipment If this featur...

Page 17: ...set a beep will sound from the entrance station 39 Adjust the volume of the bell speaker You can adjust the volume from 10 to 100 as needed 40 Adjust the angle of view You canset the angle of viewfort...

Page 18: ...ss Low Normal High Adjust the brightness of the screen 5 Alarm clock Set an alarm Alarm volume Set 10 100 Alarm 1 2 3 4 5 6 You can set each alarm separately Alarm status Turn the alarm function on of...

Page 19: ...try stations View Edit You must enter the correct password to enter the input station settings Cancel Button address to set the target address of button calls to the input station Private device If en...

Page 20: ...m Update the program Note In a standby or DVR calendar the device will be in screen saver state if no operation is performed within 4 hours Warranty SAFE HOME europe s r o as a supplier guarys to the...

Page 21: ...Website www veria eu SAFE HOME europe s r o reserves the right to modify and change product specifications without notice All materials are carefully inspected but the company SAFE HOME europe s r o i...

Reviews: