background image

60   VELUX

VELUX   61

Menu

No. 1

Window

Locate

House 

light colour 

Product settings 

P1

P2

Details

Back

HousE

ligHts

No. 2 

No. 3

No. 4

Edit

Back

lights

No. 3 

Colour code:

standard

iNFoRmatioN

P1

P2

Enter

Back

Colour code: 

34

sEt ColouR CodE

Colour code: 

34

saved

iNFoRmatioN

Lighting


Light colour


 You can choose among 100 different light colours for your 
lighting product. The exact colours and the standard colour 
code depend on the individual manufacturers of the prod-
ucts.  


 Note: 

This feature is not avaible for VELUX frame lights 

KRA 100.


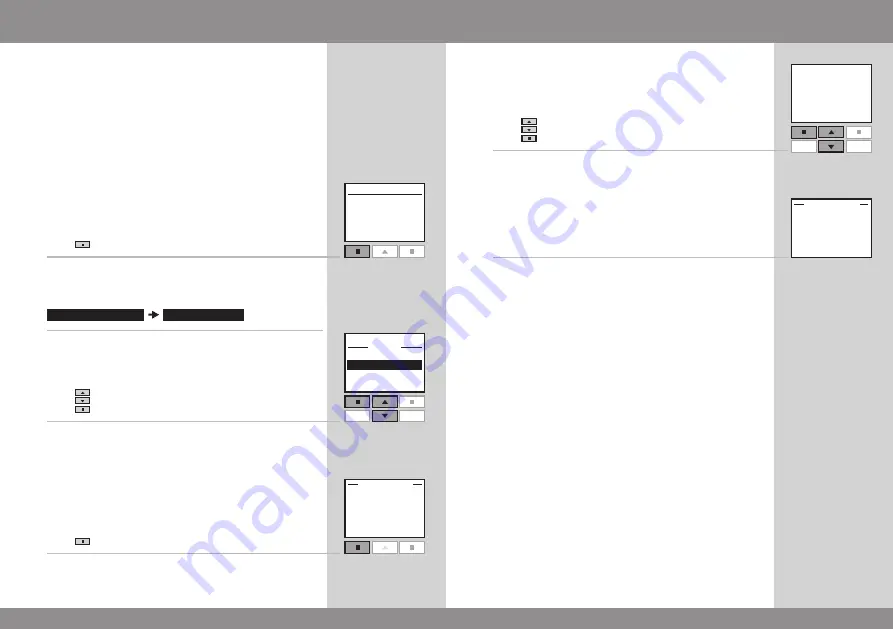
 The example shows how to change the light colour from 
standard to colour 34 (a red shade) in lighting product  
No. 3.

Press 

 "Menu".

Scroll through the menus:

 The display shows a list of the lighting products in which 
the light can change colour.  
Press 

 to highlight lighting product "No. 3".

Press 

 "Details" to see the current colour.

 The display shows the current light colour.
Press 

 "Edit" to change the colour code.

 The current colour code flashes.
Press 

 to change colour.

Press 

 "Enter" to confirm the changed colour.

The display shows that the selected colour has been saved.

Summary of Contents for GGL INTEGRA

Page 1: ...VAS 452641 2010 02 Directions for use ENGLISH GGL GGU INTEGRA GGL GGU Solar CVP KMX 100 KMX 200 KSX 100 KLR 100 ...

Page 2: ...splay 64 65 Display light 64 Sleep mode 65 Keypad lock 66 Access code 67 Software version 68 Clearing remote control settings 69 Extending the system Registering new products 70 71 Using additional activation controls 73 81 Copying to a new remote control 74 75 Copying to a remote control in operation 76 77 Copying products from other types of activation controls 78 79 Copying products to other ty...

Page 3: ...tivated via the rain sensor From fully open it will take up to one minute from the time of activation before the window is completely closed Therefore in case of sudden rain water may enter the room before the window is closed In case of snow and or ice the operation of the window may be blocked Important information Product This product has been designed for use with genuine VELUX products Con ne...

Page 4: ...ntrols see above Then the information must be copied from this remote control to the other remote controls see section Using additional activation controls Products to be operated with the remote control must be registered in the remote control Registration however depends on whether the remote control is new or whether it is already used for operating other products 1 If the remote control is alr...

Page 5: ...ol of sunscreen ing is offered see section Energy Balance Selection keys for activating the menu and confirming the chosen menu function for locating the Room Group Zone or product to be operated The current function of the individual selection key is stated directly above in the display Navigation keys for scrolling up and down in the product or menu list for scrolling through the time intervals ...

Page 6: ...cate the product first Press to start operation With additional electrical products The window is equipped with a window operator a roller shutter a blind and frame lights The example shows how to locate and operate the blind Press to find Blind Press to start operation Locating and operating a product More than one window With one electrical product Three windows are equipped with window operator...

Page 7: ... Press to start operation Closing the window automatically When a window has been opened with the remote control you can set it to close again automatically after a certain time For instance you might want to air your house briefly when returning home The possible settings are Off 5 min 10 min 15 min 20 min 30 min 45 min and 60 min The example shows how to time window No 1 to close after 10 minute...

Page 8: ...ow to open window No 1 even if it is raining 1 Locate the window Press to open the window 2 The display shows that the window cannot be opened because the window operation has been limited by the rain sensor 3 The display asks whether to disable the rain sensor tem porarily Press Yes to disable the rain sensor temporarily 4 The window is opened The display shows the icon and counts down until the ...

Page 9: ...operated in two ways For instance a Venetian blind can be drawn up and down and its slats can be tilted Once the product has been located choose Tilt or Turn with the navigation keys To obtain ventilation via the ventilation flap without opening the window release key when Ventilation is displayed Choosing setting positions The light in a lighting product or a Group of lighting prod ucts can be se...

Page 10: ...ngs User settings program Enter Back PRODUCT SETTINGS System settings Menu guide Guide to the menu functions of the remote control Additional information about the individual function is provided in the relevant section Navigating through the menus The example shows how to find the menu item Room by means of menu choices 1 Press Menu 2 Displays a list of menu items under Menu Press to highlight Ho...

Page 11: ... Scroll through the menus 3 The display shows day date and time Press Keep to confirm the setting Press Edit to change day date or time 4 Press to highlight Clock Press Enter to confirm your choice 5 Press to highlight Set clock Press Enter to confirm your choice 6 Press to set minutes Press Enter to change to hours 7 Press to set hours Press Enter to confirm your settings 8 The display shows that...

Page 12: ...t two products of the same type eg two roller shutters In each Room a Group All with all products of the same type is automatically created to make it easier to locate and operate products of the same type simultaneously Groups created across more Rooms are called Zones Definition of Zone A Group created across more Rooms You can create a Zone consisting of for instance all roller shutters on the ...

Page 13: ...in this case Window appears in the display The individual products can be identified by pressing for a short period of time This will activate the product briefly Press to highlight the product to be moved to Room 1 Press Enter to confirm your choice 5 Displays the product chosen Press More to move additional products to Room 1 You will return to the list in item 4 Repeat items 4 5 until the relev...

Page 14: ...nfirm your choice 4 Displays a list of product types in the Room from which to move the product Press to highlight Window Press Enter to confirm your choice Editing a Room 5 Displays a list of the individual products within the product type in question Press to highlight the product to be moved The in dividual products can be identified by pressing for a short period of time This will activate the...

Page 15: ... Room 1 Groups are edited according to the same principle as Rooms Note When operating Groups a delayed execution of commands might occur If you want a particular product to respond at once this product must be operated indi vidually 2 1 3 4 Room 1 Group 1 To make it easier to locate and operate products of the same type simultaneously you can create a Group The example shows a room with four wind...

Page 16: ...Displays a list with House Room Zone Group and Product Press to highlight Room Press Enter confirm your choice 4 Displays a list of the names automatically given to the Rooms Press to highlight Room 1 Press Enter to confirm your choice 5 Displays a line of characters including space symbol save symbol dictionary symbol insert symbol and delete symbol Press to highlight the dictionary symbol Press ...

Page 17: ... Scroll through the menus 3 The display shows a list of all products and Groups in House Press to highlight the favourite product The relevant product can be identified by pressing for a short period of time This will activate the product briefly Press Select to select your favourite product 4 The display shows that your favourite product has been selected Note If a favourite area has been selecte...

Page 18: ... Enter to confirm your choice 4 Displays a list of the product types in Room 2 Press to highlight the product type where to rear range the order of the individual products Press Enter to confirm your choice Rearranging order 5 Displays a list of the individual products of the chosen product type The individual products can be identified by pressing for a short period of time This will activate the...

Page 19: ...ights between 07 00 and 07 15 on weekdays from October to April Shortcut P1 P2 A personal program that can be activated by using the shortcut keys For instance you can record and save a program under shortcut key P1 to close all windows in the house and draw all blinds down by 50 Energy Balance A pre defined program that will be enabled via the remote control and then run automatically The program...

Page 20: ...o open at 18 30 and close again at 18 45 each Monday for 12 months 1 Press Menu 2 Scroll through the menus 3 The display shows a list of areas Press to highlight Room 1 Press Enter to confirm your choice 4 The display shows a list of the product types Press to highlight Window Press Enter to confirm your choice 5 Locate the window The relevant product can be identi fied by pressing for a short per...

Page 21: ... Continue to continue Press Edit to return to item 13 in case of addi tions or changes 15 The display asks whether to save selected day Press Yes to save the selected day 16 The display shows various options Press to highlight Add functions to set the closing position of the window plus the day and time for closing Press Enter to confirm your choice 17 The display shows the latest selected product...

Page 22: ...ess Edit to choose an end date Press Enter to confirm your setting 23 The display shows that My program 1 is enabled in the chosen period 24 Check current time and date settings to ensure accurate operation of the products The display shows day date and time Pres Keep to confirm the settings Pres Edit to change day date or time Choose Enable under menu item Program settings to get a full list of a...

Page 23: ...w to program window No 1 in Room 1 to open immediately and close again after 1 hour and 30 minutes delay by a single press on shortcut key P1 1 Press Menu 2 Scroll through the menus 3 The display shows a list of areas Press to highlight Room 1 Press Enter to confirm your choice 4 The display shows a list of the product types Press to highlight Window Press Enter to confirm your choice 5 Locate the...

Page 24: ...choose minutes Choose 0 minutes if you want the window to open im mediately Press Enter to change to hours 13 Press to set hours Press Enter to confirm your setting 14 The display shows various options Press to highlight Add functions to set the closing position and time of the window Press Enter to confirm your choice 15 The display shows the latest selected product Press Continue to continue 16 ...

Page 25: ...date and time Press Keep to confirm the settings Press Edit to change day date or time 21 Press to set the delay First choose minutes Press Enter to change to hours 22 Press to set hours Press Enter to confirm your setting 23 The display shows various options Press to highlight Add functions to add add itional operating commands for the window or other products to the program Press Enter to return...

Page 26: ... key P1 The example shows how to activate the program Shortcut 3 via shortcut key P1 1 Press P1 three times to activate the program Shortcut 3 Note Max time interval between each key press 2 seconds Otherwise the shortcut program that happens to be high lighted will be activated 2 Shortcut 3 is highlighted in the display and the program automatically starts 3 The display shows that the program Sho...

Page 27: ...ilding The transition period is 0 to 8 weeks depending on the geographical location See also data sheet with spe cific points of time on the CD ROM Data Sheet Energy Balance In addition the control automatically discerns between weekdays and weekend so that the sunscreening products are not operated before 8 o clock in the morning at weekends Settings The program can be enabled in two settings Sta...

Page 28: ...utters 1 Press Menu 2 Scroll through the menus 3 Press Continue 4 Press to highlight Enable Press Enter to confirm your choice 5 Press to highlight Standard Press Enter to confirm your choice 6 Press to highlight the city that is geographically clos est to the location of the building Press Enter to confirm your choice 7 The display shows that the chosen city has been saved 8 The display shows tha...

Page 29: ...elow 1 Press Menu 2 Scroll through the menus 3 Press Continue 4 Press to highlight Enable Press Enter to confirm your choice 5 Press to highlight Customised Press Enter to confirm your choice 6 Press to highlight the city that is geographically clos est to the location of the building Press Enter to confirm your choice 7 The display shows that the chosen city has been saved 8 The display shows a l...

Page 30: ...nabled 13 Check current time and date settings to ensure accurate automatic operation of the sunscreening products The display shows day date and time Press Keep to confirm the settings Press Edit to change day date or time 14 Icon A shows that automatic control has been activated Energy Balance Additional products If you later want to add roller shutters or awning blinds to the program Energy Bal...

Page 31: ... of the prod ucts Note This feature is not avaible for VELUX frame lights KRA 100 The example shows how to change the light colour from standard to colour 34 a red shade in lighting product No 3 1 Press Menu 2 Scroll through the menus 3 The display shows a list of the lighting products in which the light can change colour Press to highlight lighting product No 3 Press Details to see the current co...

Page 32: ...ght can be turned on and off The speed values including the standard value are set by the individual manufacturers of the products The example shows how to change the dimmer speed from standard to speed 80 in lighting product No 9 1 Press Menu 2 Scroll through the menus 3 The display shows a list of the lighting products in which the dimmer speed can be set Press to highlight lighting product No 9...

Page 33: ...onfirm your choice 4 Press to highlight Off Press Enter to confirm your choice Note The light in the display can be turned on by choosing On in item 4 Sleep mode The life of the batteries can be prolonged by setting the remote control to go into sleep mode When it has been set to go into sleep mode the light in the display will be turned off 20 seconds after the last press of a key Time is shown P...

Page 34: ...pad even if it is locked Message as shown Press Menu Press Locate The keypad has temporarily been unlocked The keypad will automatically be locked again 20 seconds after it has been used Note The keypad lock can be deactivated by choosing Disable in item 3 Access code You can choose a personal access code to protect your per sonal settings for instance against unintentional deletion of programs Th...

Page 35: ...The display shows a code for instance 005 XXX XXX XXX The first three digits are the version number Press Back to return to the previous menu 4 The display shows the previous menu Software version Clearing remote control settings When clearing the remote control settings all personal settings for eg Rooms Zones Groups and Programs and all personal names are deleted The products however remain regi...

Page 36: ...egister product Press Enter to confirm your choice 5 Registration is running This can take up to two minutes 6 The display shows that the new product has been regis tered Now the product must be placed Note If the new product is a roller shutter or an awning blind you will via Hint be offered automatic control of sunscreening see section Energy Balance 7a If no Rooms have been created the product ...

Page 37: ...tivation controls How to copy the products from another type of activa tion control to the remote control Copying products to other types of activation controls How to copy the products in the remote control to another type of activation control The following examples presuppose the use of VELUX two way remote controls unless otherwise mentioned For other io homecontrol activation controls please ...

Page 38: ... a new remote control B not yet in operation Step 1 Prepare remote control A for copying 1 Press Menu 2 Select the submenu 3 Press to highlight Copy system Press Enter to confirm your choice Step 2 must now be completed within the next two min utes Step 2 Register products in remote control B 4 Insert the three batteries supplied type AA 1 5 volt into the remote control as shown 5 Choose language ...

Page 39: ...trol A by choosing If in doubt see section Registering new products Remote control A can now operate both the products from remote control B and the products it could already operate Step 3 Register the products in remote control B Register all products in remote control B by choosing Remote control B can now also operate both the products from remote control A and the products it could already op...

Page 40: ...ontrol B for copying 1 Prepare the products in activation control B for registra tion by pressing the RESET button on the back with a pointed object for at least 5 seconds The products must now be registered in remote control A within the next 10 minutes Step 2 Register products in remote control A 2 Press Menu 3 Select the submenu 4 Press to highlight Register product Press Enter to confirm your ...

Page 41: ...lind and the roller blinds it could already operate Note A VELUX one way remote control can operate products of the same type only in this case roller blinds Step 1 Prepare remote control A for copying 1 Press Menu 2 Select the submenu 3 Press to highlight Configure Press Enter to confirm your choice 4 Press Enter to continue selecting the product to be copied to another type of activation control...

Page 42: ...emote control A and in the products registered in A step 1 If you have more than one remote control the new security key must also be transferred to these step 2 Step 1 Change security key in remote control A 1 Press Menu 2 Scroll through the menus 3 Press to highlight Change Press Enter to confirm your choice The display now indicates that the security key has been changed 4 The display asks whet...

Page 43: ...ontrol before it is opened manually Press the test button on the window operator for at least 10 seconds The window operator and other electrical products of the window will run briefly back and forth Frame lights will flash briefly Top hung roof windows GHL GHU GPL GPU GTL GTU and VKU with KMX 200 Open the window manually If the window is already open it must be closed with the remote control bef...

Page 44: ...h 1 Slide off the battery cover as shown 2 Press the button on the right side of the remote control with a pointed object for at least 5 seconds 3 Replace the battery cover 4 Press Yes to confirm that you want to reset the remote control The remote control has now been reset To reinstate the connection between remote control and products please refer to the instructions in section Initial set up R...

Page 45: ...es of the back section Lock the unit into place at the bottom 3 Fix the unit with screw at the bottom The remote control is provided with a wall mounted holder which can be fitted anywhere in your home Note Check that the remote control can operate the relevant products from the proposed position before it is fastened to the holder 1 Fit the back section to the wall with the two screws sup plied 2...

Page 46: ...indows GGL GGU INTEGRA GGL GGU Solar or GGL GGU with KMX 100 or KSX 100 In case of power failure discharged battery The chain can be disengaged by press ing the release clip on the ventilation flap bracket A Fold the chain as shown and close the window B When the power is reconnected the battery has been re charged the chain can be re engaged by opening the window manually unfolding the chain and ...

Page 47: ...n the rain sensor may cause operating problems Therefore it is recommended to clean the rain sensor with a soft wet cloth once or twice a year or when needed 2 Solar cell In case of accumulation of dirt on the solar cell this should be cleaned with water and ordinary household cleaners Cleaning ...

Page 48: ...Limited by a remote control The command cannot be executed for instance because you have disabled the rain sensor temporarily In this case the window can only be half opened Limited by rain sensor It is raining and the rain sensor has been activated You can disable the rain sensor temporarily and operate the window Manually operated The window has been opened manually Close the window manually to ...

Page 49: ...h the Council Directive 2006 95 EEC We herewith declare that VELUX roof windows GGL INTEGRA 21 and GGU INTEGRA 21 roof windows GGL Solar 30 and GGU Solar 30 flat roof window CVP 3MX A02 electrical conversion kit KMX 100 3MG A01 3UC A02 3LA A01 and 3LR A01 for roof windows GGL and GGU electrical conversion kit KMX 200 3MX A01 3LA A01 and 3LR A01 for roof windows GHL GHU GPL GPU GTL GTU and VKU sola...

Page 50: ...i OÜ 621 7790 ES VELUX Spain S A 91 509 71 00 FI VELUX Suomi Oy 0207 290 800 FR VELUX France 0821 02 15 15 0 119 TTC min GB VELUX Company Ltd 01592 778 225 HR VELUX Hrvatska d o o 01 5555 444 HU VELUX Magyarország Kft 06 1 436 0601 IE VELUX Company Ltd 01 848 8775 IT VELUX Italia s p a 045 6173666 JP VELUX Japan Ltd 0570 00 8145 LT VELUX Lietuva UAB 85 270 91 01 LV VELUX Latvia SIA 67 27 77 33 NL ...

Reviews: