background image

4 Install the Cycling Computer

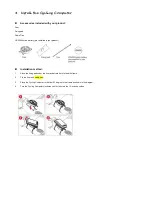
Accessories included with your product:

Fixer

Fixing pad

Cable Ties

CR2032 button battery (pre-installed in your product)

Installation method:

1.

Place the fixing pad under the fixer and attach both to the bike frame.

2.

Tie the fixer with cable ties.

3.

Place the Cycling Computer in the fixer 45 degree to the frame as shown in the diagram.

4.

Turn the Cycling Computer clockwise until it clicks into the 12-oclock position.

Summary of Contents for VDOUBLE 10

Page 1: ...cons you may find in this manual Notes Tips and remarks Appendix For other information and battery replacement please refer to appendix Please download and view the latest release of this manual at WW...

Page 2: ...oss reference table 3 2 User setup 3 3 Hot Key setup 3 4 Sensor setup 4 Install the Cycling Computer 5 Exercise Mode Training program cross reference table Instant exercise screen 6 Log Function 6 1 B...

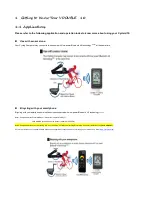
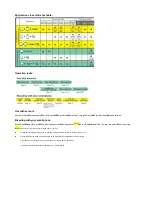
Page 3: ...martphone Bicycling with your smartphone or mobile devices connected with low power Bluetooth 4 0 technology NOTE2 Note 1 Compatible with VELOMANN Heart Rate Strap model VD10BELT VELOMANN Speed and Ca...

Page 4: ...h sensor NOTE3 Sync Setup Install the Cycling Computer Sync bicycling Note 3 Please refer to operation manual included with your sensors Please pair the optional sensor device with your cycling comput...

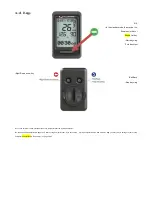
Page 5: ...Exit Back Stop bicycling Press and hold the keys until the screen fully display to reset the Cycling Computer Do the basic setups described in page 12 15 after Cycling Computer reset If you have setu...

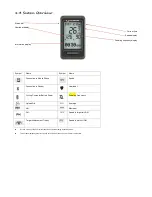
Page 6: ...le Phone Speed Connection to Sensor Heartbeat Cycling Computer Battery Power Pedaling Frequency Upload File Average AM Maximum PM Speed in Imperial UOM Target Achievement Trophy Speed in metric UOM Sc...

Page 7: ...ttings Bike Settings Exercise Statistics Note 1 If you have already setup the Language Settings once you can change it by going to SYSTEM SET LANGUAGE Note 2 Press to switch to individual setup window...

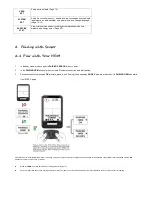
Page 8: ...window press to create Bluetooth connection and start pairing 3 Paired successfully message OK prompts press to exit Pairing failed message NO DEV prompts press to exit to PAIRING HRM and starts from...

Page 9: ...stall the sensor and its included magnet to your bike turn the crank counterclockwise until the sensor is connected to the Cycling Computer and the OK message prompts Make sure SPD CAD is set to ON in...

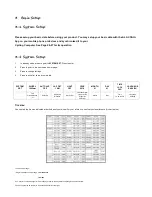
Page 10: ...SET WHEEL 1900mm AUTO LAP OFF LAP DST 1 KM LIGHT OFF YEAR 2014 MONTH 01 DAY 01 TIME 12 38 24H LANGUAGE ENGLISH Tire Circumference L Auto Lap Single Lap Distance Back Light Last two digits of year of t...

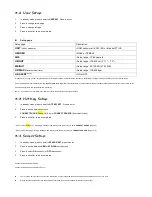
Page 11: ...Note 1 If you are above your target heart rate zone limits the heart rate value starts flashing 3 3 Hot Key Setup 1 In standby mode press to point to HOT KEY SET Press to enter 2 Press to switch betw...

Page 12: ...installed in your product Installation method 1 Place the fixing pad under the fixer and attach both to the bike frame 2 Tie the fixer with cable ties 3 Place the Cycling Computer in the fixer 45 deg...

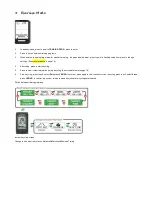
Page 13: ...e in page 18 4 After setup press to start bicycling 5 Press to view instant information during bicycling See crossreference in page 19 6 Stop bicycling press to end select Exit press YES NO to confirm...

Page 14: ...rcise session After a custom training target is achieved a champion trophy displays on the screen Precautions before exercising 1 Make sure the optional sensor has been paired with your Cycling Comput...

Page 15: ...TE 2 In unit of percentage Slope NOTE 5 Setup range 50 10 000 Cal Kcal Height NOTE 5 The metric display unit 1 meter M The Imperial display unit 1 foot FT Note 1 The symbol display at top of screen on...

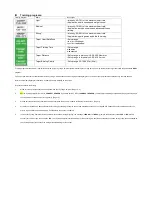
Page 16: ...after the operation is completed Average Heartbeat Current Time Average Speed Average Pedaling Frequency Maximum Heartbeat Maximum Speed Maximum Pedaling Frequency Other information reference table F...

Page 17: ...s App Start button 3 After the uploading is completed the App prompts OK press App Save button and then press the button at upper left corner to exit the mobile device press at your Cycling Computer t...

Page 18: ...NOTE 1 select YES to confirm your choice 4 Press to exit after the operation is completed Total TME 3 HR Total DST 45 KM Total CAL 1128 Accumulated Exercise Time Accumulated Distance Accumulated Energ...

Page 19: ...d immediately Supported OS Apple iOS 5 0 or later Android 4 3 or later Compatible mobile devices iPhone 4S or later iPod Touch 5 or later iPad 3 or later iPad mini or later HTC One Max HTC One M8 Plea...

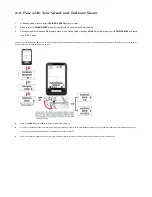
Page 20: ...ew Sensor STEP 4 Pairing steps 1 When Cycling Computer is in standby mode press to create Bluetooth connection 2 Once your Cycling Computer is discovered by the App press to start pairing 3 Once pairi...

Page 21: ...e Sync 1 Make sure your mobile device has been paired with your Cycling Computer Page 24 2 Make sure your mobile device has been paired with your optional sensors See user manual included with the sen...

Page 22: ...by mode press to point to PHONE SYNC press to create Bluetooth connection after connected press the App Start button 2 Once Sync is completed the App prompts OK press the App upper left button to exit...

Page 23: ...27 8g Material employed ABS case Appendix Precautions for use with VDOUBLE 10 Due to we cannot guarantee compatibility with other manufacturer s sensors we sincerely recommend you use VELOMANN Blueto...

Page 24: ...ith sensors through Bluetooth please do the following 1 Check battery power in your Cycling Computer and the sensor 2 Make sure the Cycling Computer HOT KEY is set to CONNECT SENSOR Page15 Health Warn...

Page 25: ...l Warnings on non replacement battery DO NOT try to remove non replacement battery CAUTION CAUTION RISK OF EXPLOSION IF BATTERY IS REPLACED BY AN INCORRECT TYPE DISPOSE OF USED BATTERIES ACCORDING TO...

Reviews: