background image

WC1857 

03.12.2009 

©

Velleman nv 

4

Rear 


Wave button 

RESET button 


Calendar/time set/lock switch 

°C/°F button 


Re-sync button 

Hour/month button 


Battery compartment 

Minute/date button 


Foldable stand 

12h/24h/year button 


Remote sensor 


S4 

RESET button 

S1 

LCD  

S5 

Battery compartment 

S2 

Status LED 


S6 

Foldable stand 

S3 

°C/°F button 


S7 

Wall mount bracket hook. 


6.


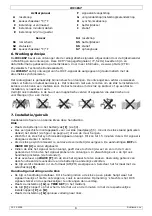
Working principle 

The 

WC1857

 contains a receiver which receives a radio-signal from a radio station located at 

Mainflingen near Frankfurt, Germany. This long-wave radio-signal (DCF77, 77.5 kHz) is based on 

atomic clocks and contains time and date information. For more information refer to 

www.ptb.de


(PTB = Physikalisch- Technische Bundesanstalt). 

The 

WC1857 

automatically synchronizes with this master clock radio-signal. 


Due to its nature, the radio-signal can be received indoors. However, it should be noted that the 
signal is weakened by the presence of concrete and metal. Therefore the clock must not be installed 

in concrete basements or inside metal cages. In large concrete office buildings or apartments, the 
clock should be located near a window for better reception. Also avoid installing the clock near 

strong magnetic fields or other devices that generate a lot of electrical noise (e.g. engines). 


7.


Installation/operation 

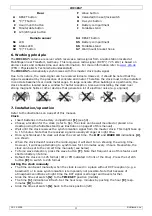
Refer to the illustrations on page 

of this manual. 

Clock 


Insert batteries in the battery compartment 

[I] 

(see §9). 


Choose a location for the clock (refer to §6). The clock can be wall mounted or placed on a 
desktop using the foldable stand (see illustration on page 

2

 of this manual). 


Wait until the clock receives the synchronization signal from the master clock. This might take up 
to 15 minutes. Note that the received signal is usually stronger at night time. 


Once synchronized, the clock will show the correct time. The 

DCF

 and 

WAVE OK 

indications 

[2]


are shown. 


When the clock doesn’t receive the radio-signal, it will start to run showing the wrong time. 

However, it will keep attempting to synchronize for 10 minutes every 3 hours. Meanwhile, the 
clock can be set to the correct time manually (see below). 


To force wave detection, press the wave button 

[F]

. Note that frequent use of this feature will 

shorten battery life time. 


Default the clock is in 12h format (AM or PM indicated in front of the time). Press the 12/24h 
button 

[E]

 to switch to 24h format. 

Setting the clock manually


The time can be set manually when the clock is used in a place without DCF reception (e.g. a 

basement) or in case synchronization is temporarily not possible. Note that because of 
atmospheric conditions at night time the DCF signal is stronger and travels further. 


Slide the time set switch 

[G]

 to the 

TIME SET

 position (middle). 


The time 

[1]

 indication will flash. Set the hour resp. minutes by pushing the hour 

[C]

 resp. 

minutes 

[D]

 buttons. 


Slide the time set switch 

[G]

 back to the lock position (left). 


Summary of Contents for WC1857

Page 1: ...N 857 EGATIVE CF WAND MURALE LOJ MUR CF WAND NUAL ERSHAND EMPLOI DEL USUA NGSANLEI E LCD DC DKLOK M E DCF GR RAL DCF C DUHR MI LEIDING ARIO ITUNG CF WALL MET NEGA RAND FO CON PAN IT NEGA 3 7 11 15 19...

Page 2: ...03 12 2009 WC1857 2 Velleman n nv...

Page 3: ...Please rea maged in tra rom childre ceable part rts and Quali y Keep this away from ce from sho nctions of t are forbidde ot covered nded purpo f certain gu esponsibilit tion day of ndication dable st...

Page 4: ...page 2 of this manual Clock Insert batteries in the battery compartment I see 9 Choose a location for the clock refer to 6 The clock can be wall mounted or placed on a desktop using the foldable stan...

Page 5: ...not show de the remo max 30m away from ures e g w e g headp it its tempe S2 will bli 7 and rem ed king S d S ion is lost a he C F bu the wall cl play the tem y with a mo splay or the wall cated unit...

Page 6: ...hout batteries wall clock 1276g remote sensor 58g power supply wall clock 3 x 1 5V C batteries LR14C not incl remote sensor 2 x 1 5V AA batteries LR6C not incl battery lifetime 12 months Use this devi...

Page 7: ...acteer uw e en kwal tel enkel b eistoffen stof en ext schokken e oestel kenn geen wijzigi lt niet onde voor het ge ade door he rdelijkheid a den gave weerg binnen en k via inklap van deze ha WC1857 7...

Page 8: ...uik Raadpleeg de figuren op pagina 2 van deze handleiding Klok Plaats de batterijen in het batterijvak I zie 9 Kies een geschikte montageplaats voor uw klok raadpleeg 6 U kunt de klok staand gebruiken...

Page 9: ...Han f S6 open ur weergee e sensor ge d tussen de fstand van stellen enz r die op dez bel enz om de 3 mi aadpleeg d or t g pperen s t t satie en ind F S3 o wandklok n ien de sens egelmatig sc a de aan...

Page 10: ...batterijen wandklok 1276 g sensor 58 g voeding wandklok 3 x 1 5 V type C LR14C niet meegelev sensor 2 x 1 5 V type AA LR6C niet meegelev levensduur batterijen 12 maand Gebruik dit toestel enkel met or...

Page 11: ...intenab e revendeu ce et de q areil uniqu es projectio e la poussi e les chocs nement ava pour des r mbent pas ue Un usag ux dommag nera toute r ormat hage de la d rieure et e r ce au sup ge 2 de cet...

Page 12: ...amp magn tique ou d un appareil g n rant un bruit lectrique p ex un moteur 7 Installation emploi Se r f rer aux illustrations en page 2 de cette notice L horloge Ins rer les piles dans l horloge I voi...

Page 13: ...es distance m tance minim etc et de t s fil metta es toutes le n des symb notement s ronisation de la temp sur l afficha sation S4 r r guli rem ants dication de d former ssayer de r a port e d l horl...

Page 14: ...piles horloge murale 1276 g capteur 58 g alimentation horloge murale 3 piles 1 5 V type C LR14C non incl capteur 2 piles 1 5 V type R6 LR6C non incl dur e de vie des piles 12 mois N employer cet appar...

Page 15: ...dura equipo a p to Evite us ento del ap modificacion ones no aut aplicaciones do de las in r responsa aci n de la interior y e olocarlo en e este man WC1857 15 L DEL U dio ambien embalaje in No tire e...

Page 16: ...co p ej un motor 7 Instalaci n uso V ase las figuras en la p gina 2 de este manual del usuario El reloj Introduzca las pilas en el reloj I v ase 9 Seleccione un lugar para el reloj v ase 6 Es posible...

Page 17: ...tancia m x a distancia m evisor etc al mbrico q ada 3 minu de los s m ermitente s ci n H si n de la te ualizaci n e n S4 si e armente co a indicaci n deforme ilas no rec oj timiento de las C de 1 5 rt...

Page 18: ...les 70x100x24mm peso sin pilas reloj de pared 1276g sensor 58g alimentaci n reloj de pared 3 x pila de 1 5V tipo C LR14C no incl sensor 2 x pila AA de 1 5V LR6C no incl duraci n de vida de las pilas 1...

Page 19: ...sch tteru Bedienung Betrieb nac sind aus Si en erlischt r Anwendu ukt f hren u achtung de esultierend nzeige Anze emperatur ellung ber Bedienungs WC1857 19 UNGSAN on ses Produ er der Verp us der Umw n...

Page 20: ...Batterien in das Batteriefach I ein siehe 9 W hlen Sie einen geeigneten Montageort f r die Uhr siehe 6 Sie k nnen die Uhr autonom mit dem Standfu auf einer Oberfl che installieren siehe Abb Seite 2 od...

Page 21: ...is or in einem seher usw das diese alle 3 Minut he nachfolg t ken S t T chronisatio C H C F S3 uf der Wand S4 wenn de den Sensor n Fall Alkoh ld die Lo Ba rmen ve nicht auf dern fern edeckel I C Batte...

Page 22: ...ien Wanduhr 1276g Sensor 58g Stromversorgung Wanduhr 3 x 1 5V Batterie Typ C LR14C nicht mitgeliefert Sensor 2 x 1 5V AA Batterie LR6C nicht mitgeliefert Lebensdauer der Batterien 12 Monate Verwenden...

Page 23: ...ring of een vervangend product tegen 50 van de kostprijs of terugbetaling van 50 bij ontdekking na n jaar tot 2 jaar Valt niet onder waarborg alle rechtstreekse of onrechtstreekse schade na de leverin...

Page 24: ...en und Zeit zu sparen lesen Sie die Bedienungsanleitung nochmals und berpr fen Sie ob es keinen auf de Hand liegenden Grund gibt ehe Sie das Ger t zur Reparatur zur ckschicken Stellt sich bei der berp...

Page 25: ...ung ad R TT ros ts NV bility that oordelijkh responsa dass nach a respons merk m V aam de denomina with wirel del type WC18 ct of this d vant stipu aakt van te bepalin sente d rtinente d rung bez arun...

Page 26: ...300 339 V1 1 1 1998 Technical data are available and can be obtained from Les donn es techniques sont disponibles et peuvent tre obtenues chez Technische gegevens zijn beschikbaar en kunnen worden aan...

Reviews: