background image

DVR4MQAE


- 19 - 

VELLEMAN 

1.


VLOSS LIST: 

Show the information of video loss list. 

2.


NET LIST: 

Show the information of net login list. 

3.


OTHERS: 

Show the information of power on / off, unlock, reset to default list. 

4.


CLEAR ALL: 

Clear all the event log lists. 


10. Additional Operation 


a.


Search 

 
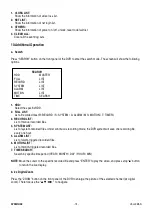
Press “SEARCH” button on the front panel of the DVR to enter the search mode. The screen will show the following 
options. 


1.


HDD: 

Select the specific HDD. 

2.


FULL LIST:  

List all recorded files (R: RECORD / S: SYSTEM / A: ALARM / MS: MOTION / T: TIMER). 

3.


RECORD LIST: 

List of manual recorded files.  

4.


SYSTEM LIST: 

List of system-recorded files. Under continuous recording mode, the DVR system will save one recording file 
every one hour. 

5.


ALARM LIST: 

List of alarm-triggered recorded files. 

6.


MOTION LIST: 

List of motion-triggered recorded files. 

7.


TIME SEARCH: 

Search by specific time period (YEAR / MONTH / DAY / HOUR / MIN). 


NOTE

: Move the cursor to the specific recorded file and press “ENTER” to play the video, and press stop “

” button 

to return the live display. 


b.


2x Digital Zoom 

 
Press the “ZOOM” button on the front panel of the DVR to enlarge the picture of the selected channel (2x digital 
zoom). Therefore use the “

▲▼◄►

 “ to navigate. 

SEARCH


HDD 

MASTER 

FULL 

LIST 

RECORD 

LIST 

SYSTEM 

LIST 

ALARM 

LIST 

MOTION 

LIST 

TIME 

SEARCH 

Summary of Contents for DVR4MQAE

Page 1: ...G4 real time compression format o high resolution recording Frame 720 x 480 pixels 30 IPS NTSC 720 x 576 pixels 25 IPS PAL CIF 352 x 240 pixels 120 IPS NTSC 352 x 288 pixels 100 IPS PAL o 1 built in H...

Page 2: ...y clean up the index system of the recorded files 250GB under 2 secs recording mode manual timer motion alarm refresh rate 120 IPS for NTSC and 100 IPS for PAL multiplex operation pentaplex functions...

Page 3: ...the picture of the selected channel 2x digital zoom 9 Press to show the 4 channel display mode Press to change the setting in the menu 10 SEG Press SEQ to activate the call monitor function Press SEQ...

Page 4: ...o the monitor or the speaker with 2 mono audio outputs 7 D V PORT Connect to a VGA card 8 IR Not used 9 DISK ARRAY PORT Connect to the disk array for extended HDD capacity 10 EXTERNAL I O PORT Connect...

Page 5: ...ess the POWER button The power LED will be red It takes approximately 10 to 15 seconds to boot the system Hold the POWER button until the red POWER LED turns green After some time the green turns red...

Page 6: ...sitivity towards the size of the triggered object on the screen The smaller the value the more sensitive the detection will become Application Different size of the object on the screen 3 TS The sensi...

Page 7: ...ecording and timer record If power is off accidentally recorded video files will still be stored in the HDDs The DVR will return to the original recording status after the power has been restored 1 MA...

Page 8: ...ss MODE button to display 4 channels Full Screen Switch Press or button to show the full screen channels Channel display switch Press SET to change channel display position Press to select the channel...

Page 9: ...vent recording function When this function is activated the recording will be triggered by motion or external alarm 3 TIMER RECORD ENABLE Start stop the timer recording function 4 OVERWRITE Select to...

Page 10: ...u Options TIMER Move the cursor to TIMER and press ENTER The screen will show the following options 1 DATE A scheduled record date SUN MON TUE WED THU FRI SAT MON FRI SAT SUN DAILY OFF can be set to a...

Page 11: ...ON OFF Daylight saving time can be adjusted manually Enter the daylight saving menu mode to set start time end time and to adjust the hour of the daylight saving NOTE Press button to do the selection...

Page 12: ...unction 5 PRE NEXT Select PRE to go to the previous page Select NEXT to go the next page NOTE TITLE 6 characters letters or symbols BRIG from 0 255 the default value is 110 CONT from 0 255 the default...

Page 13: ...s 00 and the lowest sensitivity setting is 15 The default setting is 03 NOTE The default setting of Spatial Sensitivity is 03 This means that when 3 grids are detected for motion at one time the syste...

Page 14: ...colour of video loss screen Blue or Black 5 PLAYBACK INFO Set the position where playback information will be indicated centre or normal on the button of left hand side of the screen 6 DWELL DURATION...

Page 15: ...ilable capacity has only xxx GB left 9 ALARM DURATION SEC Press ENTER or or button to set the duration time of alarm recording 5 10 20 40 sec 10 PRE ALARM Set the pre alarm function on 8MB off When pr...

Page 16: ...ess ENTER or or button to set the ID of DVR 0 255 4 PASSWORD Press ENTER or or button to set the password for accessing DVR 5 RESET DEFAULT Press ENTER and select YES to confirm or NO to cancel 6 CLEA...

Page 17: ...name and password from ISP supplier For detailed PPPoE setting refer to 10 f Licensed Software AP NOTE DHCP and PPPoE network types need to apply DDNS service to get Hostname to correspond to dynamic...

Page 18: ...nsed software to view the playback USB PLAYBACK WITH PC Open the programme Video Player C Program Files Video Server E Video Player Locate the backup file on your memory stick or PC e g F CH04_01 787...

Page 19: ...of manual recorded files 4 SYSTEM LIST List of system recorded files Under continuous recording mode the DVR system will save one recording file every one hour 5 ALARM LIST List of alarm triggered re...

Page 20: ...nu_System d The N P System 1 Press POWER button to shutdown and press POWER to switch to PAL system press till the monitor shows the video image of the DVR 2 Press POWER button to shutdown and press P...

Page 21: ...enu see 9 l Advance Menu_Network or in System Config of the licensed software AP see 9 m Advance Menu_Backup Network Type Dynamic IP DHCP and PPPoE Set the Network information in System Config of the...

Page 22: ...e video web server will start to record Press this button again to stop the recording The recorded files will be saved onto the PC Each recorded file can contain up to 18 000 frames When the recorded...

Page 23: ...ce press this button to enter the call monitor function and press again to exit from call monitor mode t Enter u PTZ Control Off On PTZ channel onto which the camera is connected When you turn the PTZ...

Page 24: ...will function as if you click 3 times 8 Playback Operation see 10 f Network Backup or 10 e USB Backup A Playback Information Information display such as Date Time Resolution Rewind Forward Speed Statu...

Page 25: ...VANCED SETTING Press the System Config button to enter the system setting page NETWORK The network configuration allows the DVR to connect to an Ethernet network or dial up 1 Static IP Enter the serve...

Page 26: ...the password column Enter the Hostname in the Domain column Choose the DDNS system name After setting press APPLY to confirm DDNS APPLY EXAMPLE Go to a website providing free DDNS services Example htt...

Page 27: ...ires to verify the password Enter the user name and password 5 After setting press APPLY to confirm FTP Press the button to enter the system setting page 1 When alarm or motion is triggered a video co...

Page 28: ...to enter the motion detection sensitivity and area setting box 2 Motion Detection Sensitivity Set the detection sensitivity in 4 different adjustable factors LS The sensitivity of comparing two differ...

Page 29: ...function When the motion is triggered the icon will appear on the screen The software AP will start recording automatically NETWORK BACKUP Press the button to enter the system setting page 1 Backup t...

Page 30: ...G pictures will be made at your designated space set in File Path plus an email containing the MJPEG pictures 1 10 pictures will be sent to the address which is set under Mail FTP Notification MJPEG p...

Page 31: ...icking 5 times 3 Max Log List Set the maximum number of log list 4 Server Log Press Server Log button to enter the server log list window ACCOUNT 1 Set up the user s account max 5 accounts password li...

Page 32: ...fault alarm audio sound is alarm wav You can have your own alarm sound file by entering the file path g AP Connection Via AP Browser The DVR can be viewed over the network with a web browser This func...

Page 33: ...nt Step 4 Choose Windows Offline Installation or Windows Online Installation Step 5 Take Windows Offline Installation as an example Save the setup file jre 1_5_0_04 windows i586 p on the desktop of PC...

Page 34: ...4 4 After installation the 4CH_MPEG 4 icon will appear on the desktop of the phone 5 Click the icon of the 4CH_MPEG 4 video server to enter the setting frame Type in IP address port username and passw...

Page 35: ...k the setting of the camera lens DVR keeps rebooting Place the HDD near the power connector or replace the HDD HDD failure Test with another HDD Test with another HDD cable Make sure HDD Master and Sl...

Page 36: ...2 serial communication signals PIN 2 RS232 RX DVR can be remotely controlled by an external device or control system such as a control keyboard using RS 232 serial communication signals PIN 3 PIN 5 AL...

Page 37: ...ix 3 Recording Time Table 1 Take the NTSC system and outdoor environment as an example 2 Recording time varies depending on the following factors Different camera quality Different picture composition...

Page 38: ...50 HDS722525VLAT80 250GB 7200 rpm IBM Deskstar 120GXP 80GB 80GB 7200 rpm IBM Deskstar 120GXP 80GB 120GB 7200 rpm Maxtor DiamondMax 536DX 60GB 4W060H4 60GB 7200 rpm Maxtor DiamondMax Plus 9 80GB 5400 r...

Reviews: