background image


CCTVPROM7


14/07/2010 

©

Velleman nv 

20

7.4 Playback en back-up 


Installeer eerst de nodige software op de aan te sluiten computer. 

7.4.1 Installatie van de software 


Dubbelklik op [DVR_ClientSetupCHS] op de cd-rom. 


Volg de instructies op het scherm. 


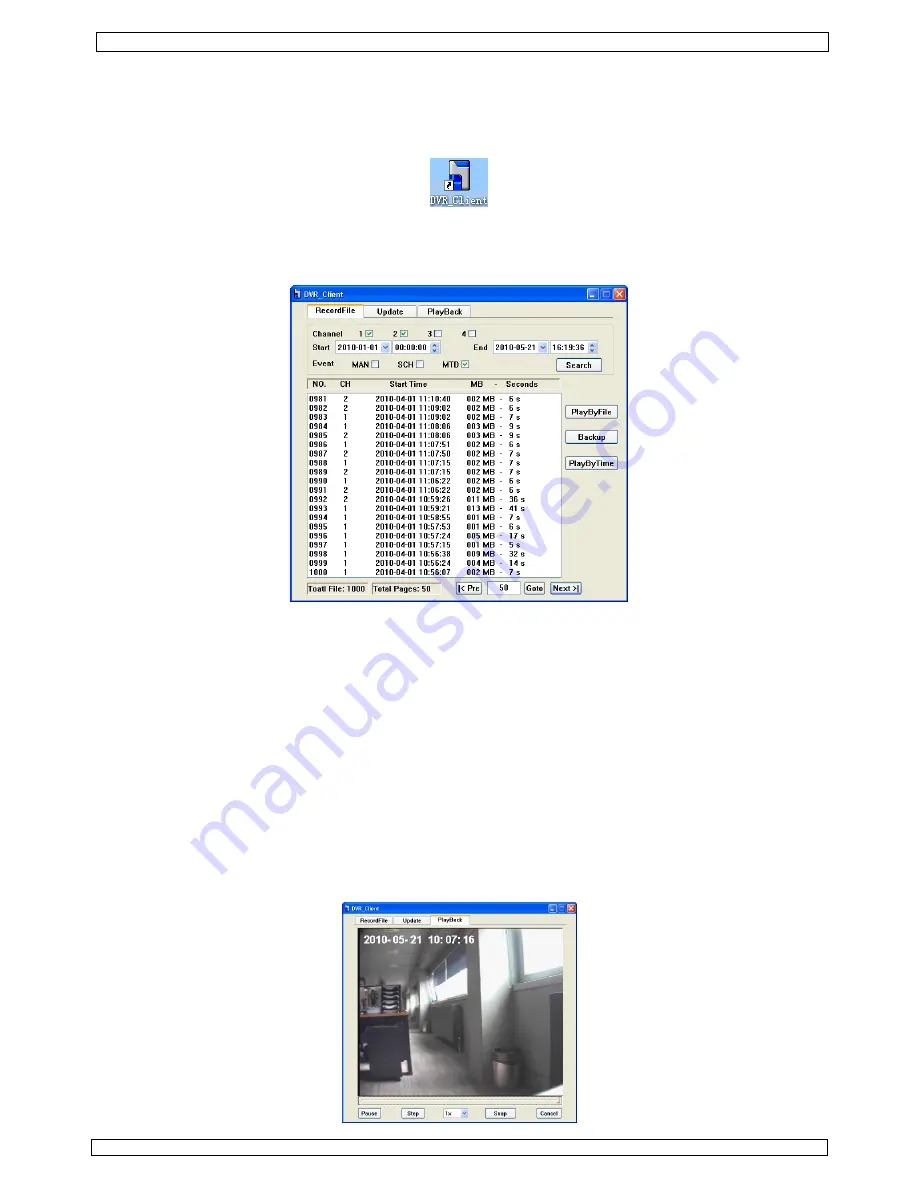
Dubbelklik, eens de installatie voltooid is, op de nieuwe icoon om de software te openen. 


7.4.2 Aansluiting van de hardware 


Steek de USB-stekker van de meegeleverde kabel in de USB-poort 

[A]

 en een vrije USB-poort van de 

computer. De USB-led 

[13]

 licht op. 

7.4.3 Files zoeken 


Selecteer het gewenste kanaal. 


Stel start- en einddatum en -tijd in. 


Selecteer de gebeurtenis die de opname heeft gestart (manueel, geprogrammeerd of na 

bewegingswaarneming). 


Klik op SEARCH om de lijst met opnames weer te geven. 


Scroll doorheen de lijst met <PRE of NEXT> of geef een paginanummer in en klik op GOTO. 

7.4.4 PlayByFile 


Selecteer een file en klik op PLAYBYFILE. De beelden verschijnen in het PLAYBACK-venster (zie 

§7.4.7

). 

7.4.5 Back-up 


Klik op BACKUP om een kopie van de file op de computer te bewaren. 


Kies een doelmap, een naam en het type file (MJPEG of AVI). Wacht tot de file naar het gewenste 
formaat werd geconverteerd. 

7.4.6 PlayByTime 


Kies een enkel kanaal indien u deze functie wilt gebruiken (om overlappende files te vermijden). Alle files 
worden achtereenvolgens afgespeeld. 


Ook hier verschijnen de beelden in het PLAYBACK-venster (zie 

§7.4.7

).  

7.4.7 PLAYBACK-venster 


Summary of Contents for CCTVPROM7

Page 1: ...UNCTIONELE BEVEILIGINGSSET ENSEMBLE VIDÉOSURVEILLANCE MULTIFONCTIONNEL JUEGO DE VIDEOVIGILANCIA MULTIFUNCIÓN UNIVERSELLER ÜBERWACHUNGSSATZ USER MANUAL 3 GEBRUIKERSHANDLEIDING 13 NOTICE D EMPLOI 23 MANUAL DEL USUARIO 33 BEDIENUNGSANLEITUNG 43 ...

Page 2: ...CCTVPROM7 14 07 2010 Velleman nv 2 ...

Page 3: ...cks Always disconnect mains power when the device is not in use or when servicing or maintenance activities are performed Handle the power cord by the plug only 3 General Guidelines Refer to the Velleman Service and Quality Warranty on the last pages of this manual Indoor use only Keep this device away form rain moisture splashing and dripping liquids Never put objects filled with liquid on top Ke...

Page 4: ...d To replace it refer to 8 Make sure the device is unplugged from the mains before making any connections and do not touch any electronic circuitry to avoid electrostatic discharge Connecting the cameras Choose a location for the camera keeping following guidelines in mind do not install the camera in locations where extremely high or low temperatures or excessive vibrations may occur avoid mounti...

Page 5: ...the arrow keys or mouse to move between menu fields Click on a menu field or press enter to open the underlying menu o Check box select X to activate or empty to deactivate disable the option Use the arrow up or down to change the setting or left click in the field o Combo field select content from a range of options only one is possible Use arrow up down or mouse click to select the appropriate o...

Page 6: ...ontrast and saturation 0 99 default 50 Click on APPLY TO to apply the setting to the indicated channel Select a different channel to apply the same settings to that channel When finished click OK to save or CANCEL to exit without saving Select the channel for which to schedule continuous recording The grid is divided into 24 hours horizontal and 7 week days vertical E g when the 4th square on the ...

Page 7: ...e the PREV and NEXT buttons to scroll through the pages EXIT to return to the previous menu PLAY When pressing the PLAY button the DVR shows the found recordings sequentially Recordings from CH1 are shown in the top left area CH2 in the top right area and so on Controls affect all images simultaneously Motion detect Set the motion parameters or the motion schedule Motion parameters Select the chan...

Page 8: ...ect the baud rate 1200 2400 4800 9600 19200 38400 57600 or 115200 Click on APPLY TO to apply the setting to the indicated channel Select a different channel to apply the same settings to that channel When finished click OK to save or CANCEL to exit without saving PTZ controls Select the video channel Select Direction Focus Zoom Iris or Automatic Depending on the selection options change Use the Up...

Page 9: ...g time a password will be required to operate the DVR Set to 1 2 5 10 15 or 30 minutes or 1 hour Setting will only take effect when password is enabled Password To change the password first enter the old password Default password is 888888 Enter a new password Only use the numbers on the bottom of the screen Confirm the new password and press OK Date Time Set the date and time of the DVR Date form...

Page 10: ...t start and end date and time for the search function Select the event that triggered the recording Manual Scheduled or Motion Detected Press the Search button to retrieve the file overview Scroll through the pages using the Pre or Next buttons or enter a page number and press Goto 7 4 4 PlayByFile Select a file and press the PlayByFile button The video will start to play in the PlayBack tab refer...

Page 11: ...e mounting bracket back Tighten the 4 screws marked with X Close the cover and reseat the 6 screws 9 Battery The remote control uses 1 battery type 3V lithium CR2025 included To re place the battery press on the side of the battery holder 1 and pull 2 to slide it open Insert the battery with the right polarity facing up in battery holder and close the battery compartment by pushing it back into th...

Page 12: ...le 39 8 power supply 12VDC dimensions Ø45 x 55mm weight 290g Use this device with original accessories only Velleman nv cannot be held responsible in the event of damage or injury resulted from incorrect use of this device For more info concerning this product and the latest version of this user manual please visit our website www velleman eu The information in this manual is subject to change wit...

Page 13: ...s te vermijden Trek de stekker uit het stopcontact trek niet aan de kabel voordat u het toestel reinigt en als u het niet gebruikt 3 Algemene richtlijnen Raadpleeg de Velleman service en kwaliteitsgarantie achteraan de handleiding Enkel voor gebruik binnenshuis Bescherm dit toestel tegen regen vochtigheid en opspattende vloeistoffen Plaats geen object gevuld met vloeistof op het toestel Bescherm t...

Page 14: ...g Raadpleeg de figuren op pagina 2 van deze handleiding De harddisk is al in de DVR geïnstalleerd Raadpleeg 8 indien u de harddisk wilt vervangen Zorg dat de DVR niet op het lichtnet is aangesloten en raak het elektronische circuit niet aan om elektrostatische ontlading te vermijden Aansluiting van de camera s Kies de montageplaats voor de camera Houd rekening met volgende punten Installeer de cam...

Page 15: ...e menuvelden met de pijltjestoetsen of de muis Klik op een menuveld of druk op de bevestigingstoets om het submenu te openen o Vinkhokje Vink een hokje aan om de functie in te schakelen of vink het hokje uit om de functie uit te schakelen Vink aan of uit met de pijltjestoetsen of klik in het veld o Comboveld Selecteer een optie met de pijltjestoetsen of met de muis o Lijst Klik met de linkermuiskn...

Page 16: ... of 25 Stel de helderheid het contrast en de intensiteit in 0 99 standaard 50 Klik op APPLY TO om de wijzigingen voor het kanaal toe te passen Klik op OK om te bewaren of op CANCEL om het menu te verlaten Selecteer het kanaal waarvoor u de opname wenst te programmeren De horizontale as van de rooster stelt de uren voor de verticale as stelt de dagen voor Klik het vakje aan wanneer u op dat tijdsti...

Page 17: ...r de normale schermweergave terug te keren Klik op PREV of op NEXT om door de lijst te bladeren Klik op EXIT om naar jet vorige menu terug te keren PLAY Klik op PLAY om de gevonden files achtereenvolgens weer te geven De opnames door kanaal 1 verschijnen linksboven die van kanaal 2 rechtsboeven enz De bedieningen beïnvloeden alle beelden gelijktijdig Motion detect bewegingswaarneming Stel de param...

Page 18: ... adres in 00 99 Selecteer het PTZ protocol Pelco D Pelco P B01 Samsung enz Stel de baudsnelheid in 1200 2400 4800 9600 19200 38400 57600 of 115200 Klik op APPLY TO om de wijzigingen voor het kanaal toe te passen Klik op OK om te bewaren of op CANCEL om het menu te verlaten PTZ controls PTZ bediening Selecteer het kanaal Selecteer Direction Focus Zoom Iris of Automatic Verplaats de camera met U D L...

Page 19: ...l in op 1 2 5 10 15 of 30 minuten of op 1 uur Deze instelling wordt enkel ingeschakeld indien het paswoord geactiveerd is Password paswoord Om het paswoord te wijzigen geef eerst het oude paswoord in standaard paswoord 888888 Geef het nieuwe paswoord in met de toetsen onderaan het scherm Bevestig het paswoord met OK Date Time datum en tijd Stel datum en tijd in formaat datum maand dag jaar MM DD Y...

Page 20: ...gebeurtenis die de opname heeft gestart manueel geprogrammeerd of na bewegingswaarneming Klik op SEARCH om de lijst met opnames weer te geven Scroll doorheen de lijst met PRE of NEXT of geef een paginanummer in en klik op GOTO 7 4 4 PlayByFile Selecteer een file en klik op PLAYBYFILE De beelden verschijnen in het PLAYBACK venster zie 7 4 7 7 4 5 Back up Klik op BACKUP om een kopie van de file op d...

Page 21: ... batterij met de positieve pool naar boven en steek de batterijhouder terug in de afstandsbediening WAARSCHUWING Ga voorzichtig met batterijen om Volg de veiligheidsvoorschriften op de verpakking Gooi batterijen weg volgens de plaatselijke milieuwetgeving Houd batterijen uit de buurt van kinderen 10 Technische specificaties DVR videoformaat PAL videocompressie MJPEG CIF video ingang 4 kanalen comp...

Page 22: ...e meest recente versie van deze handleiding zie www velleman eu De informatie in deze handleiding kan te allen tijde worden gewijzigd zonder voorafgaande kennisgeving AUTEURSRECHT Velleman nv heeft het auteursrecht voor deze handleiding Alle wereldwijde rechten voorbehouden Het is niet toegestaan om deze handleiding of gedeelten ervan over te nemen te kopiëren te vertalen te bewerken en op te slaa...

Page 23: ...rtels Débrancher l appareil s il n est pas utilisé ou pour le nettoyer Tirer la fiche pour débrancher l appareil non pas le câble 3 Directives générales Se reporter à la garantie de service et de qualité Velleman en fin de notice Pour usage à l intérieur uniquement Protéger contre la pluie l humidité et les projections d eau Ne jamais placer d objet contenant un liquide sur l enregistreur Protéger...

Page 24: ... image canal 2 Remarque Les boutons restants n ont aucune fonction 6 Connexion Se référer aux illustrations en page 2 de cette notice Le disque dur est préinstallé dans l enregistreur numérique Pour le remplacement voir 8 Veiller à ce que l enregistreur numérique soit déconnecté du réseau électrique avant toute connexion Ne pas toucher le circuit électronique afin d éviter les décharges électrosta...

Page 25: ...re lorsqu on le sélectionne Faire défiler les champs avec les boutons directionnels ou la souris Cliquer sur un champ ou cliquer le bouton de confirmation pour ouvrir le sous menu o Champ à dé cocher Cocher la case pour activer la fonction découcher la case pour désactiver la fonction Utiliser les boutons directionnels ou cliquer dans le champ o Champ combo Sélectionner une option avec les boutons...

Page 26: ...rer l intensité le contraste et la saturation 0 99 standard 50 Cliquer sur APPLY TO pour activer les modifications Sélectionner OK pour sauvegarder la configuration ou sélectionner CANCEL pour quitter le menu sans sauvegarde des modifications Sélectionner le canal à programmer La grille représente les 7 jours de la semaine axe verticale divisés en 24 heures axe horizontal Exemple La 4ième case sur...

Page 27: ...ode d affichage normal Feuilleter à travers la liste avec PREV ou NEXT Cliquer sur EXIT pour revenir au menu précédent PLAY Cliquer sur PLAY pour afficher tous les fichiers l un après l autre Les enregistrements de canal 1 s affichent en haut à gauche ceux de canal 2 en haut à droite etc Les boutons de commandes influencent simultanément toutes les images Motion detect détection de mouvement Confi...

Page 28: ...ung etc Sélectionner la vitesse baud 1200 2400 4800 9600 19200 38400 57600 ou 115200 Cliquer sur APPLY TO pour activer les paramètres Sélectionner OK pour sauvegarder la configuration ou sélectionner CANCEL pour quitter le menu sans sauvegarde des modifications PTZ controls pilotage PTZ Sélectionner le canal Sélectionner Direction Focus Zoom Iris ou Automatic Déplacer la caméra avec U D L R Config...

Page 29: ...tivé Password mot de passe Pour modifier le mot de passe entrer d abord l ancien mot de passe mot de passe par défaut 888888 Entrer le nouveau mot de passe avec les boutons en bas de l écran Confirmer avec OK Date Time date et heure Configurer la date et l heure format de la date mois jour année MM DD YYYY format de l heure heure minutes secondes Remarque Il n est pas possible de modifier la date ...

Page 30: ...étection de mouvement Cliquer sur SEARCH pour afficher la liste des enregistrements Faire défiler la liste avec PRE ou NEXT ou entrer le numéro de la page et cliquer sur GOTO 7 4 4 PlayByFile Sélectionner un fichier et cliquer sur PLAYBYFILE Le fichier s affiche dans la fenêtre PLAYBACK voir 7 4 7 7 4 5 Sauvegarde Cliquer sur BACKUP pour sauvegarder une copie du fichier sur ordinateur Sélectionner...

Page 31: ...et réinsérer le support dans la télécommande AVERTISSEMENT Manier les piles avec précaution Respecter les consignes de sécurité sur l emballage Écouler les piles usagées en respectant la réglementation locale concernant la protection de l environnement Maintenir les piles à l écart des enfants 10 Spécifications techniques DVR format vidéo PAL compression vidéo MJPEG CIF entrée vidéo 4 canaux signa...

Page 32: ...rsion la plus récente de cette notice visiter notre site web www velleman eu Toutes les informations présentées dans cette notice peuvent être modifiées sans notification préalable DROITS D AUTEUR SA Velleman est l ayant droit des droits d auteur pour cette notice Tous droits mondiaux réservés Toute reproduction traduction copie ou diffusion intégrale ou partielle du contenu de cette notice par qu...

Page 33: ... del enchufe para desconectar el cable de red nunca del propio cable 3 Normas generales Véase la Garantía de servicio y calidad Velleman al final de este manual del usuario Sólo para el uso en interiores No exponga este equipo a lluvia humedad ni a ningún tipo de salpicadura o goteo Nunca ponga un objeto con líquido p ej un florero en el aparato No exponga este equipo a polvo No exponga este equip...

Page 34: ...ervación Los botones restantes no tienen función 6 Conexión Véase las figuras en la página 2 de este manual del usuario El disco duro está preinstalado en la videograbadora digital Para reemplazarlo véase 8 Asegúrese de que la videograbadora digital esté desconectada de la red eléctrica antes de cualquier conexión No toque el circuito electrónico para evitar las descargas eléctricas Conectar las c...

Page 35: ...n los botones direccionales o el ratón Haga clic en un campo o haga clic en el botón de confirmación para abrir el submenú o Campo des marcar Marque la casilla para activar la función desmarque la casilla para desactivar la función Utilice los botones direccionales o haga clic en el campo o Campo combo Seleccione une opción con los botones direccionales o el ratón o Lista Seleccione un elemento de...

Page 36: ...Ajuste la intensidad el contraste y la saturación 0 99 estándar 50 Haga clic en APPLY TO para activar las modificaciones Seleccione OK para guardar la configuración o seleccione CANCEL para salir del menú sin guardar las modificaciones Seleccione el canal que quiere programar La rejilla representa los 7 días de la semana eje vertical divididos en 24 horas eje horizontal Ejemplo La cuarta casilla d...

Page 37: ...lver al modo de visualización normal Hojee a través de la lista con PREV o NEXT Haga clic en EXIT para volver al menú anterior PLAY Haga clic en PLAY para visualizar todos los ficheros uno tras otro Las grabaciones de canal 1 se visualizan en la parte superior izquierda los ficheros de canal 2 en la parte superior derecha etc Los botones de control afectan simultáneamente todas las imágenes Motion...

Page 38: ... B01 Samsung etc Seleccione la velocidad en baudios 1200 2400 4800 9600 19200 38400 57600 ó 115200 Haga clic en APPLY TO para activar los parámetros Seleccione OK para guardar la configuración o seleccione CANCEL para salir del menú sin guardar las modificaciones PTZ controls pilotage PTZ Seleccione el canal Seleccione Direction Focus Zoom Iris o Automatic Desplace la cámara con U D L R Ajuste la ...

Page 39: ...ada Password contraseña Para modificar la contraseña introduzca primero la antigua contraseña contraseña por defecto 888888 Introduzca la nueva contraseña con los botones de la parte inferior de la pantalla Confirme con OK Date Time date et heure Ajuste la fecha y la hora formato de la fecha mes día año MM DD YYYY formato de la hora hora minutos segundos Observación No es posible modificar la fech...

Page 40: ...ión de movimientos Haga clic en SEARCH para visualizar la lista de las grabaciones Faire desplazarse por la lista con PRE o NEXT o introduzca el número de la página y haga clic en GOTO 7 4 4 PlayByFile Seleccione un fichero y haga clic en PLAYBYFILE El fichero se visualiza en la pantalla PLAYBACK véase 7 4 7 7 4 5 Copia de seguridad Haga clic en BACKUP para guardar une copia del fichero en el orde...

Page 41: ...do a distancia ADVERTENCIA Sea cuidadoso al manejar las pilas Respete las advertencias del embalaje Respete las leyes locales en relación con el medio ambiente al tirar la pila Mantenga las pilas lejos del alcance de niños 10 Especificaciones DVR formato de vídeo PAL formato de compresión vídeo MJPEG CIF entrada de vídeo 4 canales señal de vídeo compuesto 1Vpp 75 ohm BNC salida de vídeo 2x señal d...

Page 42: ...parato Para más información sobre este producto y la versión más reciente de este manual del usuario visite nuestra página www velleman eu Se pueden modificar las especificaciones y el contenido de este manual sin previo aviso DERECHOS DE AUTOR Velleman NV dispone de los derechos de autor para este manual del usuario Todos los derechos mundiales reservados Está estrictamente prohibido reproducir t...

Page 43: ...sen Sie dazu den Netzstecker an der Grifffläche an und ziehen Sie nie an der Netzleitung 3 Allgemeine Richtlinien Siehe Velleman Service und Qualitätsgarantie am Ende dieser Bedienungsanleitung Nur für die Anwendung im Innenbereich Schützen Sie das Gerät vor Regen und Feuchte Setzen Sie das Gerät keiner Flüssigkeit wie z B Tropf oder Spritzwasser aus Stellen Sie keine mit Flüssigkeit befüllten Geg...

Page 44: ... in Vollbild Kanal 2 Bemerkung andere Tasten der Fernbedienung haben keine Funktion 6 Anschluss Siehe Abbildungen Seite 2 dieser Bedienungsanleitung Die Festplatte wurde schon im DVR installiert Siehe 8 wenn Sie die Festplatte ersetzen möchten Beachten Sie dass der DVR nicht mit dem Netz verbunden ist und berühren Sie den elektronischen Kreis nicht um elektrostatische Entladung zu vermeiden Anschl...

Page 45: ...e wird nicht unterbrochen wenn Sie den Bildschirm ausschalten 7 1 Allgemeine Richtlinien für das Menü Drücken Sie MENU auf der Frontplatte 4 oder der Fernbedienung oder klicken Sie mit der Maus auf MENU unten im Schirm um das Menü anzuzeigen Das Menü ist in mehreren Teilen aufgeteilt o Menüfeld Ein Menüfeld steht markiert und erscheint in einem neuen Fenster wenn Sie es anklicken Blättern Sie mit ...

Page 46: ...len Sie FORMAT um die Festplatte zu formatieren Bemerkung Die Festplatte kann während einer Aufnahme nicht formatiert werden Record Aufnahme Das Menü RECORD enthält 3 Submenüs Wählen Sie den Kanal den Sie einstellen möchten Geben Sie den Kanal einen Namen wenn nötig bis 8 Zeichen Stellen Sie die Bildqualität ein LOWEST LOW MIDDLE HIGH oder HIGHEST Stellen Sie die Anzahl Bilder pro Sekunde ein 1 3 ...

Page 47: ...erkung Die Liste zeigt nur die 100 ältesten Dateien an Ändern Sie die Sucheinstellungen um die Liste zu kürzen Wählen Sie eine Datei und klicken Sie auf PLAY um die Datei abzuspielen Bedienungen abspielen pausieren durchspülen 2x 4x 8x x x 1 8 x 1x zurückspülen 2x 4x 8x x x 1 8 x 1x Menü verlassen Verbergen Sie die Bedienungstasten oder zeigen Sie diese mit der rechten Maustaste an Sind die Bedien...

Page 48: ...hen an wenn Sie den Zeitpunkt aufnehmen möchten Beispiel Das vierte Kästchen der zweiten Reihe ist angekreuzt rot Die Kamera für den gewählten Kanal startet die Aufnahme um 03u00 und stoppt die Aufnahme um 04u00 Klicken Sie auf APPLY TO um die Änderungen für den Kanal anzuwenden Klicken Sie auf OK um zu speichern oder auf CANCEL um das Menü zu verlassen PTZ Pan Tilt Zoom Wählen Sie den Kanal Stell...

Page 49: ...s Passwortmenü ein Stellen Sie das Time out unter LOCKTIME ein Nachdem die eingestellte Zeit vergangen ist müssen Sie das Passwort wieder eingeben Stellen Sie auf 1 2 5 10 15 oder 30 Minuten oder 1 Stunde ein Diese Einstellung wird nur eingeschaltet wenn das Passwort aktiviert ist Password Passwort Um das Passwort zu ändern geben Sie zuerst das alte Passwort ein Standard Passwort 888888 Geben Sie ...

Page 50: ...s mitgelieferten Kabels in den USB Anschluss A und einen freien USB Anschluss des Computers Die USB LED 13 leuchtet 7 4 3 Dateien suchen Wählen Sie den gewünschten Kanal Stellen Sie das Anfangs und Enddatum und die Zeit ein Wählen Sie das Ereignis das die Aufnahme ausgelöst hat manuell programmiert oder nach Bewegungserfassung Klicken Sie auf SEARCH um die Liste mit Aufnahmen anzuzeigen Blättern S...

Page 51: ...uben der Festplatte und entfernen Sie die Festplatte Stecken Sie eine neue SATA Festplatte in den Montagebügen und schrauben Sie fest Formattieren Sie die Festplatte als FAT32 Verbinden Sie den Datenbus und das Netzteil und installieren Sie den Montagebügel wieder Schrauben Sie die 4 Schrauben X wieder fest Schließen Sie den DVR 9 Die Batterien Die Fernbedienung funktioniert mit 1x CR2025 Lithiumb...

Page 52: ...ensprung 2 01 Video Ausgang 1 0Vpp komposit 75 Ohm Gammakorrektur 0 45 eingebautes Objektiv 6 mm Blickwinkel 39 8 Stromversorgung 12 VDC Abmessungen Ø 45 x 55 mm Gewicht 290 g Verwenden Sie dieses Gerät nur mit originellen Zubehörteilen Velleman NV übernimmt keine Haftung für Schaden oder Verletzungen bei falscher Anwendung dieses Gerätes Für mehr Informationen zu diesem Produkt und die neueste Ve...

Page 53: ...d product tegen 50 van de kostprijs of terugbetaling van 50 bij ontdekking na één jaar tot 2 jaar Valt niet onder waarborg alle rechtstreekse of onrechtstreekse schade na de levering veroorzaakt aan het toestel bv door oxidatie schokken val stof vuil vocht en door het toestel alsook zijn inhoud bv verlies van data vergoeding voor eventuele winstderving verbruiksgoederen onderdelen of hulpstukken d...

Page 54: ...Devuelva el aparato con la factura de compra original y transpórtelo en un embalaje sólido preferentemente el embalaje original Incluya también una buena descripción del defecto Consejo Lea el manual del usuario y controle los cables las pilas etc antes de devolver el aparato Si no se encuentra un defecto en el artículo los gastos podrían correr a cargo del cliente Los gastos de transporte correrá...

Reviews: