background image


14

4.3.3 Monitor 


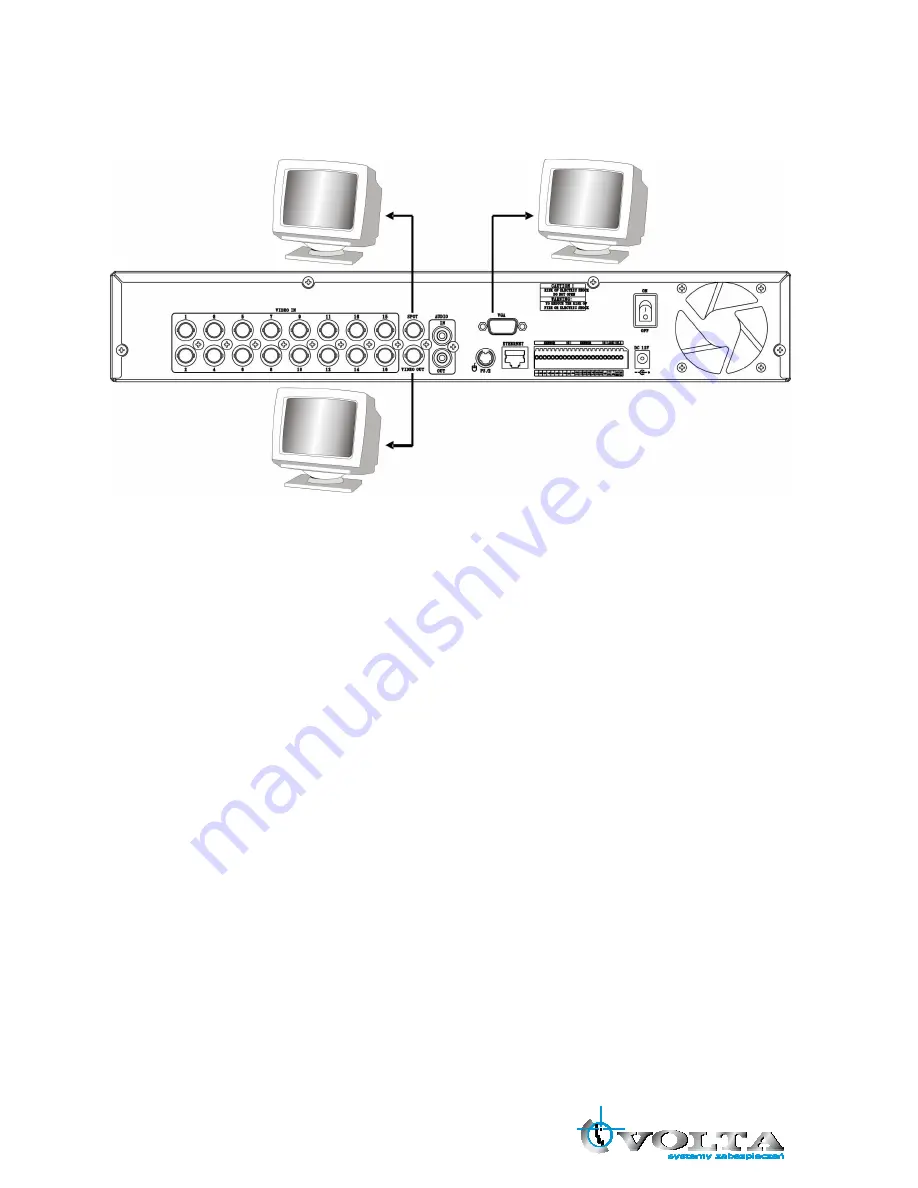
DVR supports two types of monitor output, one is Composite output (BNC connector); the other one is VGA 

output (DSUB-15). But you can just select one monitor output type at a time.   


* Composite Output: 

(1)

  Power off 

(2)

  Press the MENU button and CH3 button at the same time 

(3)

  Power on 

(4)

  When  you  hear  a  beep  sound,  it  means  images  already  output  to  the  Composite  port.  Now  you  can 

release the buttons. 


* VGA Output: 

(1)

  Power off 

(2)

  Press the MENU button and CH4 button at the same time 

(3)

  Power on 

(4)

  When you hear a beep sound, it means images already output to the VGA port. Now you can release the 

buttons. 


SPOT MONITOR 

MAIN MONITOR 

VGA MONITOR 

Summary of Contents for VEDVR 2108

Page 1: ...I User Manual VEDVR 2108 VEDVR 2116 H 264 Multiplex DVR...

Page 2: ...cause harmful interference to radio communications Operation of this equipment in a residential area is likely to cause harmful interference in which case the user will be required to correct the inte...

Page 3: ...DVR outside of the reference temperature and humidity indicated in the specification Avoid exposing the DVR to violent movement or vibration Do not use or store the DVR in direct sunlight or near to...

Page 4: ...4 4 sensor Input 15 4 4 1 Sensor Input Menu Setup 15 4 5 RS 485 16 4 5 1 RS 485 Menu Setup 16 4 5 2 PTZ Camera Installation 16 4 5 3 PTZ Camera Operation 17 4 5 4 PTZ Camera Preset Mode 17 4 6 Relay O...

Page 5: ...6 4 1 Motion Detection 39 6 4 2 Event Screen Mode 40 6 4 3 Event Message 40 6 4 4 Event Message Reset 40 6 4 5 Event Buzzer 40 6 4 6 Event Record 40 6 5 Other Record Setup 42 6 5 1 Preview Quality 42...

Page 6: ...sword 60 9 4 2 DVR List 60 9 4 3 HDD Search 61 9 4 4 File Search 62 9 4 5 Arrange Windows 63 9 4 6 Viewer Option 63 9 4 7 Display 65 9 4 8 DVR Controller 66 9 4 9 PTZ Controller 66 9 4 10 Setup 67 9 4...

Page 7: ...gh 16CH client software and IE browser Audio recording Motion detection with area selecting and sensitivity adjusting by each camera Remote controller Email notification Control all functions of PTZ c...

Page 8: ...L 1 DVR 2 Client Viewer Software CD 3 User Manual 4 Remote Controller 5 Power Cord 6 Power Adapter 7 Battery CONTENTS 1 DVR 2 Client Viewer Software CD 3 User Manual 4 Remote Controller 5 Power Cord 6...

Page 9: ...ber to be displayed in full screen b enter the numeric password when prompted c number 0 for audio function 5 PLAY PAUSE Z a Starts the playback of recorded data By default the playback starts from th...

Page 10: ...n be used to connect to numerous USB 2 0 backup devices 14 MULIT This button is used to toggle between multiple display modes 16 13 10 9 7 and 4 channel split screen display modes 15 SLOW IRIS CLOSE P...

Page 11: ...OCUS OUT DECREASSE VALUE SECTION A a activates and deactivates the automatic channel sequence b focuses out in PTZ mode c decreases the value of a selection in the menu screen d sets the starting poin...

Page 12: ...CE THE RISK OF FIRE OR ELECTRIC SHOCK CAUTION WARNING IN OUT SPOT VIDEO OUT AUDIO VIDEO IN PS 2 SENSOR 485 RL1 G 3 4 1 2 G 7 8 5 6 11 12 9 10 15 16 13 14 N O C M D D G G SENSOR Item Description 1 VIDE...

Page 13: ...Exit Activates the SPOT monitor control 9 FUNCTION Use with other buttons 10 MENU Up directional button Enter Menu Setup 11 AR RESET Alarm reset Left directional button 12 PIP Down directional button...

Page 14: ...ayback direction 21 RECORD Starts and stops the recording mode 22 LIVE PB Switches the LIVE mode and Playback mode STOP 23 AUDIO Audio function 24 MULTI Multi display mode 25 CAMERA BUTTONS Numeric bu...

Page 15: ...rsor to the desired channel and double left click Change from Single Channel to Multi ChannelDisplay Double left click MENU MODE Enter MENU Right click Select Enter Double left click Return to Previou...

Page 16: ...10 Chapter 4 INSTALLATION 4 1 Total Connection Lay out...

Page 17: ...Installation First please remove the HDD holder from the DVR machine Pic1 Pic1 Lock HDD holder symmetirically in the two sides of HDD Pic2 Pic3 Pic2 Pic3 Insert the SATA cable and power cable into SA...

Page 18: ...ck the HDDs onto DVR machine Pic5 Pic5 Insert the SATA cables into the sockets on the main board Pic6 Make sure the HDD1 cable insert into HDD1 socket Now the installation was finished Pic7 Pic6 Pic7...

Page 19: ...microphone to the AUDIO IN port Audio Output AUDIO OUT Connect the RCA Line output to a monitor with a built in speaker NOTE This DVR can be connected only with a line audio and not support a micropho...

Page 20: ...2 Press the MENU button and CH3 button at the same time 3 Power on 4 When you hear a beep sound it means images already output to the Composite port Now you can release the buttons VGA Output 1 Power...

Page 21: ...r EVENT SENSOR INPUT menu to select the correct sensor input type which connected with DVR Select the right sensor type according to the type of installed sensor with the unit NORMAL OPEN The sensor i...

Page 22: ...RS 485 device which connected with DVR The parameters must the same with the device 4 5 2 PTZ Camera Installation Connect the PTZ camera to DVR RS 485 interface D to D D to D and then connect the cam...

Page 23: ...the PTZ button to enter the PTZ mode 3 Press the PRESET button to enter the PTZ PRESET SET mode 4 Use the direction buttons to adjust the camera position you want 5 Press one number button to remembe...

Page 24: ...events will trigger off the relay signal RELAY SELECT Event Type ALARM Sensor Input LOSS Video Loss MOTION Motion Detection RELATY OUTPUT TIME 1 30 sec According to the time set the buzzer starts bee...

Page 25: ...the video signal system is set to NTSC Do not input the PAL type video signal or it may cause the DVR s malfunction In this case turn off and on again 5 1 2 Screen Display a Multi display To change a...

Page 26: ...ezed Then press the channel users want to freeze the message will be shown at camera title Press next channel to stop others Press FREEZE again to release this function FREEZE function is not availabl...

Page 27: ...ss of monitoring screen 5 1 5 PIP Mode Select a single camera in live view and then press the PIP button and the following screen will be displayed For example CH1 Select the desired camera that will...

Page 28: ...ENU button to enter the main menu screen Move the cursor to desired position using the buttons then press the button to enter each submenu Change the value using the F F buttons or truning the wheel s...

Page 29: ...23 5 2 Screen...

Page 30: ...TO SEQUENCE mode The default is OFF VIDEO LOSS SKIP If selected ON every VIDEO LOSS channel will be skipped in the AUTO SEQUENCE mode The default is ON Auto Sequence Display ADD AUTO SINGLE ON Press t...

Page 31: ...d on the screen in gigabyte Record Status ON Displaying the recording status of each channel on the screen The default is ON Clock Display ON The date and time will be displayed on the screen The defa...

Page 32: ...lay mode The default is WHITE Remote Control ID ON The remote controller ID will be displayed on the screen The default is OFF TEXT Use the characters or symbols in the CHARACTER TABLE as Title name B...

Page 33: ...t the character table 5 2 4 Multi Screen Enter one of the five modes 4 7 9 for 8CH and 4 7 9 10 13 for 16CH and change the selected channel to multi split screen Turn the display on and then it will b...

Page 34: ...ct the channel of spot monitor EVENT Event channel will be displayed automatically on spot monitor SEQUENCE Every single channel will be switching and displaying in sequence SPOT SEQUENCE TIME The dur...

Page 35: ...s shown on the screen to adjust the BRIGHTNESS CONTRAST HUE and SATURATION of each channel 5 3 System 5 3 1 HDD REC HDD INITIALIZE Select YES and press ENTER button to format the HDD The value is from...

Page 36: ...5 3 2 Clock System clock adjustment DATE TIME Manually adjust the Date and Time values DATE YYYY MM DD YEAR MONTH DAY TIME HH MM SS HOUR MINUTE SECOND TIME ADJUST If the INTERNET TIME ADJUST is ON sys...

Page 37: ...If you are operating more than one DVR in the same place and wish to use the remote controller the remote controller ID setup is required Otherwise do not change the default set value and ALL should b...

Page 38: ...32 If PASSWORD CHECK is ON when user using following functions system will request the password Record Search Playback Copy Live Audio DVR Menu Setup DVR Status checking and PTZ control...

Page 39: ...ons NOTE You can use only 0 9 number buttons to setup the PASSWORD The default passwords as ADMIN is 11111111 USER1 is 22222222 USER2 is 33333333 USER3 is 44444444 USRE4 is 55555555 CAUTION For securi...

Page 40: ...ved in the USB storage device 3 SAVE MENU TO FILE Save the menu settings to the USB storage device 5 3 8 Firmware Upgrade You can update the DVR firmware through the USB interface Insert the USB devic...

Page 41: ...cursor to any time point on the vertical ALL roll to enable the record schedule on the time point of the whole horizontal roll Mouse Control Select click on the desired record time on the RECORD PROG...

Page 42: ...AME Select the desired frame rate for normal recording If you enable the QUICK SETUP all the manual recording schedule recording and event recording will use the average record frame to record For exa...

Page 43: ...loss alarm or motion is detected DVR will store post recorded data during the selected period The post recording time can be set from 0 second to 60 second and the default is 10 AUDIO RECORD Select O...

Page 44: ...recording frame on weekend The default RECORD PROGRAM is PROGRAM6 RECORD STATUS You can find the present RECORD PROGRAM setting in the DVR STATUS page User can adjust each camera settings in the RECOR...

Page 45: ...able in NORMAL RECORD mode EVENT TYPE A Alarm L Video Loss M Motion Detection N A Four channels are grouped and placed in one page The resolution is revealed in gruops which means each group consists...

Page 46: ...EEN HOLD Keeping the current screen even if the event occurs EVENT FULL Display the full screen of the channel which the event occurs EVENT MULTI Display the multi screen when the event occurs EVENT F...

Page 47: ...ecording choose OFF PRE RECORD TIME When video loss alarm or motion is detected DVR will store pre recorded data during the selected time The pre recording time can be set from 0 second to 5 second an...

Page 48: ...cord mode In the mean time the image showed will be a littlt bit late than live video You can see the size of each image quality and how long you can record in the instlled HDDs by the preview quality...

Page 49: ...d when the HDD is full REPEAT RECORD ALARM When the rest capacity of HDD matches the setting value DVR will stop to write datas into HDD and show the warming message on the screen The setting value is...

Page 50: ...play from the button pressing time Press the DIRECT button again will switch the playback direction Press the LV PB button in the PLAYBACK mode DVR will switch back to LIVE mode 7 1 Calendar Search Y...

Page 51: ...ct to playback signal channel or all channels Select the desired HDD ID CHANNEL TIME and press the ENTER button then you can playback Press ESC button to go back to the previous menu Make sure the rec...

Page 52: ...a signal from the sensor input DVR begins to record the input data according to the PRE POST TIME in the RECORD setup and the details will be listed in the EVENT LIST CAUTION If the internal HDD s is...

Page 53: ...wn Select the desired file and press ENTER to playback 7 7 Bookmark Search Search the record data according to the BOOKMARK Enter the BOOKMARK SEARCH menu and press the ENTER button Select the desired...

Page 54: ...8 times slower than normal playback speed 1 16 16 times slower than normal playback speed 1 32 32 times slower than normal playback speed 1 64 64 times slower than normal playback speed 1 128 128 time...

Page 55: ...6 16 times faster than normal playback speed 32 32 times faster than normal playback speed 64 64 times faster than normal playback speed 128 128 times faster than normal playback speed However much da...

Page 56: ...c period for repeative palyback 1 Start playback 2 Press SEQ button to set up SECTION A Starting Position then the screen will show A 3 Press FREEZE button to set up SECTION B End Position then the sc...

Page 57: ...t please connect the USB devices DVD Writer HDD Card Reader to DVR and enter the COPY munu MEDIA Select USB_FRONT HDD ID The HDD HDD0 HDD1 which the record data saved The default is NORMAL search data...

Page 58: ...DVD HDD ID CHANNEL COPY START TIME COPY END TIME and press the ENTER button to start the copy NOTE You can see a password input message Please input the password by the numeric buttons or press ECT b...

Page 59: ...ocess will be continued FORMAT MEDIA Format the present storage device 8 2 Copy Status Review the status of the present COPY process COPY CUR TIME Indicate current copying situation among the total co...

Page 60: ...54 message FORMATTING will be displayed while formatting NOTE If you don t connect any media you will see the message Fail The first time formatting the media will a take longer...

Page 61: ...R enter menu setup and then select save and exit to quit the menu setup Static IP If you want to use static IP please set the DHCP to OFF Then just input the IP SUBMASK GATEWAY DNS and PORT The defaul...

Page 62: ...k card for LAN operation 9 2 2 Network Environment PC DVR Minimum Requestment 1Mbps 0 5Mbps Recommended 16 Frames Sec 3Mbps 3Mbps The image transmission rate is depending on the login users of DVR 9 2...

Page 63: ...ath press Install to start installation Installation DVR Viewer completed Click on YES to install the Roxio UDF Reader Click on Next Click on Install Click on OK and the installation completed Double...

Page 64: ...ontroller mouse and the front buttons on the DVR the client software provides a controller to control the DVR remotely PTZ Controller To enter the DVR Menu Setup To review the DVR status To make a scr...

Page 65: ...59...

Page 66: ...Viewer is run for the first time it prompts for the administrator s password When you run the software in the future you ll need this password If you don t want to set a password please keep it empty...

Page 67: ...cting If you login with the ADMIN password you can use all functions as in DVR but if you login with other user s password you can t modify the menu setup The maximum login users of DVR are 16 but jus...

Page 68: ...ecord data to DVD or USB storage device Then use File Search function to search and playback these data on PC Click on the File Search button the following window appears 1 Select the desired search p...

Page 69: ...rrange Windows Arrange the windows opened by DVR Viewer automatically 1 window 2 4 windows 5 9 windows 10 16 windows Double click on one window in multi display mode to extend to full screen 9 4 6 Vie...

Page 70: ...eld mode This reduces the resolution but is suitable for recorded images in low frame rate Dynamic IP Server Set the IP address of Dynamic IP Server and Backup IP Server Warning Sound Check Event mean...

Page 71: ...65 9 4 7 Display a Signal Display Mode Click on the desired channel button to display as Signal Display Mode...

Page 72: ...ntroller button a control panel similar to DVR front panel will appears 9 4 9 PTZ Controller Use the PTZ Controller to control PTZ camera through internet AF AutoFocus Adjustment Zoom PTZ camera Zoom...

Page 73: ...d the DVR menu settings from a file Load From DVR Load the real time settings from DVR to PC Update to DVR Update the menu settings in PC to DVR QUICK SETUP Please refer to 6 2 QUICK SETUP SCREEN You...

Page 74: ...DULE RECORD ON OFF An hour block when enabled becomes Green Move the cursor to any time point on the vertical ALL roll then click on SCHEDULE RECORD ON OFF to cancel record schedule Turn the wheel scr...

Page 75: ...t settings please refer to 6 3 RECORD SETUP EVENT Please refer to 6 4 EVENT SETUP SYSTEM Please refer to 5 3 SYSTEM LINK Please refer to Chapter 4 and 9 1 NETWORK SETUP DOWNLOAD Download the Firmware...

Page 76: ...on STATUS button to review the System Record Network Bit Rate status 9 4 12 Print Click on the PRINT button to make a screen snapshot and save as a file The size of snapshot is depend on the Record Im...

Page 77: ...DVR DVR Viewer Copy automatically 9 4 14 Search Please refer to Chapter 7 Search Operation and Menu Setup 9 4 15 Record and Playback Control Buttons 1 Fast Backward 2X 128X 2 Playback Backward Slowly...

Page 78: ...72 Files DVR DVR Viewer Save automatically...

Page 79: ...ed SMTP SERVER Move the cursor to SMTP SERVER and press ENTER button to input the IP address Select the character using the buttons and then press the ENTER button To exit this CHARACTER TABLE screen...

Page 80: ...and then press the ENTER button To exit this CHARACTER TABLE screen press the ESC button 10 2 Record Limit In this function you can choose a certain period of time for recording After certain period o...

Page 81: ...net Explorer Step1 Connect to this web site IP address 211 174 251 155 and the following interface will be shown Step2 Input the IP address of DVR and then click Connect Step3 Type the password to acc...

Page 82: ...tiveX component is downloaded and installed automatically It will take a few minutes If the Internet Explorer does not allow this installation please adjust the security option of the browser Note2 If...

Page 83: ...UBISHI 2X 4X Verbatim 6X VIO 4X DVD RW MITSUBISHI 1X 4X Verbatim 6X PHILIPS 1 4X Q Why isn t PS 2 mouse working A User needs to use the mouse together with the wheel Some functions need this third but...

Page 84: ...DIVISION 1 4 7 9 1 4 7 9 10 13 16 ZOOM 2X OSD Graphic OSD RECORDING COMPRESSION H 264 RESOLUTION 720x480 720x240 360x240 NTSC 720x576 720x288 360x288 PAL F R A M ERATE NTSC 60 120 240FPS 60 120 240FP...

Page 85: ...ETWORK INTERFACE 16CH Client Viewer Web Browser SPEED 120 Frames per second PROTOCOL TCP IP SMTP HTTP DHCP DDNS WEB BROWSER Internet Explorer 5 0 or higher BACKUP INTERNAL DVD RW EXTERNAL USB HDD USB...

Reviews: