background image

34

VEGASON 51K … 53K

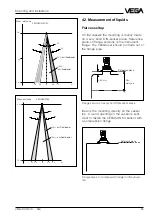
Wrong

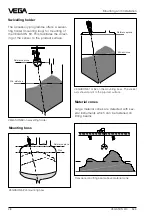
Mounting on a vessel with parabolic tank top

Correct

1

/

2

vessel
radius

Wrong

Max. meas.
distance

Distance of the
transducer to the
vessel wall

Curve 1 (liquids)

Curve 2 (solids)

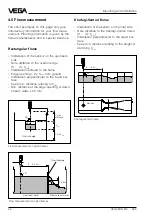
Mounting and installation

Sensor too close to the vessel wall

if the sensor is mounted too close to the ves-
sel wall (dimension A in diagram) strong false
echoes can be caused. Build-up, rivets,
screws and weld joints superimpose their
echoes on the product echo or useful echo.
Please ensure the sufficient distance of the
sensor to the vessel wall depending on the
maximum measuring distance (dimension B
in diagram). In case of good reflection condi-
tions (liquids, no vessel installation) we rec-
ommend the provision of the sensor distance
according to 

diagram curve 1

. At a max.

meas. distance of, for example 10 m the
distance of the transducer, according to
curve 1, should be approx. 1 m. In case of
solids with bad reflection conditions provide
a distance to the vessel wall according to

diagram curve 2

. With very bad meas. con-

ditions it could be necessary to increase the
distance to the vessel wall or to gate out the
false echoes additionally by a false echo
storage and thereby adapt the sensor more
precisely to the environment.

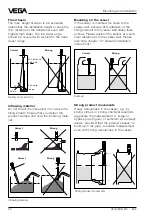
Parabolic effects on dished boiler head
or basket arch vessels

Round or parabolic tank tops act like a para-
bolic mirror for the signals. If the sensor is
placed to the focus of such a parabolic tank
top the sensor receives amplified false ech-
oes. The optimum mounting is generally in the
range of half the vessel radius from the cen-
tre.

³

 60 mm

Summary of Contents for VEGASON 51K

Page 1: ...Level and Pressure Operating Instructions VEGASON 51K 53K ...

Page 2: ...as systems 10 3 Technical data 3 1 Data 17 3 2 Approvals 21 3 3 Dimensions 22 Safety information The described module must only be installed and operated as described in these operating instructions Please note that other action can cause damage for which VEGA does not take responsibility Ex area Please note the approval documents attached yellow binder and especially the included safety data shee...

Page 3: ... Flow measurement 30 4 6 False echoes 31 4 7 Installation error 33 5 Electrical connection 5 1 Connection and connection cable 36 5 2 Connection of the sensor 37 5 3 Connection of the external indicating instrument VEGADIS 50 38 6 Set up 6 1 Adjustment structure 39 6 2 Adjustment with PC 39 6 3 Adjustment with the adjustment module MINICOM 52 6 4 Adjustment with the HART handheld 58 ...

Page 4: ...The level proportional measuring signal is provided as 4 20 mA output signal The parameter adjustment of the analogue 4 20 mA signal is individually possible and reflects the measuring range or the adjusted adjustment range of the sensor Measured value indication If desired an indicating instrument for direct lobal survey can be mounted on to the series 50 ultrasonic sensors The indicating instru ...

Page 5: ...separate from the sen sor Connection for each process G 11 2 A 11 2 NPT G 2 A 2 NPT Compression flange DN 100 ANSI 4 Approvals CENELEC ATEX PTB FM CSA ABS LRS GL LR FCC 1 3 Adjustment Each measuring distance is different there fore each ultrasonic sensor must be given some basic information on the application and the environment e g you need to inform the sensor which level means empty and which l...

Page 6: ...cted with the two wire PC interface converter VEGACONNECT 2 to the sensor or to the signal line The adjustment and parameter adjustment data can be saved with the adjustment soft ware on the PC and protected with pass words If required the adjustment can be transmitted quickly to other sensors Adjustment with adjustment module MINICOM With the 3 2 cm x 6 7 cm 6 key adjustment module with display y...

Page 7: ...r or the external indication instrument VEGADIS 50 Adjustment with HART Handheld Series 50 sensors with 4 20 mA output signal can also be adjusted with the HART Handheld A special DDD Data Device Description is not necessary as the sensors can be adjusted with the HART standard menus of the handheld For adjustment just connect the HART Handheld in any position of the 4 20 mA output signal line or ...

Page 8: ...antages of an ultrasonic level measurement for applications where the special advantages of a non con tact measurement are not applicable for price reasons VEGASON 50 ultrasonic sensors control the two wire technology perfectly The supply voltage and the output signal are transmitted via a two wire line An analogue 4 20 mA output signal is available as output or meas uring signal Types and version...

Page 9: ...d versions Type code The second letter of the type designation e g VEGASON 5 1 differentiates the instru ments acc to process connection and meas uring range The letter e g VEGASON 51 K characterises the output signal K stands for an analogue 4 20 mA output signal compact instrument VEGASON 51 K E X X X example P 90 250 V AC only in USA N 20 36 V DC 24 V AC only in USA Z supply via signal conditio...

Page 10: ...age 16 VEGADIS 50 VEGA CONNECT 2 HART hand held Types and versions Meas systems with VEGASON 51K 53K Two wire technology loop powered supply and output signal via a two wire line Output signal 4 20 mA passive Optional external indicating instrument with analogue and digital indication can be mounted up to 25 m away from the sensor Adjustment with PC HART handheld or adjustment module MINICOM can b...

Page 11: ...ld VEGA CONNECT 2 Types and versions 1 If the resistors of the processing systems connected to the 4 20 mA signal output are less than 200 W a resistor of 250 W to 350 W must be connected to the connection line during adjust ment The digital adjustment signal would be extremely damped or short circuited via too small input resistors of the connected processing system which means that the digital c...

Page 12: ... external indicating instrument VEGADIS 50 HART handheld Ex area Not Ex area Separator e g Stahl see 3 2 Approvals VEGA CONNECT 2 VEGADIS 50 passive 2 1 DCS active 1 If the resistors of the processing systems connected to the 4 20 mA signal output are less than 200 W a resistor of 250 W to 350 W must be connected to the connection line during adjust ment The digital adjustment signal would be extr...

Page 13: ...or e g VEGATRENN 149 Ex see 3 2 Approvals VEGADIS 50 1 DCS passive 3 Ex area Not Ex area 1 If the resistors of the processing systems connected to the 4 20 mA signal output are less than 200 W a resistor of 250 W to 350 W must be connected to the connection line during adjust ment The digital adjustment signal would be extremely damped or short circuited via too small input resistors of the connec...

Page 14: ...ith PC HART handheld or adjustment module MINICOM can be plugged in the sensor or in the external indicating instrument VEGADIS 50 Types and versions passive VEGADIS 50 0 4 20 mA Relay see 3 2 Approvals 1 Ex area Not Ex area HART handheld VEGA CONNECT 2 1 If the resistors of the processing systems connected to the 4 20 mA signal output are less than 200 W a resistor of 250 W to 350 W must be conne...

Page 15: ...t load 500 W Types and versions active 2 VEGADIS 50 1 1 If the resistors of the processing systems connected to the 4 20 mA signal output are less than 200 W a resistor of 250 W to 350 W must be connected to the connection line during adjust ment The digital adjustment signal would be extremely damped or short circuited via too small input resistors of the connected processing system which means t...

Page 16: ...RT handheld on the signal line of the appropriate sensor without the participa tion of all other sensors in the communication even though all sensors react to the address zero The low inner resistor alternating load resistor by filter capacitor of the voltage source short circuits the signals before they can cross over to the other sensor lines The C R 0 2 Ω 250 Ω 250 Ω 250 Ω 250 Ω 250 Ω 250 Ω res...

Page 17: ... voltage limit with Ex sensors HART load Diagram of the min supply voltage dependent on the sensor current two wire sensor Current consumption two wire sensor max 22 5 mA four wire sensor max 140 mA Power consumption two wire sensor max 80 mW 0 45 VA four wire sensor max 1 2 W 2 50 VA Load two wire sensor see diagram four wire sensor max 500 W Load diagram of the two wire sensor loop resistor of p...

Page 18: ... measuring range Accuracy of the 4 20 mA output signal 0 025 D A converter Resolution 1 mm Characteristics Min span between empty and full adjustment 20 mm recommended 50 mm Ultrasonic frequency 70 kHz 55 kHz 34 kHz Intervals 1 0 s 1 0 s 1 0 s Beam angle at 3 dB emitted power 5 5 5 5 3 Response time 2 2 20 s dependent on the factory setting Materials Housing PBT Valox Transducer process connection...

Page 19: ... safe in conjunction with a safety barrier or separator Temperature class permissible ambient temperature on the transducer when used in Ex areas T6 42 C T5 58 C T4 60 C T3 60 C Ex approved in category or zone ATEX Zone 1 II 2 G IEC CENELEC PTB Zone 1 II 2 G Classification mark EEx ia IIC T6 Process connections VEGASON 51 G 11 2 A 11 2 NPT VEGASON 52 G 2 A 2 NPT VEGASON 53 DN 100 compression flang...

Page 20: ...ed by the sensor and up to 25 m away from the sensor also the adjustment module MINICOM can be inserted Signal output Signal output two wire technology 4 20 mA load dependent on supply voltage see load diagram page 17 four wire technology 4 20 mA load max 500 W Resolution of the 20 mA signal 0 025 of operating range Failure of the 20 mA signal 0 025 of operating range Two wire technology The analo...

Page 21: ...esearch ABS American Bureau of Shipping LRS Lloyds Register of Shipping GL German Lloyd CSA Canadian Standards Association Technical data Ex area zone 1 Series 50 senors require special safety barri ers and separators for operation in Ex area zone 1 The safety barriers and separators provide intrinsically safe ia circuits The followes shows a choice of instruments with which the series 50 sensors ...

Page 22: ...ta VEGASON 51 VEGASON 52 61 22 206 ø50 152 95 ø72 0 4 m 85 SW 60 Thread G 2 A or 2 NPT Min distance to the medium 65 22 202 ø39 152 95 ø60 0 25 m 85 Reference plane 2 x M20x1 5 Thread G 11 2 A or 11 2 NPT Min distance to the medium Reference plane ...

Page 23: ...he connection cable min 5 mm and max 9 mm Otherwise the seal effect of the cable entry is not ensured Adjustment module MINICOM Adjustment module for insertion into VEGASON series 50 sensors or into the exter nal indicating instrument VEGADIS 50 ESC OK Tank 1 m d 12 345 74 32 5 67 5 193 ø158 152 95 247 ø148 12 M8x10 ø12 ø12 120 0 6 m Min distance to the medium Mounting loop suitable for compressio...

Page 24: ...Note the information for the reference planes in chapter Dimensions The max filling is dependent on the required min distance of the instrument used 0 25 m to 1 4 m and the installation place of the instrument or the transducer Full Span Min distance 1m Empty Min distance Min distance 0 25 m 0 4 m 0 75 m Reference plane Type 51 Type 53 Type 52 Beam angle and false echoes The ultrasonic impulses ar...

Page 25: ...socket piece Ideal is the mounting directly on the vessel top A round opening on the vessel is suffi cient to fasten the VEGASON 53 sensor with a compression flange Flange version compression flange on flat vessel top Reference plane Reference plane Min distance 60 mm 0 0 m 7 m 50 1 2 1 2 m 0 4 0 4 100 5 5 12 4 m Meas distance 0 0 m 15 m 100 50 1 2 1 2 m 0 4 0 4 3 8 Meas distance Mounting and inst...

Page 26: ...ort 11 2 or 2 socket piece Reference plane 60 mm You can also mount the sensors with 11 2 or 2 thread to short socket pieces Dished tank ends On dished tank ends please do not mount the instrument in the centre but approx 1 2 vessel radius from the centre Dished tank ends can act as paraboloidal reflectors for the ultrasonic pulses If the transducer is placed in the focus of the parabolic tank end...

Page 27: ...he example of a shaft Shaft You can realise very good meas results with a meas pipe in continous narrow shafts see figure The meas pipe used must have smooth walls inside e g PE sewage pipe and a diameter of 100 mm This coordination works without problems as long as the inside of the meas pipe has no build up cleaning Also check the use of hydrostatic pressure transmitters or capacitive electrodes...

Page 28: ...ss The socket axis should point to the product surface VEGASON 52 on mounting boss Reference plane Min distance VEGASON 53 on swivelling holder Reference plane Min distance Mounting and installation Swivelling holder The accessory programme offers a swivel ling holder mounting loop for mounting of the VEGASON 53 This facilitates the direct ing of the sensor to the product surface Mounting boss Ref...

Page 29: ...asured product could stick to the socket For measurements in products which do not cause any build up the socket extension in form of a meas pipe can be permanently submerged into the measured product The ultrasonic mesurement is then only carried out in the meas pipe without being interfered with by vessel installations see page 28 Pump shaft Socket piece should not be submerged into the adhesive...

Page 30: ...ume manufacturers and in special literature Rectangular flume Installation of the sensor on the upstream side Note distance to the overfall edge 3 4 x hmax Installation centered to the flume Edge opening 2 x hmax from ground Installation perpendicular to the liquid sur face Keep min distance relating to hmax Min distance of the edge opening of down stream water 50 mm Khafagi Venturi flume Installa...

Page 31: ... the flat top turned towards the sensor should be covered with an angular shield with which the false echoes are then scat tered Vessel protrusions slope Vessel protrusions intake pipe Correct Wrong Correct Wrong Vessel mountings Vessel mountings such as for example a ladder often cause false echoes When pro jecting the measuring point please ensure the free access of the ultrasonic signals to the...

Page 32: ...ho Mounting and installation Flood basin The max height of water to be expected determines the installation height to keep the min distance of the transducer even with highest high water The low water edge should be covered with a shield in the trans ducer range Inflowing material Do not mount the instrument in or above the filling stream Ensure that you detect the product surface and note the inf...

Page 33: ...ting to the product Weak measuring signals are caused if the sensor is not directed to the product surface Direct the sensor axis vertically to the prod uct surface to achieve optimum measuring results Strong heat fluctuations Strong heat fluctuations e g due to the sun cause measuring errors Provide a shield Min distance to the medium When the min distance to the medium is not maintained the inst...

Page 34: ... rec ommend the provision of the sensor distance according to diagram curve 1 At a max meas distance of for example 10 m the distance of the transducer according to curve 1 should be approx 1 m In case of solids with bad reflection conditions provide a distance to the vessel wall according to diagram curve 2 With very bad meas con ditions it could be necessary to increase the distance to the vesse...

Page 35: ... socket piece Wrong Correct Reference plane 60 mm Socket piece too long When mounting the sensor in a socket piece which is too long strong false echoes are caused aggravating the measurement Please ensure that the transducer protrudes at least 30 mm out of the socket piece ...

Page 36: ...nds on the sensor and on the processing system when you have determined by measurement that no or only lowest earth compensating cur rents flow via the screens Use a very low impedance earth connection foundation plate or mains earth Ex protection If an instrument is used in hazardous areas the necessary regulations conformity and type approvals for systems in Ex areas must be noted e g DIN 0165 I...

Page 37: ...screw on the top of the sensor The sensor cover with the optional indication display can then be opened Unscrew the compression screw and shift the screw over the approx 10 cm dismantled connection cable The compression screw of the cable entry is protected with a safety lock in posi tion against automatic loosening Now loop the cable through the cable entry into the sensor Screw the compression s...

Page 38: ...s on the right of the housing figure ESC OK Tank 1 m d 12 345 VEGADIS 50 ESC OK Tank 1 m d 12 345 3 2 1 5 6 7 8 4 1 2 C 5 6 7 8 4 3 Commu nication 4 20 mA Display L1 N ESC OK Tank 1 m d 12 345 1 2 C 5 6 7 8 4 3 1 2 C 5 6 7 8 Commu nication 4 20 mA Display Four wire sensor separate supply Two wire sensor loop powered Screws OUTPUT to sensor DISPLAY in the cover of the indicating instrument 4 20 mA ...

Page 39: ...cific DDD Data Device Descrip tion is not required The ultrasonic sensors are adjusted with the HART standard menus All main functions are therefore accessible Some functions which are rarely used such as for example the scaling of the A D con verter for the signal output or the adjustment with medium are not possible or are blocked by the HART handheld These functions must be carried out with the...

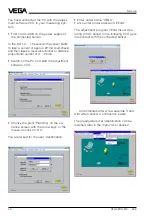
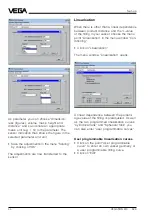
Page 40: ...A Switch on the PC and start the adjustment software VVO Choose the point Planning on the en trance screen with the arrow keys or the mouse an click on OK You are asked for the user identification Set up Enter under name VEGA Also enter under password VEGA The adjustment program VEGA Visual Ope rating VVO called in the following VVO gets into contact with the connected sensor and indicates after a...

Page 41: ...sly use a VEGACONNECT instead of the new VEGA CONNECT 2 have you connected VEGACONNECT 2 to COM1 on the PC Configuration Choose the menu Configuration Measure ment loop to get further information on the sensor type the software version of the sensor the meas unit the measurement loop designation etc Click on Quit Click on the menu Configuration Measure ment loop Modify This is the first step to se...

Page 42: ...justment You can carry out the Min Max adjustment with medium or without medium Generally you will carry out the adjustment without me dium When you want to carry out the adjust ment with medium you have to carry out the min adjustment with emptied vessel and the max adjustment with filled vessel It is convenient and quick to carry out the adjustment without medium as shown in the example Choose w...

Page 43: ...racteristics points are too close together the possible meas error increases Ideal would be to carry out the adjustment at 0 and 100 In the menu Instrument data Parameter adjustment Conditionig Linearisation you can later enter if necessary a linear depend ence between the product distance and the percentage filling degree Click in the menu Adjustment on Quit You are again in the menu window Instr...

Page 44: ... than a linear dependence between product distance and the value of the filling in your vessel choose the menu point Linearisation in the menu window Con ditioning Click on Linearisation The menu window Linearisation opens A linear dependence between the percent age value of the filling is preadjusted As well as the two programmed linearisation curves Cylindrical tank and Spherical tank you can al...

Page 45: ...window Linearisation point 1 is at 0 filling percent age value corresponding in the example to an actual distance to the product surface of 5 850 m empty vessel The volume value is therefore 45 l rest filling of the vessel Linearisation point 2 is at a level of 30 30 of the measuring distance of 1 270 m 5 850 m In our example there are 576 l at 30 filling level in the vessel Linearisation point 3 ...

Page 46: ...enu window Current output Here you can adjust the signal condition of the 4 20 mA output signal If you have carried out adjustments in this menu window click on Save If you want to keep the adjustments without modifications click on Quit You are in the menu window Outputs again Display of measured value Click in the menu window Outputs onthe menu point Display of measured value The menu window Sen...

Page 47: ...e output menu window Instru ment data parameter adjustment again Sensor optimisation In the menu Sensor optimisation you can carry out special optimising adjustments Meas environment Choose the menu point Sensor optimi sation in the menu window Instrument data parameter adjustment First click on Meas environment With the menu point Operating range you can define the operating range of the sensor d...

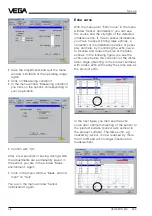
Page 48: ...sor optimisation you can see the course and the strength of the detected ultrasonic echo If due to vessel installations you have to expect strong false echoes a correction of the installation position if possi ble can help by monitoring the echo curve to localise and reduce the size of the false echoes In the following figure you see the echo curve before the correction of the instal lation angle ...

Page 49: ... echoes The small window Learn false echoes opens Enter here the checked product distance and click on Create new You hereby authorise the sensor to mark all echoes before the product echo as false echoes This avoids the sensor erroneously detecting a false echo as a level echo Click on Show echo curve The echo curve and the false echo marking are shown Quit the menu with Quit You are in the menu ...

Page 50: ...ristics data are shown Parameter adjustment of interfaces See VEGA Visual Operating manual Display of measured value Click in the main menu window on the menu Display and then on Display of meas ured value In the menu window Display of measured value the measured value actual meas dis tance in m the percentage filling degree with the limits adjusted in the min max adjustment in the example 5 850 m...

Page 51: ...the serial number is shown You can save the sensor on your PC in a directory of your choice either individually or in groups with all adjustments In addition you can add a short note to each backup Saved sensor data can be transferred to other sensors later If you have for example a system with several storage vessels and identical sensors it is sufficient to configure one sensor and then transfer...

Page 52: ...ns to the set up steps 1 8 follow 1 Adjustment ESC OK 2 4 Tank 1 m d 12 345 ESC OK Tank 1 m d 12 345 4 20 mA Set up 6 3 Adjustment with the adjustment module MINICOM As with the PC you can also adjust the sen sor with the small detachable adjustment module MINICOM The adjustment module is thereby plugged into the sensor or into the external indicating instrument optional For the adjustment with th...

Page 53: ...out medium Adjust ment in m d Min adjustment OK OK OK OK The distance indication flashes and you can choose feet and m Confirm the adjustment with OK OK Adjust ment in m d With and you adjust the percentage value for the min value or the lower level l ex ample 0 0 0 0 bei m d XX XXX OK OK or or Max adjustment The max adjustment upper product dis tance is made in the same way example 100 and 1 270 ...

Page 54: ...tment with the PC and the adjust ment software VVO this would be 45 for 45 l Confirm with OK With the key you change to the 100 menu Enter here the figure of your param eter corresponding to a 100 filling In the example 1200 for 1200 l Confirm with OK If necessary choose a decimal point How ever note that only max 4 digits can be dis played In the menu Prop to you choose the parameter mass volume ...

Page 55: ...ays useful when false echo sources such as struts must be reduced With the creating of a false echo storage you authorise the sensor electronics to note the false echoes and save them in an internal database The sensor electronics treat these false echoes differently from the useful echo and gates them out 8 Useful and noise level In the menu you get important information on the signal quality of ...

Page 56: ... Correc tion Now OK Meas dist m d 4 700 SON 52 K 1 00 When switching on the sensor type and the software version are displayed for a few seconds 4 5 6 Adjust ment Aus wer tung Out puts mA output Sensor displ Fail ure mode 22mA prop to Di stance mA output 4 20mA w out medium Adjust ment in m d with medium 0 0 at m d XX XXX 100 0 at m d XX XXX Min adjust at XXX X Max adjust at XXX X Sca ling Lin cur...

Page 57: ...Now OK Reset runs Reset tode fault Meas unit m d Sensor type SON52 K Serial number 1094 0213 Softw Vers 0 40 Dis tance m d 4 700 max range m d 7 000 Sensor Tag Sensor Softw date 15 09 1997 Meas dist m d X XX Ampl XX dB S N XX dB Ampl XX dB S N XX dB With these keys you move in the menu field to the left right top and bottom 7 8 ESC OK Simu lation Simu lation Now OK Simu lation XXX X Simulation One...

Page 58: ... VEGAMET 513 S4 514 S4 515 S4 VEGALOG EA card 100 150 Ohm Set up With each HART handheld you can set up the VEGASON series 50K ultrasonic sensors like all other HART capable sensors A spe cial DDD Data Device Description is not necessary Just connect the HART handheld to the signal line after having connected the sensor to power supply Note If the resistor of the power supply is less than 250 Ohm ...

Page 59: ...iguration and for that safety reasons you should switch your sys tem over to manual operation After having pressed ENTER press SEND here in the example for the min adjustment Press OK and the adjustment will now be transferred to the sensor After a short time you are asked to switch you system over from manual to automatic operation Confirm with OK 4 2 5 2 Generic SENSOR 1 PV LRV 5 850 m 2 PV URV ...

Page 60: ...tion 5 PV xfer fnctn HELP SAVE HOME Generic SENSOR Process variables 1 Snsr 2 281 m 2 AI rnge 69 140 3 AO 1 15 059 mA HELP SAVE HOME Generic SENSOR Online Generic 1 Device setup 2 PV 2 281 m 3 PV AO 15 059 mA 4 PV LRV 7 000 m 5 PV URV 0 000 m SAVE Generic SENSOR Device setup 1 Process variables 2 Diag Service 3 Basic setup 4 Detailed setup 5 Review SAVE HOME Allgemein SENSOR PV Meßanfang ist unbek...

Page 61: ...see next page 1 4 3 1 The sensor also provides te 4 20 mA signal as well as a digital HART level signal If the poll address is zero the sensor takes a level dependent 4 20 mA current and delivers a digital HART level signal If the poll address is 1 15 the sensor still delivers a digital HART level signal however the sensor current is frozen to 4 mA The 4 20 mA signal is then no longer available Se...

Page 62: ...e initialisation word press ENTER and then SEND Confirm the message to change over to manual operation with OK and the message to switch over to automatic operation again with OK Only then is the adjustment written in the sensor and effective 1 4 3 1 1 4 3 1 2 Low In case of failure current output goes to 22 mA High In case of failure current output goes to 3 6 mA 1 4 3 1 3 1 4 3 1 3 1 from 1 4 3 ...

Page 63: ...VEGASON 51K 53K 63 Notes ...

Page 64: ...ilding 505 Yardley PA 19067 7706 Tel 215 321 6012 Fax 215 321 6067 Tech Support Toll Free 866 DrLevel or 888 NIVELCO Email info DrLevel com or info hitechtech com Web Site www DrLevel com or www hitechtech com A TECHNOLOGY FOR EVERY LEVEL APPLICATION ...

Reviews: