background image

Vega Light Control Systems 

● Holland, Michigan 49424


2.  INSTALLATION INSTRUCTIONS 

  Refer to fixture installation manual for fixture mounting procedures 

  Please refer to 

www.vegalightcontrolsystems.com 

for additional install instructions 


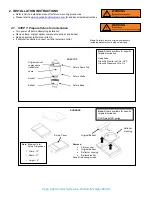
2.1.  STEP 1: Prepare fixture for installation 

  Turn power off before attempting installation 

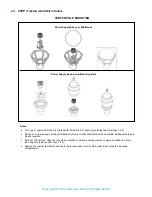
  Remove lamp, original optical components, socket, and ballast 

  Remove internal reflectors or Lite Lid 

  If photocell-controlled, connect unit after external control 


WARNING

!

Risk of electric shock

Disconnect power before servicing

WARNING

!

Risk of burn

Allow unit to cool fully before servicing

POST-TOP 

Note

: Failure to remove original components 

including ballast will void product warranty. 

Original optical 
components 
(reflectors) 

Fixture Dome Top 

Ballast 

Socket 

Lamp 

Fixture Base 

Fixture Globe 

Note:

 Kits are available for specific 

targeted luminaries 
 
Holophane: 
Granville Premier cat. No. GVP 
Granville Classic cat. No. GV 

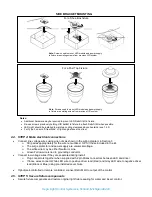
SHOEBOX 

Fixture Cover 

Remove: 


Fixture cover 


Original ballast 


Reflector housing 


Ballast bracket 

Save all mounting screws 

Note:

 Minimum Total  

          Fixture Dimensions


 Width 

– 12” 


 Depth 

– 17” 


 Height 

– 6” 

Reflector 
 Housing 

Original Ballast 

Note:

 Kits are available for specific 

targeted luminaries 
 
RUUD model PR series 
Granville Classic cat. No. GV 

Summary of Contents for D4-C

Page 1: ...SDICTION RISQUE D INCENDIE OU DE CHOC LECTRIQUE L INSTALLATION DE CE N CESSAIRE DE MODERNISATION EXIGE UNE PERSONNE FAMILI RE AVEC LA CONSTRUCTION ET LE FONCTIONNEMENT DU SYST ME LECTRIQUE DU LUMINAIR...

Page 2: ...FIXTURE AMBIENT OPERATING TEMPERATURE FOR LED RETROFIT MODULE 104 F 40 C MAXIMUM AMBIENT OPERATING TEMPERATURE CANNOT EXCEED 140 F 60 C INSTALLATION REQUIREMENTS MAY VARY DEPENDING ON THE LUMINAIRE R...

Page 3: ...plication Specific configuration for mounting in Granville Classic 7 and 4 fitters with 19 glass globes One piece assembly Granville Premier Kit Style Watts CCT Type Mounting Dimming Mounting Code Det...

Page 4: ...mm LED Light Engine Height Adjustable From 15 Down To 9 75 D4 F Model Fully Enclosed 60W Max Adapter Plate D4 S Down Light Model with Side Brackets D4 M Model Mid Mount Enclosed 80W Max 4 73 or 5 91...

Page 5: ...LexaLite Lindy 408 globe performs best at LED height set 8 from the base of the globe Crown 88266 CL has an optimum output when set 13 from the base of the globe 5 Measure the maximum temperature achi...

Page 6: ...efore servicing WARNING Risk of burn Allow unit to cool fully before servicing POST TOP Note Failure to remove original components including ballast will void product warranty Original optical compone...

Page 7: ...ght tighten set screw enough to hold tube then tighten another turn with hex key see 1 4 2 4 Side brackets can be adjusted bent trimmed or special ordered to span or offset LED mounting height Allow a...

Page 8: ...acing the street see 1 4 6 Re use screws previously holding HID ballast to fixture to attach Retrofit Kit when possible Additional hardware maybe required For Post Top fixtures LED Light should be ins...

Page 9: ...Black or Blue using pre installed Lever Nuts If photocell controlled or remote controlled connect Retrofit Kit to output of the control 2 5 STEP 5 Secure fixture components Secure fixture components a...

Page 10: ...rranty period contact VEGA sales representative for RMA 3 If out of warranty period contact VEGA sales representative for information to replace surge protector LEDs are dim or not lit 1 DC Cable is u...

Reviews: