background image


X2-O

PERATIONS 

M

ANUAL 

B

UTTON 

D

ISPLAY


Doc: 70-00-0950A, Serie X2, 20211220  

© Vector Controls GmbH, Schweiz 

Page 3-16 

Subjects to alteration 

www.vectorcontrols.com 

V

ECTOR


2.2


LCD Display 

Overview 

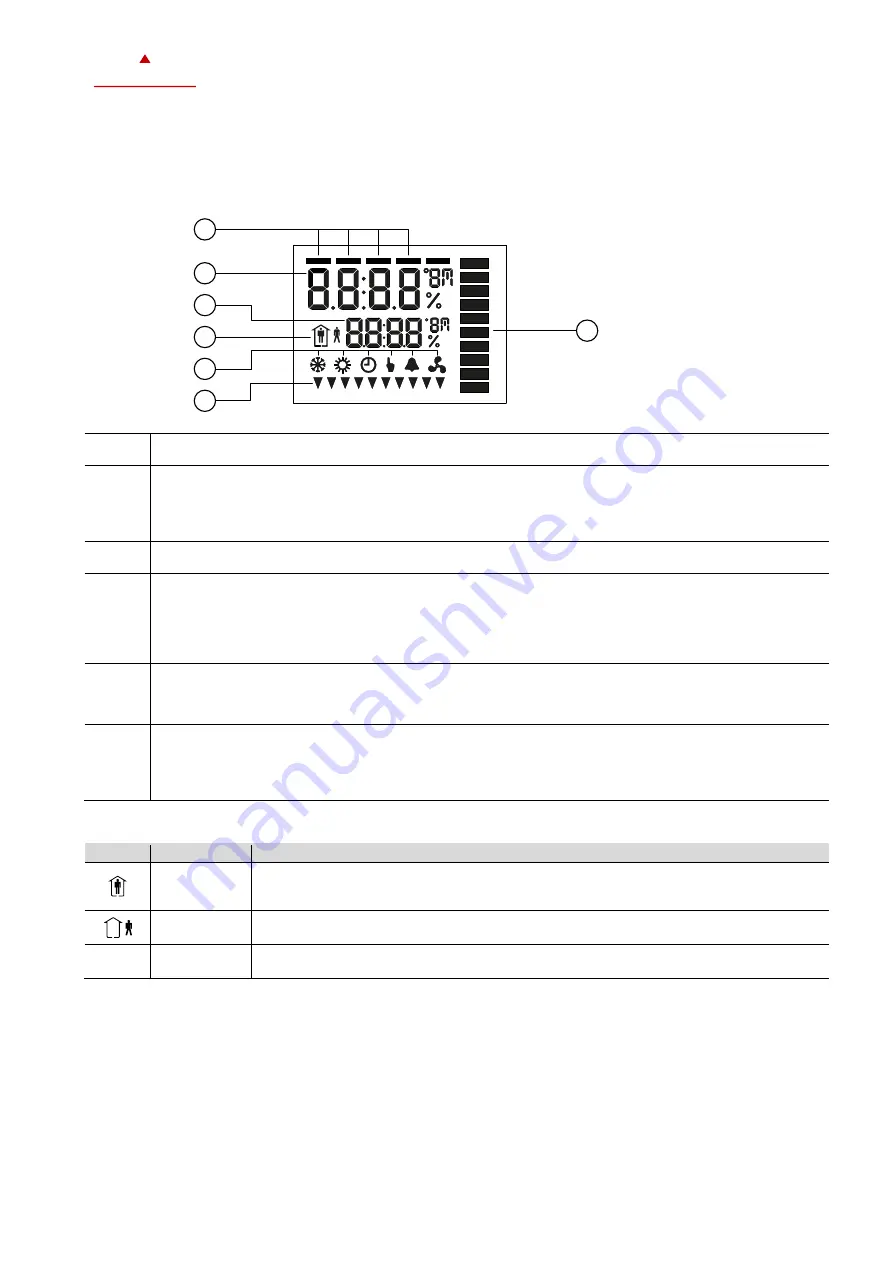
This section explains the meaning of the symbols on the LCD Display of the different operation terminals. 
 

2.2.1


TCX2 / TCI2 / OPA / OPU / OPC2-S / SDC2 / SOC2 series Display 


Control loop indication 

-


When changing setpoints, the top bar indicates the control loop (1-4) that is being changed. 

Large digits 

Small digits 

-


The large and small digits are used to show current input values, acting setpoints, alarms and 

errors, submenu text or setup and configuration values, depending on the operating state of the 

controller. 

Operating Mode 

-


See chapter 2.3 

Controlling Mode 

-


See chapter 2.4 

Alarm 

-


See chapter 2.6 

Fan is active / fan auto mode 

-


In auto mode fan speed is automatically regulated by the controller. 

Triangle indication 

-


In idle display, the triangles in the display indicate active digital outputs. 

-


In parameter setting, the triangles in the display are used for setting weekly time schedules 

indicating the days of the week the schedule is active. 

Indication side bar 

-


The side bar represents the analog indication of a value while 1 bar represents a small value and all 

bars active represent the maximum value. 

-


No side bar is displayed if in configuration disabled. 

-


When creating schedules, the sidebar serves as a navigation aid for the corresponding steps. 


2.3


Operating Modes 

Display  Mode 

Description 


Occupied 

(Comfort) 

The X2 device maintains the occupied (comfort) temperature set points defined within each 

control loop. 

In occupied mode, the fan can be set to auto or manual fan speed. 


Unoccupied 

(ECO) 

The X2 device maintains the unoccupied (ECO, economy) temperature set points defined 

within each control loop. 

OFF 

Protection 

(Holiday) 

The X2 device runs in standby. The system is protected against overheating and frost if 

enabled. Inputs are monitored for alarms. 


1

2

3

6

4

5

7

Summary of Contents for X2 Series

Page 1: ...VAC system solutions for entire buildings There is a suitable solution for almost every application With the EasySet program the controllers can be conveniently read out programmed and transferred to...

Page 2: ...ating mode selection On Off Occupied Unoccupied mode Menu navigation Back to the previous menu Long press Off if occupation mode is configured Return Back Menu navigation Return to top menu Menu navig...

Page 3: ...ler 6 Triangle indication In idle display the triangles in the display indicate active digital outputs In parameter setting the triangles in the display are used for setting weekly time schedules indi...

Page 4: ...ay Status Description Alarm Alarm Error active see chapter 2 6 and 2 7 LED on flashing Normal Status LED is on or blinks briefly once every 5 seconds LED blinking Alarm Error Status LED blinks every s...

Page 5: ...the memory does not match firmware Err3 Internal error Err4 Configuration error An assigned input is not activated or has failed Check all settings and ensure that all inputs used are activated and f...

Page 6: ...on briefly to go to the first control loop Input value and setpoint are displayed Top bar indicates control loop 1 4 2 Change the setpoint with the or button The setpoint is automatically saved after...

Page 7: ...n briefly to change the fan speed The side bar indicates the actual fan speed The fan speed will alternate between FSP0 FSP1 FSP2 FSP3 AUTO FSP0 FSP0 may be disabled by settings the number of availabl...

Page 8: ...e programmed Pr01 to Pr12 Schedules can change the operating mode of the controller on off occupied unoccupied change the fan status position an output directly or change a setpoint The summer winter...

Page 9: ...e button Schedule status indicates whether it is OFF or ON Press the button to change the status When schedule is ON is displayed Press the button 1x to go back to the previous submenu 5 3 2 Set weekl...

Page 10: ...d above the 1 3 top bar symbols are displayed 10 Press the button to not execute the program on Monday Day 1 The triangle symbol above the 1 disappears The 3 top bar symbols disappear 11 Press the but...

Page 11: ...equirements Time scheduler is enabled see chapter 5 3 1 Procedure 1 Press the button longer than 2 seconds SEL and the actual Date and Time are displayed alternatingly 2 Press the button briefly to go...

Page 12: ...day the holiday ends with the button 5 bars indicate setting step 5 is executed 10 Press to finish the holiday setup 11 Now you are back in menu program selection instruction No 4 Start creating the...

Page 13: ...ooling The controller is in fan only mode The fan is controlled according to the controller configuration or setpoint The cooling output is deactivated Heating Heating only The controller stays in hea...

Page 14: ...f the universal inputs with the button U I the input number and the value are displayed 4 To go back to the previous submenu press the button 1x 5 Press the button to go to the analog output submenu A...

Page 15: ...umber and the total runtime of the output are displayed If the runtime is greater than 9999 hours one bar appears on the side bar for every 10 000 hours The example on the right corresponds to 30345 h...

Page 16: ...ie X2 20211220 Vector Controls GmbH Schweiz Page 16 16 Subjects to alteration www vectorcontrols com VECTOR Smart Sensors and Controls Made Easy Quality Innovation Partnership Vector Controls GmbH Swi...

Reviews: