background image

Page 4 / 5


NOTE:

1. The sensitivity of the motion sensor will increase as the

    environmental temperature gets colder. For best performance, 

    gently clean the lens with a soft cloth every 1 or 2 months to

    ensure maximum sensitivity. 
2. When installed at a height of 6.5 feet, at 77 degrees Fahrenheit,

    the light will provide a maximum detection distance of 30 feet

    and detection range of 150 degrees. (See Fig.6, Fig.7)


3. The sensor will be more sensitive to motion across its

    detection path than motion directly towards it. (See Fig.8) 

4. To reduce possible nuisances, do not mount the fixture

    near a heat source like an air conditioner, vent or furnace

    exhaust, or in a direction facing any reflecting object or

    other light source.  

Sensitivity of Motion Sensor

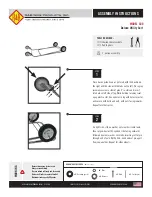
1. The sensitivity can be adjusted from 5 to 30 feet by using the

     "Sens" knob. (See Fig.5).

2. Turn the knob clockwise for increased sensitivity.

3. Turn the knob counterclockwise for decreased sensitivity.


Where you install your light is important:

Be sure the light is mounted straight on the wall;

otherwise, the detection distance may be limited. 

5`

6`

10`

30`

Fig.6

Fig. 7

Least sensitivity

Most sensitivity

Sensor

Fig. 8

Motion

Motion

150˚

TROUBLESHOOTING

Refer to following information to solve your problems.

Set the rotary knob in the test mode for testing.

Night

If the light 

isn’t on

SYMPTOM

DAY/NIGHT

POSSIBLE CAUSE

SOLUTION

Day

Rotary knob is not set in the test 

mode.

Wall switch or circuit breaker is off. Turn on wall switch or circuit breaker.

Test the light bulb on normal working light fixture.

Tighten the light bulb.
Check wire connections.

Relocate fixture away from western facing wall.

Eliminate or turn off other light source, block other

light source from shining onto sensor, or relocate

fixture.

Light bulb may be burned out.

Light bulb is loose.

Incorrect or loose wire connections.
Too much sunlight is shining onto 

sensor in the early evening.
Too much light is shining onto 

sensor due to another light source, 

such as a street lamp or other light 

fixture.


The fixture may be installed in 

shaded area.

Only need to relocate fixture.

No corrective action needed.

On cloudy or overcast days, the light

may stay on longer than anticipated.

Still on the manual override mode.

Turn off the light, then turn it on after 5 seconds.

False triggering caused by a heat 

source, such as a heater, dryer vent,  

or heated swimming pool.

Eliminate heat source or relocate fixture.

The knob is not set in any mode.

Rotate it again to the mode you want.

Day

Night

If the light 

stays on

231012

Summary of Contents for T0728

Page 1: ...d wire is securely connected 7 For general safety and to avoid any possible damage to the sensor be sure the power is switched off before replacing the bulb 8 Compatible with most LED dimmable bulbs H...

Page 2: ...und screw then depending on local code connect it to the house ground wire with the wire connector C Carefully put all of the wires back into the outlet box 4 Attach the backplate of the fixture to th...

Page 3: ...ration only The light will turn on automatically at dusk and turn off at dawn Auto Mode Off Mode Manual Override Manual Override Operation Diagram Turn wall switch OFF ON in 0 5 3 Seconds Turn wall sw...

Page 4: ...Motion Motion 150 TROUBLESHOOTING Refer to following information to solve your problems Set the rotary knob in the test mode for testing Night If the light isn t on SYMPTOM DAY NIGHT POSSIBLE CAUSE SO...

Page 5: ...ed for the products intended use operation in temperatures outside of the range specified in the instruction manual usage with improper power supply power surges or dips For coastal locations some cor...

Page 6: ...e que la energ a est apagada posici n off antes de reemplazar la bombilla 8 Compatible con la mayor a de las bombillas LED regulables Paquete de ferreter a incluido Informaci n importante Caracter sti...

Page 7: ...go local con ctelo al cable de descarga a tierra de la casa con el conector de cable C Vuelva a colocar con cuidado todos los cables en la caja de toma de corriente 4 Adjunte la placa posterior del ar...

Page 8: ...desactivaci n manual Apague Encienda el interruptor de pared en 0 5 3 segundos Apague Encienda el interruptor de pared en 0 5 3 segundos Fig 4 5 MODO de desactivaci n manual solo funcionamiento noctu...

Page 9: ...resolver los problemas Coloque la perilla rotatoria en el modo de prueba para comprobar el funcionamiento Noche Si la luz no est encendida S NTOMA D A NOCHE POSIBLE CAUSA SOLUCI N D a La perilla rota...

Page 10: ...os funcionamiento a temperaturas fuera del rango especificado en el manual de instrucciones uso con suministro de corriente inadecuado sobretensiones o ca das de energ a En las zonas costeras una cier...

Page 11: ...ur des raisons de s curit et pour viter d endommager le d tecteur assurez vous que l alimentation est coup e avant de remplacer l ampoule 8 Compatible avec la plupart des ampoules DEL modulables Mat r...

Page 12: ...aison l aide du connecteur de fil C Remettez soigneusement tous les fils dans la bo te de sortie 4 Fixez la plaque arri re du luminaire la plaque de montage A en ins rant les vis de montage du luminai...

Page 13: ...rr t manuel Sch ma de fonctionnement de la commande Arr t manuel teignez allumez l interrupteur mural en 0 5 3 secondes teignez allumez l interrupteur mural en 0 5 3 secondes Fig 4 5 MODE Arr t manuel...

Page 14: ...sibilit minimale Sensibilit maximale D tecteur Fig 8 Mouvement Mouvement 150 R SOLUTION DES PROBL MES Reportez vous aux informations suivantes pour r soudre vos probl mes Placer le bouton rotatif en m...

Page 15: ...s de la plage sp cifi e dans le manuel d instructions une utilisation avec une alimentation lectrique inappropri e des surtensions ou des baisses de tension Dans les r gions c ti res une certaine corr...

Reviews: