background image

4

Installation

Unpack the appliance and stove casing

The Madrona engine is supplied separately from the 
stove casings. The Traditional stove—MFCS01 (black) 
or MFCS02 (majolica brown)—and the Contemporary 
stove MFCS04 are each supplied in two cartons. You 
must have in hand the stove casing before starting the 
assembly of the appliance.

Unpack the carton carefully. 

We strongly recommend 

that you leave the engine sitting on the packaging 
base in which it came to avoid damaging the 
control valve, wires and pipes already attached 
to the engine until it is ready to insert in the stove 
casing.

Some parts are packed in the cardboard sleeve around 
the engine; make sure you take them all out of the 
packaging. Make sure you have all the components 
including the stove casing components before you start 
the installation.

CAUTION

LEAVE THE ENGINE ON ITS PACKAGING 
BASE to avoid damage to the control valve, 
wires and pipes until ready to insert into 
stove casing.

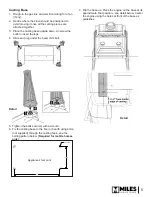
Casting Tolerances

Due to the nature of cast iron and concrete, dimen-
sional consistency may vary from one unit to the 
next and some variation in surface fi nish and fl at-
ness is to be expected. We have done our best to 
control and make allowance for this; however some 
variation is inevitable.

Floor Requirements

The Madrona heater is approved for installation 
directly on any combustible material other than soft 
fl ooring material such as carpet or vinyl.

Mobile Home Floor Fixing

The Madrona stove must be fi xed to the fl oor 
through the fl oor when used in a mobile home.

Mantel Requirements

The Madrona stove may be installed with a 
combustible mantel provided clearances are 
maintained as indicated above. Be aware that 
although safe, some combustible materials and 
fi nishes at the listed clearances may, over time, 
discolor, warp, or show cracks. Care should be 
taken when choosing materials—consult your 
fi replace dealer.

Summary of Contents for MADRONA MFCS01

Page 1: ...e listed heater models The application of this kit does not affect the venting capa bilities or method of preparation of the MF28 heater as de scribed in the MF28 heater installation manual To complet...

Page 2: ...anel Arched front panel Arched barrier screen Fret traditional MFCS01 3 black Base panel Square front panel with square barrier screen MFCS02 1 majolica Infill plate Top panel Legs 4 RH side panel LH...

Page 3: ...5 8 venting Suggested gas line access point through wall Route to avoid optional fan Pipe supplied with engine see engine manual p 18 x Mantel shelf clearances Mantel Depth A 0 1 0 26 mm 2 5 51 127 m...

Page 4: ...E ON ITS PACKAGING BASE to avoid damage to the control valve wires and pipes until ready to insert into stove casing Casting Tolerances Due to the nature of cast iron and concrete dimen sional consist...

Page 5: ...down Unscrew the bolts to insert the legs 4 Slide each leg under the head of its bolt 5 Tighten the bolts securely with a wrench 6 Fix the casting base to the floor or hearth using bolts not supplied...

Page 6: ...op Spar 1 Position the top spar on the side brackets located between the engine and the cast sides 2 Fix the spar with two 3 8 pre assembled screws provided Complete engine installation Refer to the e...

Page 7: ...hout removing the front casting Once the stove has cooled down and with extra care not to hit the glass of the window simply slide up the fret out of its brackets angle it up and remove it To put it b...

Page 8: ...8 9 10 Description Part no Description Part no Black Majolica Black Majolica 1 Base 4000926AH 4000926MJ 8 Infill Plate 4000927AH 4000927MJ 2 Top Panel 4000928AH 4000928MJ 9 Hook 2 4000990 with 400883...

Page 9: ...rni avec ce foyer r duit le risque de br lure en cas de contact accidentel avec la vitre chaude et doit tre install pour la protection des enfants et des personnes risques DANGER INSTALLATEUR Laissez...

Page 10: ...1 3 Panneau de base Devanture carr e MFCS01 1 ou MFCS02 1 MFCS01 2 ou MFCS02 2 MFCS01 3 ou MFCS02 3 Crochets Devanture carr e Base de feu Panneau du dessus Plaque de remplissage Base Pattes Panneau c...

Page 11: ...d acc s la conduite de gaz sugg r Orientez pour viter le ventilateur facultatif Tuyau fourni avec le foyer voir guide du foyer p 18 D gagements pour manteau ou tablette Profon deur A 0 1 0 26 mm 2 5...

Page 12: ...itaires peuvent avec le temps se d colorer se d former ou craquer S lectionnez les mat riaux avec soin et consultez votre marchand au besoin Installation D ballez l appareil et le casier de fonte Le f...

Page 13: ...ns rer les pattes 4 Glissez chaque patte sous la t te de son boulon 5 Resserrez les boulons l aide d une cl 6 Remettez la base l endroit Fixez la base de fonte par les pattes au plancher l aide de bou...

Page 14: ...dessus 1 Positionez la plaque du dessus sur les supports de c t s situ s entre le moteur et les c t s de fonte 2 Fixez la plaque du dessus avec deux vis de 3 8 pr assembl es Completez l installation d...

Page 15: ...de feu en fonte amovible Pour faciliter l acc s la soupape et au r cepteur de t l commande la base de feu peut tre enlev e sans avoir d crocher la devanture Une fois le po le refroidi et en prenant b...

Page 16: ...000926AH 4000926MJ 2 Dessus en fonte 4000928AH 4000928MJ 3 Pattes 4 4000929AH 4000929MJ 4 Panneau c t droit 4000930AH 4000930MJ 5 Devanture arqu e 4000934AH 4000934MJ 6 Base de feu 4000935AH 4000935MJ...

Reviews: