background image

Connect

Manual

Auto

If this function is set to Auto, connection between 
the Last Used phone and this unit will take place 
automatically as soon as the devices are less than 
a few meters apart. 

Pairing


Access the Bluetooth setup and press “Yes” option on the screen, then “Wait pairing” displays on 


the screen. Now you can pair a phone with the unit.


This unit can pair with 4 mobile phones in all, but just one can be active at a time.


The Default phone will be retained only if all other paired phones are deleted. (Default Phone: 


The phone that was first paired with the unit.)


When maximum pairing has been completed, that is, four mobile phones have been connected 


with the unit, and you want to still pair a new one, then the system will retain the default phone 


and last used phone used. The phone least used (except the default phone) will be deleted and 


the new paired phone will become the last used phone. (Last Used Phone: The phone connected 


with the unit that was used last.)


If you want pair your phone with the unit, the password 1234 is used to complete the pairing. 


When asked, enter this password in the phone you are pairing with this unit. 

Auto Connect


If the unit has been set to auto connect, it will attempt to connect to the last used phone first. If 


Auto Connect is not activated, the unit will return to the previous operating mode.


When the phone connects to the unit successfully, all of the cell phone’s Bluetooth enabled 


options will be active.

Making a phone cal

l


There are four ways to make a phone call from this unit:


1. Make use of the Number dial on the screen to make a call.


2. You can enter the phone number using the numeric keypad and press the OK button on the 


remote control to make a call. (must be in the Bluetooth mode)


3. You can open the phone book and select one to make a call directly. (Your cell phone must 


support this option)


4. If your phone supports voice dial, access this mode on your phone instead of using the 


Phonebook

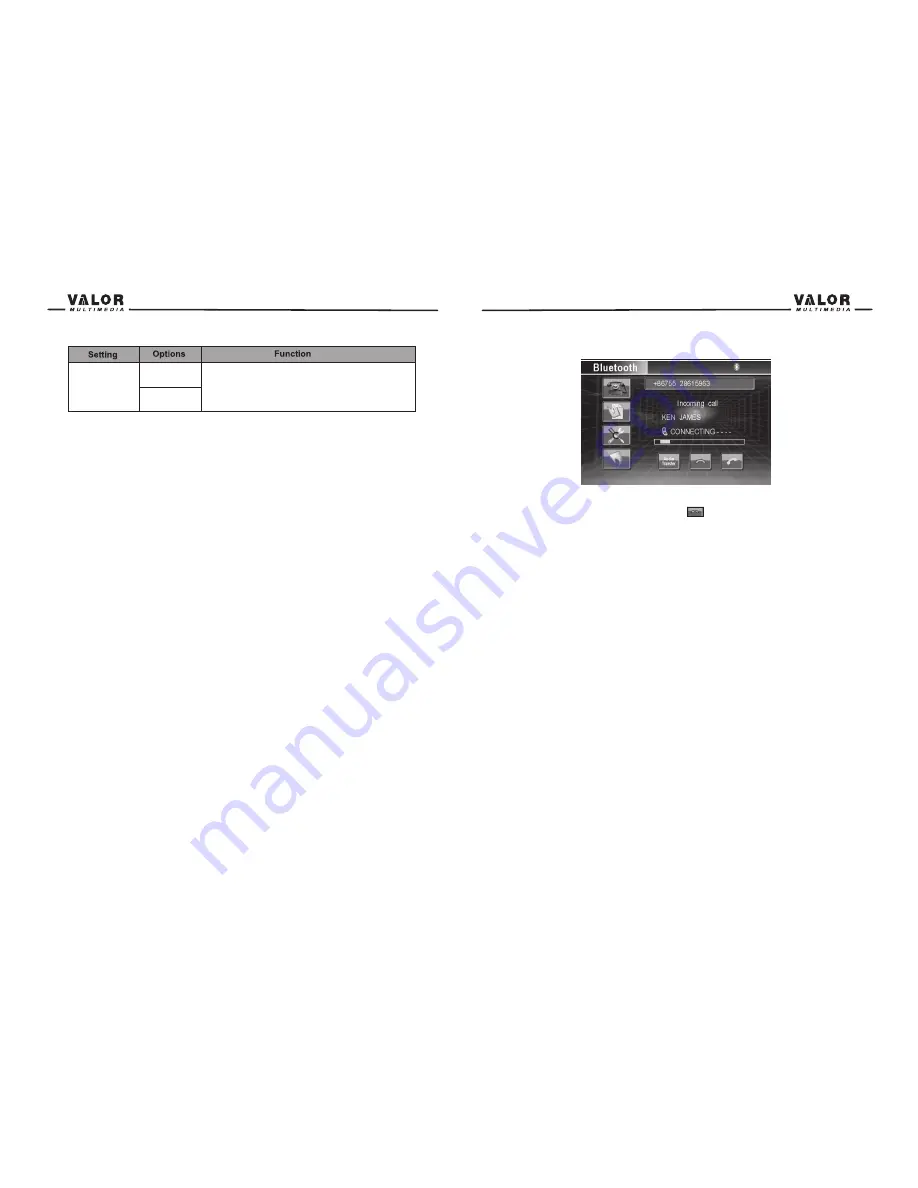
Answering an incoming call 


You can answer an incoming call even if the source other than the telephone is selected.


You can answer an incoming call automatically or manually (refer to Bluetooth setup and the 


Controls and Indicators title (Button Operation) for exact instructions)


When a call comes in, this interface will display on the screen:

End a call


Press the ESC button on the remote or touch the


icon to end a call.

46

47

NOTE: 

Not all handsets are compatible with the Bluetooth hands free system. 

Please check the compatibility list if you are experiencing connectivity problems. If 

you are experiencing operation problems, please contact your installation center for 

assistance. You may have an incompatible handset and your unit is functioning 

normally. 

Summary of Contents for NVG-720W

Page 1: ...NVG 720W ...

Page 2: ... Mechanism Accessing DVD Mode Using the Touch Screen Controls Controlling Playback Accessing the DVD Menu Moving Through Chapters Fast Forward Fast Reverse Selecting 2 Channel or 6 Channel Audio Playback GOTO Search Direct Chapter Track Selection Viewing an Alternate Picture Angle DVD Only Zooming Multi Language Discs DVD Only Playback Information General Disc Information DVD Setup Menu Accessing ...

Page 3: ...nt Built in 50W X 4 output amplifier 5 1 channel surround sound output Dual zone function with easy operation Smart Touch screen operation All functions can be operated by included Remote Controls Rear zone remote control operation Smart Dial remote control operation Built in Satellite Radio Control Built in iPod Control Navigation Ready Powerful Graphic User Interface and software update ability ...

Page 4: ...enu when the unit is on Press to answer an incoming call if the unit has been connected to a Bluetooth enabled cell phone 2 IR REMOTE CONTROL RECEIVER 3 SRC Press to select a source Press and hold to toggle rear zone mode On Off 4 MUTE Press the button to mute the volume and press the button again to restore the volume 5 PREVIOUS 6 NEXT 7 PLAY PAUSE Press to play pause 8 BLUETOOTH MICROPHONE 9 SD ...

Page 5: ...PEN Press the OPEN button to activate the motorized system and move the TFT monitor into viewing position Press again to close the TFT 19 DISP NAVI Press to display system information on the front LCD screen when the main screen is closed When main screen is open press to select Navigation mode 20 LCD DISPLAY 21 AS PS Auto store program scan Press to auto store strong radio stations in the 12 pres...

Page 6: ...ear Zone Remote Control 1 3 4 6 8 10 13 16 17 20 21 2 5 9 7 11 15 14 19 18 12 7 6 Select FM AM band on Tuner mode Stop playback Remote Control Front Zone Remote Control 1 2 3 4 5 6 7 8 9 10 11 12 13 14 15 16 17 18 19 20 21 22 23 24 25 26 27 28 Power Open Mute SRC Numeric button VOL up VOL down Information GOTO search Stop Band Select ESC Menu Picture Repeat A B OK Direction buttons Turn the power ...

Page 7: ...ing CD Turn on PBC while playing VCD Enter the main menu of the disc Previous Select the previous chapter track for playback Search an available radio station by decreasing tuning frequency on tuner mode Next Select the next chapter track for playback Search an available radio station by increasing tuning frequency on tuner mode Fast Reverse Fast Forward Fast reverse the disc content Fast forward ...

Page 8: ...while TFT Auto Open is On 11 10 TFT Monitor Operation Open Close TFT Monitor Press the button on the front panel or on the front zone remote control to open close the monitor TFT Monitor Auto Open If TFT Auto Open is On when the unit is turned on the monitor automatically opens to the last viewing position and closes automatically when the unit is turned off If TFT Auto Open is Off when the unit i...

Page 9: ...the AUX IN CAMERA Mode CAMERA mode is only available when the camera is connected and when backing up To install a rear view video camera connect the CAMERA video input cable to the rear view camera Output cable NOTE If you have not connected a device to the unit the source can not be selected Example If you have not connected an iPod to the unit the iPod source will not be available Volume Adjust...

Page 10: ...ter Volume Front Left Channel Volume Front Right Channel Volume Rear Left Channel Volume Rear Right Channel Volume Center Channel Volume Subwoofer Volume Item 00 to 40 10 to 10 10 to 10 10 to 10 10 to 10 10 to 10 10 to 10 6 Channel Audio Adjustments Rear Zone If a monitor is installed in the rear zone and connected to the rear zone AV output passengers in the back seat can control the DVD output u...

Page 11: ...meric button on the remote control or touch the numeric keypad on the screen to adjust the hour or minutes 5 Press the OK button on the remote control or on the keypad of the screen to confirm setup Return to normal playback The system will automatically return the previous playback mode that it was in before accessing the setup menu 20 seconds after the last operation 17 16 Selecting a Feature fo...

Page 12: ...omatically return the previous playback mode that it was in before accessing the setup menu 20 seconds after the last operation Bass Freq 60Hz 80Hz 100Hz 130Hz 150Hz 200Hz Depending on the audio source select the Bass Center Frequency to achieve the best Bass effect 19 18 ASP Audio Signal Processing Configuration Menu The ASP Configuration menu allows you to make fine audio adjustment Accessing th...

Page 13: ...y mode 2 In the standby mode the unit stands in low power state with audio output only 3 In the standby mode you can return to normal screen mode by performing any unit operation Treble Freq 10KHz 12 5KHz 15KHz 17KHz Depending on the audio source select the Treble Center Frequency to achieve the best Treble effect Selecting a crossover frequency sets a cut off frequency of the subwoofer s LPF low ...

Page 14: ...band if needed 2 Touch an on screen preset button 6 to select the corresponding stored station Auto Store AS Press the AS PS button on the panel or Press and hold the button on the screen to automatically scan and store all stations in current band 23 22 Tuner Operation 1 Current Source information touch this area to return to MAIN menu 2 Current Radio Band Indicator 3 Current Preset Station playi...

Page 15: ...closed Ejecting a Disc Press the button on the unit to eject the disc The unit automatically reverts to Tuner mode at the same time Reset the Loading Mechanism If the disc loads abnormally or does not play properly press and hold the button on the unit to reset the loading mechanism The disc is ejected and normal operation resumes Accessing DVD Mode To switch to DVD mode when a disc is already ins...

Page 16: ... multiple languages 8 Touch to display Sub title 9 Touch to return to DVD main menu Controlling Playback Stopping Playback Touch the stop button on the screen or press the button on the remote control to stop DVD play touch the play pause button on the screen or the OK button on the remote Control to resume disc play Pausing Playback Touch the play pause button on the screen to suspend or resume d...

Page 17: ...ion The following information is displayed at the top of the screen during DVD playback 1 Indicates Current playing source 2 Indicates the forth of 16 titles on the DVD is currently playing 3 Indicates the first of 20 chapters on the DVD is currently playing 4 Indicates the playback time of the current title 5 Indicates EQ setting or decoding mode when listening to a DVD with 5 1 surround sound 6 ...

Page 18: ...playing source 2 Indicates the forth of 16 tracks on the DVD is currently playing 3 Indicates the playback time of the current title 4 Indicates EQ Setting 5 Indicates the Loud Setting 6 Indicates the current system time 7 Indicates the current playback source of the rear zone General Disc Information Disc Symbols Rear Off Level 2 User ...

Page 19: ...ustment Once inside a menu press the on the remote control or touch the item directly to select the feature to be adjusted Adjusting a Feature 1 Enter the option field for the feature you want to adjust by pressing the OK button on the remote or by pressing SMART DIAL A submenu appears in a second row with the selected option 2 Select a new value by pressing the buttons on the remote control or ro...

Page 20: ... please refer to the disc description 35 34 NOTE For standard discs not formatted for widescreen use of the 16 9 aspect ratio will result in image distortion SPEAKER Menu Speaker Menu Features Speaker Mode Front Surround Subwoofer Center Full 6CH DownMix Large Small Large Small None Present None Large Small None 6 channel mode 2 channel mode If you select this mode the selections below will not be...

Page 21: ... 6 Touch to play pause 37 36 CD MP3 WMA JPEG Operation Instructions for Insert Eject Play Pause Stopping Playback Track Selection Fast Forward Fast Reverse Scan and Random Play are the same for DVD CD and MP3 operation Please see the DVD Player Operation section for information about these topics The file naming formats listed below are compatible with this unit ISO 9660 file name 12 characters fi...

Page 22: ...the screen to access a track directly 16 Current track total tracks 17 Elapsed playing time 18 Playback information 19 Volume indicator 38 7 Touch to stop disc playback 8 Touch to turn to the previous page 9 Touch to turn to the next page 10 Touch to display previous folder 11 Touch to display next folder 12 Touch to fast forward current track 13 Touch to activate deactivate Repeat Single Mode 14 ...

Page 23: ...e deactivate Repeat Single Mode 15 Touch to activate deactivate Random Mode 16 Touch to access root directory list 17 Touch to display a numeric keypad on the screen to access a track directly 18 Touch to display track list 19 Current track total tracks 20 Elapsed playing time 21 Playback information 22 Volume indicator According to the above instruction 16 when you press the button the touch scre...

Page 24: ...3 Touch to scan the previous available channel of all categories 14 Touch to scan the next available channel of all categories 15 Touch to scan the previous available channel of current category 16 Touch to scan the next available channel of current category 17 Touch to activate deactivate Scan Mode 18 Touch to display the numeric keypad on the screen to access a channel directly Auto Scan Touch t...

Page 25: ...Bluetooth User Interface Dial Interface 1 8 6 2 3 4 7 5 1 Current source indicator touch this area to access MAIN menu 2 Touch to access the dial interface 3 Touch to access the Phone book 4 Touch to access Bluetooth setup 5 Touch to switch the audio output between the unit and the mobile phone 6 Make use of these buttons to achieve some base functions of the phone 7 Touch to return to the previou...

Page 26: ...f Auto Connect is not activated the unit will return to the previous operating mode When the phone connects to the unit successfully all of the cell phone s Bluetooth enabled options will be active Making a phone call There are four ways to make a phone call from this unit 1 Make use of the Number dial on the screen to make a call 2 You can enter the phone number using the numeric keypad and press...

Page 27: ...e and apply parking brake Provlem Corrective Action Cause GENERAL Navigation Operation Access the Navigation mode 1 Access the MAIN menu and select the NAVI button on the touch screen to enter the Navigation Operation interface 2 Press the SRC button on the front panel or on the remote control to switch the source to Navigation Navigation Operation Please read the Navigation Software User Manual I...

Page 28: ...d Auto antenna not properly connected LOCAL function is activated Disc already inside unit Disc is warped or scratched Disc is dirty or wet Incompatible disc is used Disc rating exceeds Parental Lock rating limit Disc region code is not compatible with unit Disc is inserted upside down Disc is illegally copied PCB is not available on the disc PCB is on Disc is dirty or scratched File is damaged ba...

Page 29: ...n neutral detergent such as alcohol may result in scratching or discoloration 2 Keep off water and other liquid things 3 If the temperature inside the player gets too high a protective circuit automatically stops playing the disc And then please wait for the unit to cool down before operating the player again 4 Never insert anything other than a 5 12 cm compact disc into the player as the mechanis...

Page 30: ...rmat NTSC PAL auto detection Output 1Vp p 75 ohm buffered Input 1Vp p 75 ohm FM Tuner Section Tuning Range 87 5MHz 107 9MHz Mono Sensitivity 30dB 10dBu Quieting Sensitivity 50dB 15dBu Alternate Channel Selectivity 70dB Signal to Noise Ratio 1kHz 58dB Image Rejection 60dB Stereo Separation 1kHz 30dB Frequency Response 30Hz 15kHz 3dB AM Tuner Section Tuning Range 530kHz 1710kHz Sensitivity 20dB 20dB...

Reviews: