background image

- 7 -

2.6.  Connect the Device

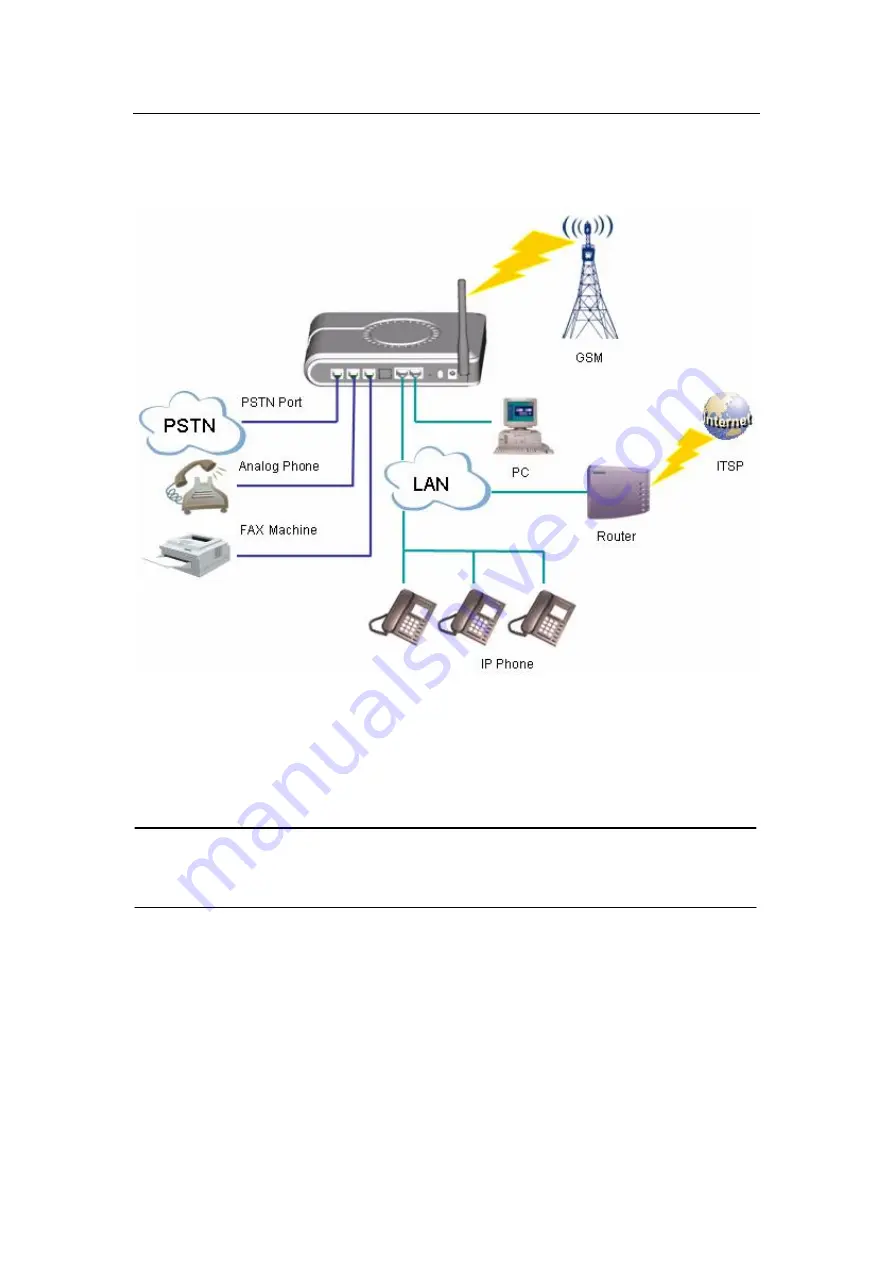
2.6.1. Connect diagram

2.6.2. Connect the power

Plug the DC end of the power adapter to the power socket on the device and the other
end to an available power outlet. Switch the power control which is located at the back
panel of the  -

to ON position and then the power indicator will light up indicating

the device is on.

WARNING!

n

Never use a power adapter other than the one provided with 

2.6.3. System Startup

The status light on the front panel will flash for a few moments during boot-up, and then
remain lit, indicating the device is on.

2.6.4. Connect the network

Connect the RJ11 port on the device to a Router/Switch by cable. The LAN indicator will
light if connected correctly.

www.vaidsys.ru

Glidervox

Glidervox

Summary of Contents for Glidervox-2G

Page 1: ...g VoiceMail Auto Attendant Hunt Group Ring Group Call Transfer Call Forward and much more which help businesses reduce communications costs and stay connected everywhere GLIDERVOX 2G IP PBX is an all...

Page 2: ...f PBX Features offers a full range of traditional PBX features like Call ID Call Forward Call Transfer Call Waiting and more All such features are available to both analog and VoIP extensions Auto Att...

Page 3: ...Email can be received as text message form by Mobile Voicemail The voice mail feature allows messages to be recorded when a particular extension can not be answered It is also possible to send partic...

Page 4: ...runk Configuration WEB Browser IVR Keypad Firmware Upgrade HTTP FTP 1 5 Hardware Specifications Network Interface Two 10 100Mbps Auto Negotiation RJ45 ports Analog Interface 2 RJ11 analog ports GSM In...

Page 5: ...n approved power supply of the type described in the operating instructions or marked on the equipment Use only the power adapter supplied with Unplug and refer servicing to a licensed technician when...

Page 6: ...of the onboard lines A Line is occupied if the indicator light is lit 2 5 Back Panel Line The Line connectors are RJ11 ports used for connecting incoming telephone lines Ext1 Ext2 The Ext1 and Ext 2...

Page 7: ...on and then the power indicator will light up indicating the device is on WARNING n Never use a power adapter other than the one provided with 2 6 3 System Startup The status light on the front panel...

Page 8: ...hone cable to wall phone jack of an incoming phone line and the other end to the line jack at the back of the WARNING l Never connect the line to the phone jack Otherwise the device may be damaged 3 C...

Page 9: ...rface overview After successful login the desktop screen will appear l Online Help center Click this icon to enter the online help center of l Application Manage Add remove or update the application o...

Page 10: ...ddress and DNS server address for the LAN port here Device s MAC address is shows in the Mac Address section 3 1 5 Control Panel This screen lets you change password for the login account modify syste...

Page 11: ...iately Through NTP Server Tick the option Auto Synchronize with Internet NTP Server The device will automatically synchronize time with the NTP server periodically You should select the time zone wher...

Page 12: ...ort and the login timeout of the HTTPD server If there is no action performed after the timeout specified here the Web screen will return to the login page Diagnostic Enter a destination host s IP add...

Page 13: ...en selected User need click start button at below to start debug if Manual is been selected Service Status Show the status of the debug mode Duration Specific the debug duration debug will automatical...

Page 14: ...patched to fix some minor bugs or perform some minor update to the firmware The whole system including the embedded Linux operation system can be updated by reprogramming the flash Just select the ap...

Page 15: ...te Changes to reload the IP PBX service without rebooting the device NOTE l Only one CODEC type is supported by at a time If you want to change to other CODEC type you should update the firmware to co...

Page 16: ...be used by the IP extension to register to the IPPBX l VoiceMail Select On to activate the voice mail box for the extension or Off to deactivate it l Email Notification Specific an Email address An e...

Page 17: ...ck the Extensions menu and Add IP Extension submenu The Add IP Extension screen will appear You can create an SIP account here l Number 3 16 The telephone number of an IP extension can be any number l...

Page 18: ...message l SMS Notify Number Specific a mobile number A message will be sent to that mobile phone whenever this extension has a new SMS message Click OK to submit and then click Save Reload to take im...

Page 19: ...ot ring when this service is activated l Unconditionally call forward Specific a phone number here and all incoming calls will be forwarded to that number automatically To deactivate this service just...

Page 20: ...he LCD screen of the phone as the caller name l Keep alive Select ON to allow device to check if the extension is reachable Default is OFF l VoiceMail Select On to activate the voicemail box for the e...

Page 21: ...or GSM1 Line1 l Line ID The Line ID is a readonly value It is generated by the system automatically and is used to identify each line in the system l Line Group Line Group consists of analog or VoIP...

Page 22: ...over to the next available line in the group when the line is busy Each onboard line belongs to different Onboard_Line group l External Number The PSTN number of the PSTN line connected to the Line po...

Page 23: ...e total number of the lines is 4 including lines added via VoIP gateway VoIP provider and VoIP trunk excluding the 2 onboard lines So the available number in the list of the Number of physical lines m...

Page 24: ...he line if Outgoing is selected both incoming and outgoing calls are allowed on the line if Both is selected l External Number The PSTN number of the PSTN line connected to the Line port of the gatewa...

Page 25: ...sponding fields of the lines you created in the Configure the Routing Once your gateway has been configured and its SIP or VoIP lines are registered with the System server the gateway must be configur...

Page 26: ...ve Select ON to allow device to check if the line is reachable Default is OFF l Number of VoIP lines Select the number of VoIP lines supplied by the VoIP provider and that you are actually using l Out...

Page 27: ...the line if Outgoing is selected both incoming and outgoing calls are allowed on the line if Both is selected l Line ID The Line ID is an internal number used by to identify each line Click the Finis...

Page 28: ...via SIP Trunk An advantage of SIP Trunk is that the two devices can call each other directly at any time as long as their IP addresses are reachable to each other with no registration needed between t...

Page 29: ...calling If no value is specified here no authentication is performed when a call comes in l Inbound Auth Password The authentication password associated with the inbound authentication ID l Outbound...

Page 30: ...utbound rule defines on which line an outbound call should be placed This allows you to create a set of rules which specifies how a call should be made based on which extension is making the call and...

Page 31: ...table n Begin with Only numbers begin with the specified value will be accepted n End with Only numbers end with the specified value will be accepted n Include with Numbers with the specified value wi...

Page 32: ...of the Extension Incoming calls will be routed to the voicemail box of the selected extension Click OK to submit the changes and then click Save Reload to reload the system to take immediate effect Cl...

Page 33: ...he outbound rule before it is routed to a selected line l Postfix User can add postfix to a number that has been caught by this outbound rule before it is routed to a selected line NOTE l Strip Digit...

Page 34: ...o the rule name and clicking the Delete button on the top left of the table or clicking the rule name to enter the Edit Outbound Rule screen if you want to modify the rule 3 5 3 Operation number Click...

Page 35: ...gh Click to enable the FXS port dial as part of the dialed number The default is disabled l Edit the rules Use can edit the rules just like using the notepad Click OK to save or Cancel to abort the ch...

Page 36: ...and have the general sales number ring on all 3 extensions at the same time or after each other When you create a ring group you also assign it a virtual extension number This will be the number used...

Page 37: ...s it Click OK to submit the changes and then click Save Reload to reload the system to take immediate effect 3 6 2 Voice Menu The auto attendant feature allows to answer incoming calls automatically a...

Page 38: ...software and save the voice file in wav format and then upload it to the device via Voice Prompt page Click the Advanced menu and Voice Menu submenu The Voice Menu Manage page will appear Manage Voic...

Page 39: ...he menu options n No Action No action will be taken The system will send an error message to the user and ask for another input n Repeat prompt Replay the voice prompt n Connect to Extension System wi...

Page 40: ...pt Click the Advanced menu and Voice prompt submenu The Voice prompt Manage page will appear 3 6 4 Custom Prompt Click the Advanced menu and Custom Prompt submenu The Custom Prompt Manage page will ap...

Page 41: ...out of the call queue on a first in first out basis as members become available Usually Call Queue is used for attendants who need to handle many incoming calls supports only one call queue for atten...

Page 42: ...n click Save Reload to reload the system to take immediate effect 3 6 6 Call Pickup You can accept an incoming call that is ringing at another extension which belongs to the same pickup group as your...

Page 43: ...an be added l Name A description name for memorization l Pickup Group Members Select the extensions that should be members of this pickup group Click OK to submit the changes and then click Save Reloa...

Page 44: ...fice time in this page so the inbound call route can be controlled by different time factor 3 6 8 Call Back Click the Advance menu and Cal Back submenu The Call Back setting page will appear Caller ID...

Page 45: ...anges and then click Save Reload to reload the system to take immediate effect 3 6 9 Call Park Click the Advance menu and Cal Park submenu The Call Park setting page will appear Park Number start Defi...

Page 46: ...ered extension is in the range of 604800 second The extension can keep their own registry expire value n When this parameter does not have a value and the registry expire value of the registered exten...

Page 47: ...how many records will be deleted when the CDR is full Click OK to submit the changes and then click Save Reload to reload the system to take immediate effect Check the Call Detail Record Click the St...

Page 48: ...erver and stop ringing l Ring Timeout for Call Forward 1575s Define the ringing timeout time when call forward is activated for how long the phone will ring until it forward calls and stop ringing 3 7...

Page 49: ...This is a read only parameter It shows how many messages can be saved in each voicemail box Its value changes according to the above two parameters l SMTP Server Assign a simple mail transfer protoco...

Page 50: ...ng When extension port received an incoming call either via line port or via VoIP polarity reversal signal will be generated when remote phone is picked up or hung up n When outgoing When extension po...

Page 51: ...System Restore Click the General menu and ROXos Restore submenu The ROXos Restore page will appear l Create restore data Click this button and a system data restoration file will be generated l Downlo...

Page 52: ...orner of the wizard window to move forward or back The web interface will jump to corresponding pages automatically according to the wizard User can then click the house icon at the top right corner o...

Page 53: ...53 e The name of message receiver should be filled in country code followed with mobile phone number delegates a symbol or symbols www vaidsys ru...

Page 54: ...54 www vaidsys ru...

Page 55: ...Outbound Rules l Pick up your extension s handset l Listen for the dial tone l Dial the outbound prefix of the calling rule l Dial the PSTN number followed by 6 1 3 Making outgoing PSTN calls via VoIP...

Page 56: ...en to the dial tone l Dial the outbound prefix of the VoIP trunk line group l Dial the number followed by 6 2 Receiving calls When receiving calls either from PSTN or VoIP your phone will ring Just li...

Page 57: ...function is enabled or not A tip will show up when you put your mouse over the icon 6 2 3 Call Transferring You can transfer an incoming call to another number during conversation l During conversatio...

Page 58: ...be forwarded to A voice prompt can be heard telling you the successful activation of the call forwarding no answer function To deactivate call forwarding no answer n Pick up your IP phone s handset n...

Page 59: ...d call will be picked up in the new destination 6 3 Using Voicemail If voicemail is enabled on an extension incoming calls will be forwarded to voicemail if the extension is busy or no one answers aft...

Page 60: ...ng no answer function for the extension where X represents the number you want the call to be forwarded to 971 Deactivate call forwarding no answer function 976X Activate call forwarding off line func...

Reviews: