background image

Specifications 

5-1

5 Specifications

Note  

Specifications are subject to change without notice.

Item

Description

Printing 
Method

Electrophotographic four color (CMYK) printing using tandem (4) drum system

Printing 
Speeds

Cassette

A4: 30 ppm, B5, A5, A6: 

27

 ppm

*1

, Letter: 32 ppm, Legal: 26 ppm

MP Tray

A4: 27 ppm, B5, A5, A6: 27 ppm

*1

, Letter: 28 ppm, Legal: 23 ppm

Duplex Printing Speed

A4: 30 ppm, B5, A5: 

27

 ppm

*1

, Letter: 32 ppm, Legal: 15 ppm

Resolution

600 dpi

First Print Out Time

When EcoPower is OFF, B/W : 8.5 seconds or less / Color : 10.0seconds or less
When EcoPower is ON, B/W : 38.5 seconds or less / Color : 40.0 seconds or less

Warm-up Time 
(22°C, 
60%RH)

Power On

36 seconds or less

Sleep 
(within 3 hours)

30 seconds or less

Controller

PowerPC750CL-600 MHz

Memory

Standard

256 MB

Maximum

1280 MB

Operating Systems

Microsoft Windows 2000/XP/Vista, Windows Server 2003
Apple Macintosh OS X

Interface

Standard

USB: Hi-Speed USB
Network: 10 BASE-T/100 BASE-TX
KUIO-LV slot

Option

Hard Disk

Memory Card Slot

1 (Compact Flash, 4 GB or less)

Monthly Duty

Average

3,000 pages (plain, A4 paper)

Maximum

100,000 pages (plain, A4 paper)

*1 : After 16 pages the printing speed becomes 14 ppm.

Summary of Contents for CLP 3630

Page 1: ...instruction handbook colour printer CLP 3630 basic ...

Page 2: ......

Page 3: ...arameters 2 2 Printing a Network Interface Status Page 2 10 Installing the Printer Driver 2 11 Printing from Application Software 2 17 Status Monitor 2 18 Uninstalling Software Windows PC 2 22 3 Maintenance General Information 3 2 Toner Container Replacement 3 2 Replacing the Waste Toner Box 3 6 Cleaning the Printer 3 8 4 Troubleshooting General Guidelines 4 2 Print Quality Problems 4 3 Error Mess...

Page 4: ...iv ...

Page 5: ...pies made of all or part of this guide any copyrightable subject must contain the same copyright notice as the material from which the copying is done Regarding Tradenames PRESCRIBE is a registered trademark of Kyocera Corporation KPDL is trademark of Kyocera Corporation Hewlett Packard PCL and PJL are registered trademarks of Hewlett Packard Company Centronics is a trade name of Centronics Data C...

Page 6: ...ect proprietary rights of Monotype Imaging you agree to maintain the Software and other proprietary information concerning the Typefaces in strict confidence and to establish reasonable procedures regulating access to and use of the Software and Typefaces 4 You agree not to duplicate or copy the Software or Typefaces except that you may make one backup copy You agree that any such copy shall conta...

Page 7: ...ESS WRITTEN AND SIGNED BY PROPERLY AUTHORIZED REPRESENTATIVES OF EACH PARTY BY OPENING THIS DISKETTE PACKAGE YOU AGREE TO ACCEPT THE TERMS AND CONDITIONS OF THIS AGREEMENT GPL Firmware of this machine is using in part the GPL applied codes www fsf org copyleft gpl html Open SSLeay License Copyright 1998 2006 The OpenSSL Project All rights reserved Redistribution and use in source and binary forms ...

Page 8: ...llowing conditions are aheared to The following conditions apply to all code found in this distribution be it the RC4 RSA lhash DES etc code not just the SSL code The SSL documentation included with this distribution is covered by the same copyright terms except that the holder is Tim Hudson tjh cryptsoft com Copyright remains Eric Young s and as such any Copyright notices in the code are not to b...

Page 9: ... BE LIABLE FOR ANY DIRECT INDIRECT INCIDENTAL SPECIAL EXEMPLARY OR CONSEQUENTIAL DAMAGES INCLUDING BUT NOT LIMITED TO PROCUREMENT OF SUBSTITUTE GOODS OR SERVICES LOSS OF USE DATA OR PROFITS OR BUSINESS INTERRUPTION HOWEVER CAUSED AND ON ANY THEORY OF LIABILITY WHETHER IN CONTRACT STRICT LIABILITY OR TORT INCLUDING NEGLIGENCE OR OTHERWISE ARISING IN ANY WAY OUT OF THE USE OF THIS SOFTWARE EVEN IF A...

Page 10: ...ct the equipment into an outlet on a circuit different from that to which the receiver is connected Consult the dealer or an experienced radio TV technician for help The use of a non shielded interface cable with the referenced device is prohibited CAUTION The changes or modifications not expressly approved by the party responsible for compliance could void the user s authority to operate the equi...

Page 11: ...ass I 1 laser products and elsewhere is certified as a Class I laser product conforming to the requirements of IEC 825 Radio Frequency Transmitter This machine contains a transmitter module We the manufacturer UTAX GmbH hereby declare that this equipment page printer model CLP 3630 is in compliance with the essential requirements and other relevant provisions of Directive 1999 5 EC Radio Tag Techn...

Page 12: ...ars any of the following labels For Europe Asia and other countries For U S A and Canada High temperature inside Do not touch parts in this area because there is a danger of getting burned Label inside the printer Laser radiation warning ...

Page 13: ...we recommend you not to install the printer in a confined area where ventilation is blocked Safety Instructions Regarding the Disconnection of Power Caution The power plug is the main isolation device Other switches on the equipment are only functional switches and are not suitable for isolating the equipment from the power source VORSICHT Der Netzstecker ist die Hauptisoliervorrichtung Die andere...

Page 14: ...minformations Verordnung 3 GPSGV 06 01 2004 Der höchste Schalldruckpegel beträgt 70 dB A oder weniger gemäß EN ISO 7779 Disclaimer UTAX GmbH will not be liable to customers or any other person or entity for any loss or damage caused or alleged to be caused directly or indirectly by equipment sold or furnished by us including but not limited to any interruption of service loss of business or antici...

Page 15: ...ion Guide Automatic 2 Sided Print Function This device includes 2 sided printing as a standard function For example by printing two 1 sided originals onto a single sheet of paper as a 2 sided print it is possible to lower the amount of paper used For more information refer to Duplex Duplex Printing section of the Advanced Operation Guide Paper Recycling This device supports the recycled paper whic...

Page 16: ...moved after installation CAUTION Avoid placing the printer on or in locations which are unstable or not level Such locations may cause the printer to fall This type of situation presents a danger of personal injury or damage to the printer Avoid locations with humidity or dust and dirt If dust or dirt becomes attached to the power plug clean the plug to avoid the danger of fire or electrical shock...

Page 17: ... electrical shock Plug the power cord securely into the outlet If metallic objects come in contact with the prongs on the plug it may cause a fire or electric shock Always connect the printer to an outlet with a ground connection to avoid the danger of fire or electrical shock in case of an electric short If an earth connection is not possible contact your service representative WARNING Keep the p...

Page 18: ...ve the power plug from the outlet to avoid the danger of fire or electrical shock Then contact your service representative Do not remove or connect the power plug with wet hands as there is a danger of electrical shock Always contact your service representative for maintenance or repair of internal parts Do not pull the power cord when removing it from the outlet If the power cord is pulled the wi...

Page 19: ...ds They could be damaged by static electricity Do not attempt to perform any operations not explained in this handbook If the printer will not be used for an extended period of time remove the paper from the cassette return it to its original package and reseal it Cautions for Toner Handling Do not incinerate toner and toner containers Dangerous sparks may cause burn Never open the toner container...

Page 20: ... phrase or reference to additional information To replace the toner container refer to Toner Container Replacement on page 3 2 Bold Used to denote buttons on the software To start printing click OK Braket Bold Used to denote operation panel keys Press GO to resume printing Note Used to provide additional or useful information about a function or feature Note Check with your network administrator f...

Page 21: ...ons Try to be familiar with the names and functions of these parts for correct use and optimal performance This chapter contains explanations on the following topics Components at the Front of the Printer 1 2 Components at the Left of the Printer 1 2 Internal Components 1 3 Components at the Rear of the Printer 1 3 Operation Panel 1 4 ...

Page 22: ... Top Tray 5 MP Multi Purpose Tray 6 Paper Cassette 7 Power Switch Components at the Left of the Printer 8 Left Cover 9 Waste Toner Box 10 Main Charger Units on the Drum Units 11 Magenta Toner Container M 12 Cyan Toner Container C 13 Yellow Toner Container Y 14 Black Toner Container K 2 5 6 1 3 7 4 8 9 10 11 12 13 14 ...

Page 23: ...Ramp 17 Duplex Unit 18 Envelope Switch Components at the Rear of the Printer 19 USB Memory Slot 20 Power Cord Connector 21 Option Interface Slot 22 Network Indicators 23 Network Interface Connector 24 USB Interface Connector 25 Rear Cover 18 19 20 21 22 23 24 25 15 17 16 ...

Page 24: ...1 4 MachineParts Operation Panel 26 Message Display 27 Ready Indicator 28 Data Indicator 29 Attention Indicator 30 Arrow Keys 31 MENU Key 32 OK Key 33 GO Key 34 Cancel Key 26 27 28 29 30 31 32 33 34 ...

Page 25: ...g Operation This chapter contains explanations on the following topics Changing Network Interface Parameters 2 2 Printing a Network Interface Status Page 2 10 Installing the Printer Driver 2 11 Printing from Application Software 2 17 ...

Page 26: ... press U or V the selection changes Refer to the explanations below when specifying the settings Set this item to On when you connect to a network using TCP IP Submenu has items including DHCP IP Address Subnet Mask Gateway and Bonjour Set this item to On when you connect to a network using TCP IP IPv6 Submenu has items including RA Stateless and DHCPv6 Note After all network related settings have...

Page 27: ... are setting IP Address Subnet Mask and Gateway 4 Press U or V to select On or Off as the setting for DHCP and Bonjour For the IP Address Subnet Mask and Gateway settings press U or V to move the blinking cursor to the number you want to change 000 to 255 Use Y and Z to move the cursor right and left 5 Press OK 6 Press MENU The display returns to Ready Note Check with your network administrator fo...

Page 28: ... question mark appears while you are setting RA Stateless and DHCPv6 4 Press U or V to select On or Off as the setting for RA Stateless and DHCPv6 5 Press OK 6 Press MENU The display returns to Ready NetWare AppleTalk IPP SSL Server IPSec and Security Level settings 1 Press MENU 2 Press U or V repeatedly until Security appears Note Check with your network administrator for the network address sett...

Page 29: ...en you connect to a network using NetWare In submenu frame mode can be selected from Auto 802 3 Ethernet II SNAP and 802 2 AppleTalk must be activated On for networking with Macintosh computers Set this item to On when you connect to a network using IPP Set this item to On when you connect to a network using SSL Server Submenu has items including DES 3DES AES IPP over SSL and HTTPS Set this item t...

Page 30: ...s set to Off use U or V to select On and press OK 2 Press Z 3 Press OK A blinking question mark appears Each time you press U or V the selection changes 4 Display the item you want to set and press OK 5 Press MENU The display returns to Ready Security Level High NetWare On Frame Type Auto Frame Type 802 3 Frame Type Ethernet II Frame Type SNAP Frame Type 802 2 Frame Type Auto ...

Page 31: ... Press OK A blinking question mark appears 3 Press OK again 4 Press MENU The display returns to Ready IPP This section explains the procedure for enabling IPP 1 Enter the administrator ID and password Then if IPP is set to Off use U or V to select On 2 Press OK A blinking question mark appears 3 Press OK again 4 Press MENU The display returns to Ready AppleTalk On AppleTalk On IPP On IPP On ...

Page 32: ...nt to set and press OK A blinking question mark appears 4 Select On or Off using U or V 5 Press OK 6 Press MENU The display returns to Ready IPSec This section explains the procedure for enabling IPSec 1 Enter the administrator ID and password Then if IPSec is set to Off use U or V to select On 2 Press OK A blinking question mark appears 3 Press OK again 4 Press Menu The display returns to Ready S...

Page 33: ...Printing Operation 2 9 Security Level Security Level is primarily a menu used by service personnel for maintenance work There is no need for customers to use this menu Security Level High ...

Page 34: ...ation Registration Normal Registration Details Restart Printer Service IMPORTANT Service is primarily a menu used by service personnel for maintenance work There is no need for customers to use this menu 1 Press MENU 2 Press U or V repeatedly until Adjust Maintenance appears 3 Press Z while Adjust Maintenance is displayed 4 Press U or V repeatedly until Service appears 5 Press Z 6 Press U or V rep...

Page 35: ...d start up Windows If the Welcome to the Found New Hardware Wizard dialog box displays select Cancel 2 Insert the CD ROM supplied with the printer into the optical drive of the PC In Windows Vista the user account management window appears Click Allow The installation program launches 3 Click View License Agreement and read the License Agreement Click Accept 4 Click Install software The software i...

Page 36: ...a a network It does not appear if the print system is connected via a USB 4 A window appears in which you can check the settings Check the settings carefully and then click Install 5 A message appears saying that the printer has been installed successfully Click Exit to exit the printer installation wizard and return the CD ROM main menu If the device setup dialog box appears after you click Exit ...

Page 37: ...ollowing the instructions in the install wizard window select the software packages to be installed and the specify the port etc For details refer to Custom Installation in the printer driver operation manual on the CD ROM Installation on a Macintosh 1 Turn on the printer and the Macintosh 2 Insert the included CD ROM Product Library into the CD ROM drive 3 Double click the CD ROM icon 4 Double cl...

Page 38: ...he operating system This completes the printer driver installation Next specify the print settings If an IP or AppleTalk connection is used the settings below are required If a USB connection is used the printer is automatically recognized and connected 8 Open System Preferences and click Print Fax 9 Click the plus symbol to add the installed printer driver Note In addition to Easy Install the Ins...

Page 39: ...icon for an IP connection or the AppleTalk icon for an AppleTalk connection and then enter the IP address and printer name 11Select the installed printer driver and click Add 12Select the options available for the printer and click Continue ...

Page 40: ...2 16 PrintingOperation 13The selected printer is added This completes the printer setup procedure ...

Page 41: ...t Print The Print dialog box displays 3 Click the drop down list of printer names All the printers installed in Windows are listed Click the name of the machine 4 Use Number of copies to enter the number of prints required Up to 999 copies can be entered For Microsoft Word we recommend that you click Options and specify Use printer settings for the Default tray 5 To start printing click OK 3 4 Not...

Page 42: ...e launched for each printer that issues the request Launch from the KX driver properties Click the About button in the KX driver Properties dialog box Then click Status Monitor in the About dialog box to launch the Status Monitor Exiting the Status Monitor Use either of the methods listed below to exit the Status Monitor Exit manually Right click the Status Monitor icon in the taskbar and select E...

Page 43: ...displayed in the taskbar notification area When you position the cursor over the icon the printer name appears Right clicking the Status Monitor icon allows you to set the options below Show the status monitor Displays or hides the Status Monitor icon Configure If the printer is connected to a TCP IP network and has its own IP address use a web browser to access the Embedded Web Server to modify o...

Page 44: ...d file can be selected if you require an audible notification Click Browse to search for the sound file Use Text to speech Select this check box to enter text you would like to hear played for events Although a sound file is unnecessary this function is applicable for Windows XP or later To use this function follow these steps 1 Select Enable Event Notification 2 Select an event to use with the te...

Page 45: ...pearance tab is contains the following items Enlarge window Doubles the size of the Status Monitor window Always on top Positions the Status Monitor in front of other active windows Transparency Displays the Status Monitor as a transparent window ...

Page 46: ...brary 1 Exit all active software applications 2 Insert the enclosed CD ROM Product Library into the CD ROM drive 3 Following the procedure used to install the printer driver click Remove Software The Uninstaller wizard appears 4 Select the software package to remove 5 Click Uninstall The uninstaller starts 6 When Uninstall complete screen appears click Next 7 Select whether you restart your comput...

Page 47: ...aintenance 3 1 3 Maintenance This chapter contains explanations on the following topics General Information 3 2 Toner Container Replacement 3 2 Replacing the Waste Toner Box 3 6 Cleaning the Printer 3 8 ...

Page 48: ...s For best results we recommend that you only use genuine UTAX Parts and Supplies Should any damage be caused by the application of a toner other than the original UTAX toner then this damage is excluded from the guarantee The toner kits are supplied in 4 different colors cyan magenta yellow and black Note Information Collection on Memory Chips The memory chip attached to the toner container is de...

Page 49: ... above message and continue printing the printer displays the message Replace toner just before the toner is used up The toner container must be replaced immediately Clean the separate charger wires etc After the cleaning is finished however the message does not automatically change to Ready To restart printing you must press GO and make the printer ready In either case replace the toner container...

Page 50: ...ginal UTAX toner containers For optimum performance it is also recommended to use only the UTAX toner containers which are specifically intended for use in your country or region If the toner container for another destinations is installed the printer will stop printing To replace the toner container first make sure of the color of the toner container requiring replacement In this example it is as...

Page 51: ...e toner container or touch the toner feed slot 6 Set the new toner container in the printer as shown in the figure below 7 Push down on the top of the toner container to install it firmly in place Use the same procedure to replace the other color toner containers 8 Close the top cover top tray Proceed to the next section Note If the top cover top tray does not close check that the new toner contai...

Page 52: ...ver and then gently remove the waste toner box 3 Close the cap to the old waste toner box after removing the box from the printer 4 To prevent toner from spilling put the old waste toner box in the plastic bag contained in the toner kit and discard it later according to the local code or regulations for waste disposal Note Remove the waste toner box as gently as possible so as not to scatter the t...

Page 53: ... box is set correctly it will snap into place 7 Make sure that the waste toner box is correctly inserted and close the left cover After replacing the toner containers and the waste toner box clean the paper transfer unit For instructions refer to Cleaning the Printer on page 3 8 Cap New Waste Toner Box New Waste Toner Box ...

Page 54: ...It should also be cleaned if streaking or lines appear on printed copies or if printouts appear faint or blurred Cleaning the Paper Transfer Unit Print problems such as soiling of the reverse side of printed pages may occur if the paper transfer unit becomes dirty To clean the paper transfer unit you must use the dry cloth CAUTION Components inside the fuser cover are hot Do not touch it with your...

Page 55: ...letely Paper Ramp Transfer Belt Black Dry Cloth Registration Roller Metal Transfer Roller Black Duplex Unit Paper Transfer Unit Note Be careful not to touch the black transfer roller and black transfer belt during cleaning as this may adversely affect print quality Note Take care not to get your hands caught in the front cover when you close it ...

Page 56: ...3 10 Maintenance ...

Page 57: ...leshooting This chapter contains explanations on the following topics General Guidelines 4 2 Print Quality Problems 4 3 Error Messages 4 6 Clearing Paper Jams 4 12 If a problem cannot be corrected contact your service technician ...

Page 58: ...l even when power is turned on and the fan makes no noise Check that the power cord is properly plugged into the power outlet Turn off the printer s power plug in the power cord securely and try turning on the printer s power again Check that the power switch is in the On position Set the power switch to the On position The printer prints a status page but does not print jobs from the computer Che...

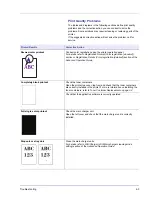
Page 59: ...ection or Registration Details Color registration detailed section of the Advanced Operation Guide Completely blank printout Check the toner containers Open the printer top cover top tray and check that the toner containers are correctly installed in the printer For more information on installing the toner containers refer to Toner Container Replacement on page 3 2 Check that the application softw...

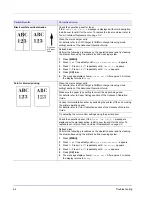
Page 60: ...arger cleaning mode setting section of the Advanced Operation Guide Make sure the paper type setting is correct the paper being used For details refer to Paper Settings section of the Advanced Operation Guide Conduct color calibration either by switching the printer off then on or using the printer operation panel For details refer to Color Calibration section of the Advanced Operation Guide Try a...

Page 61: ...ce Adjust Maintenance selection setting section of the Advanced Operation Guide Dirt on the top edge or back of the paper Check the paper chute and the ramp Pull out the paper transfer unit and check for toner on the paper ramp Clean the paper ramp using a soft dry lint free cloth For details refer to Cleaning the Paper Transfer Unit on page 3 8 Clean the main charger units For details refer to LS...

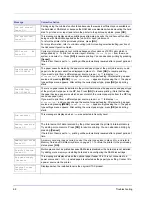
Page 62: ...displayed Call service 0123456 represents a mechanical error 0 1 2 Call for service The printer does not operate when this message is displayed The total number of pages printed is also indicated e g 0123456 Canceling data Displayed when data is being canceled Cassette not loaded The corresponding paper cassette is not installed Install the cassette The cassette number can be 1 topmost to 4 bottom...

Page 63: ...ion refer to Job Accounting Job Accounting selection setting section of the Advanced Operation Guide File not found Press GO The specified file was not found on the hard disk RAM disk or memory card For more information on the hard disk RAM disk and memory cards refer to Device Common Selecting Setting the common device section of the Advanced Operation Guide Format error Hard disk The hard disk i...

Page 64: ...ay A4 PLAIN There is no paper cassette installed in the printer that matches the paper size and paper type of the print job Set paper in the MP tray Press GO to resume printing Note that feeding the paper having a paper size which does not match the current paper size from the MP tray can cause paper jam If you want to print from a different paper source press U or V to display Use alternative and...

Page 65: ...er using a new toner kit Color of the toner container that needs to be replaced is represented by C Cyan M Magenta Y Yellow and K Black Top tray paper full The top tray has become full approx 250 pages You must remove all printed pages from the top tray When the printer detects that the top tray is empty again the printer will continues printing into the top tray Unknown toner installed Displayed ...

Page 66: ...urned off and then on reformat the hard disk 02 The disk system is not installed Recheck the requirements for using the system and the devices 04 There is no available hard disk space Delete unnecessary files etc in order to free up space 05 The specified file does not exist in the hard disk 06 There is no memory available to the hard disk system Increase the available memory 10 Formatting is not ...

Page 67: ...memory card s status 04 There is not enough space in the memory card Delete unnecessary files or use a new memory card 05 The specified file is not on the memory card or the USB memory 06 There is not enough printer memory to support the memory card system Increase printer memory 50 The memory card is write protected or invalid Check the memory card s status Code Meaning 01 Format error Try turnin...

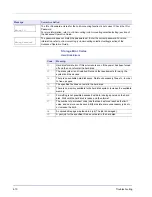
Page 68: ...e start printing Possible Paper Jam Locations The figure below explains the printer s paper paths including the options The locations where paper jams might occur are also shown here with each location explained in the table below Paper jams can occur in more than one component on the paper paths Paper Jam Message Description Reference Page Paper jam Printer Paper is jammed inside the printer pape...

Page 69: ...ng jams Press when the paper jam message has appeared Then a help message will appear to facilitate jam clearing in the location Paper jam at Cassette Paper is jammed at paper cassette 1 First open the printer s front cover and check for paper jams in the paper transfer unit For more information refer to Paper Jam in Printer on page 4 14 2 Pull out the paper cassette and remove the jammed paper Pa...

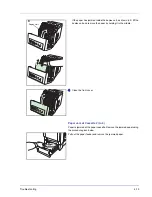
Page 70: ... not touch it with your hands as it may result in burn injury 1 Press the lever to release the lock 2 Pull the front cover towards you 3 If the paper has jammed near the registration roller as shown in A remove the paper by pulling it up from the center If the paper has jammed inside the fuser unit as shown in B open the fuser cover and remove the paper by pulling its edge A Registration Roller B ...

Page 71: ...lift the duplex unit and remove the paper by holding it in the middle 4 Close the front cover Paper Jam at Cassette 2 to 4 Paper is jammed at the paper cassette Remove the jammed paper using the procedure given below Pull out the paper feeder and remove the jammed paper C Duplex Unit ...

Page 72: ...4 16 Troubleshooting ...

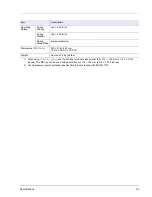
Page 73: ...ower is OFF B W 8 5 seconds or less Color 10 0seconds or less When EcoPower is ON B W 38 5 seconds or less Color 40 0 seconds or less Warm up Time 22 C 60 RH Power On 36 seconds or less Sleep within 3 hours 30 seconds or less Controller PowerPC750CL 600 MHz Memory Standard 256 MB Maximum 1280 MB Operating Systems Microsoft Windows 2000 XP Vista Windows Server 2003 Apple Macintosh OS X Interface St...

Page 74: ...s bond recycled rough letterhead color prepunched envelope cardstock coated thick high quality and custom MP Tray Plain transparency preprinted labels bond recycled vellum rough letterhead color prepunched envelope cardstock coated thick high quality and custom Paper Feed Source Capacity Cassette 500 sheets 80 g m2 MP Tray 150 sheets 80 g m2 Margin 4 mm left right top and bottom Output Tray Capaci...

Page 75: ...x H 345 518 480 mm 13 5 8 20 2 5 18 9 10 Weight Approx 29 5 kg 65 lbs When using CUSTOM 1 to 8 use the MP tray for paper sizes smaller than 105 148 mm 4 1 8 5 13 16 inches The MP tray can be used with paper sizes over 70 138 mm 2 3 4 5 7 16 inches Sound pressure level at bystander position front in accordance with EN ISO 7779 Item Description ...

Page 76: ...5 4 Specifications ...

Page 77: ...E1 We recommend the use of our own brand supplies We will not be liable for any damage caused by the use of third party supplies in this machine ...

Page 78: ...UTAX GmbH Ohechaussee 235 22848 Norderstedt Germany ...

Reviews: