


Part 2 - OPERATION
INSTRUCTIONS
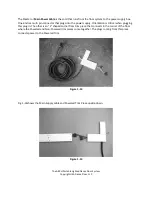
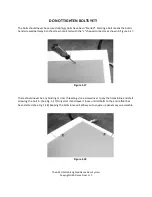
Figure 2-1:
Connections:
Your power supply and controller is shipped all ready for audio or sound control. Step one is to plug the
floor’s ai po er a le i to the
back of the unit. Second is to plug 120VAC power cord into AC inlet
and plug into a wall receptacle.
Operation:
Once the unit is plugged into power it will power up. There is no power on/off switch. Both Black-Out
buttons will be flashing. This means the floor will be black or off.
NOTE:
It is normal to see the floor flash white when first powered on.
To operate i sou d a ti atio ode press the t o Sou d A ti e utto s. This ill light their LED’s.
The set the B faders oth to %.
By pressing each Black-Out button once the floor will light up to
the sounds in the room. There are tiny microphones built-in and the sensitivity can be adjusted with the
B fader o trols.
To operate with patterns and colors please follow the directions in the manual for the RGB-3C.
The ARCH Portable Lighted Dance Floor System
Copyright USA Dance Floor, LLC


