background image


NOTE! 


Lead the cable through the side slot opening on the camera to secure the cable, 
so that you may avoid opening a hole on the ceiling. 


Disconnect  from  power  before  intalling  or  uninstalling  Micro  SD  card. 
Otherwise,  the  device  or  the  Micro  SD  card  might  be  damaged.  For 
recommended SD card specifications, contact your dealer or technical support. 

5


Startup 

Check that the device is properly installed, then connect power to start up the device. 

6


Web Login 

Log in to the Web interface to manage and maintain the device. 

1.


Open your browser, input the 

camera’s 

IP address 

192.168.1.13

 in the address 

bar and then press 

Enter

 to open the login page. 

2.


Enter  the  username  and  password  (

admin

/

123456

  by  default)  and  then  click 

Login


NOTE! 


DHCP is enabled by default. If a DHCP server is deployed in the network, the IP 
address of your camera may be assigned dynamically, and you need to use the 
assigned IP address to log in. 


If prompted, install the plug-in at your first login. Please follow the on-screen 
instructions to complete the installation and then open the browser again to 
log in. 


The default password is intended only for your first login. To ensure security, 
please  change  the  password  after  your  first  login.  You  are  strongly 
recommended to set a strong password of at least nine characters including all 
three elements: digits, letters and special characters. 


If the password has been changed, please use the new password to log in. 


Summary of Contents for 0235C4PX

Page 1: ...Mini PTZ Network Fixed Dome Cameras Quick Guide V2 01 ...

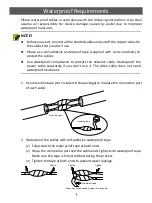
Page 2: ...otect the network cable Waterproof the power cable separately if you don t use it The video cable does not need waterproof treatment 1 Use insulation tape not included in the package to insulate the connection part of each cable 2 Waterproof the cables with self adhesive waterproof tape 1 Fully stretch the waterproof tape at both ends 2 Wrap the connection part and the cable ends tightly with wate...

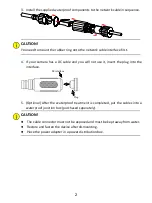
Page 3: ...C cable and you will not use it insert the plug into the interface 5 Optional After the waterproof treatment is completed put the cables into a waterproof junction box purchased separately CAUTION The cable connector must not be exposed and must be kept away from water Restore and fasten the device after dismounting Place the power adapter in a power distribution box DC interface Plug ...

Page 4: ...owered causing the camera to work abnormally If it is required to lengthen the power cable lengthen the cable between the power adapter and the mains Do not hold the tail cable by hand for weight bearing Otherwise the cable connector of the camera could be loosened When connecting to an external interface use an existing connection terminal and ensure that the cable terminal latch or clamp is in g...

Page 5: ...tly from the center outward using lens cleaning cloth If the grease or the stain still cannot be removed use lens cleaning cloth dipped with detergent and clean the glass window surface gently until it is removed Do not use organic solvents such as benzene or ethanol when cleaning the transparent dome cover Make sure the lens cleaning cloth is clean itself Never look at the transmit laser while th...

Page 6: ...card is installed inside the camera To install the SD card you need to remove the back cover of the camera first Do not hot plug the Micro SD card after it is inserted Otherwise the camera or the SD card might be damaged Contact your dealer for the recommended specifications of the Micro SD card 129 0mm 5 1 S100 0mm 3 9 143 6mm 5 7 ø 108 5mm 4 3 3 4 0mm 0 16 1 4 UNC 2B ø Third party device connect...

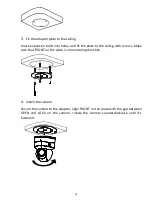
Page 7: ...t and therefore is omitted here Make sure that the wall is capable of supporting the weight of the camera 1 Uninstall the adapter plate Hold the camera rotate the adapter plate counterclockwise to detach it from the camera 2 Attach the sticker Attach the sticker to the desired mounting place Open the slot cover Insert the SD card along the arrow direction Rotate counterclockwise OPEN LOCK Adapter ...

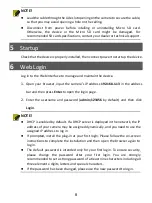
Page 8: ...x the plate to the ceiling with screws Make sure that FRONT on the plate is in monitoring direction 4 Install the camera Secure the camera to the adapter align FRONT on the plate with the gap between OPEN and LOCK on the camera rotate the camera counterclockwise until it s fastened ...

Page 9: ...ess Enter to open the login page 2 Enter the username and password admin 123456 by default and then click Login NOTE DHCP is enabled by default If a DHCP server is deployed in the network the IP address of your camera may be assigned dynamically and you need to use the assigned IP address to log in If prompted install the plug in at your first login Please follow the on screen instructions to comp...

Page 10: ...e and technology Regarding the product described in this manual Uniview asks you to fully understand and strictly abide by the applicable export laws and regulations worldwide Privacy Protection Reminder Uniview complies with appropriate privacy protection laws and is committed to protecting user privacy You may want to read our full privacy policy at our website and get to know the ways we proces...

Page 11: ...curement of substitute goods or services property damage personal injury business interruption loss of business information or any special direct indirect incidental consequential pecuniary coverage exemplary subsidiary losses however caused and on any theory of liability whether in contract strict liability or tort including negligence or otherwise in any way out of the use of the product even if...

Page 12: ...mmended Multicast Multicast is intended to transmit video to multiple devices If you do not use this function it is recommended you disable multicast on your network Check logs Check your device logs regularly to detect unauthorized access or abnormal operations Physical protection Keep the device in a locked room or cabinet to prevent unauthorized physical access Isolate video surveillance networ...

Page 13: ...Use Caution When battery is used avoid High or low extreme temperatures during use storage and transportation Extremely low air pressure or low air pressure at high altitude Battery replacement Use the battery properly Improper use of the battery such as the following may cause risks of fire explosion or leakage of flammable liquid or gas Replace battery with an incorrect type Dispose of a battery...

Page 14: ... device must accept any interference received including interference that may cause undesired operation Compliance Information Statement refer to http en uniview com Support Download_Center Product_Installation Declaration Caution The user is cautioned that changes or modifications not expressly approved by the party responsible for compliance could void the user s authority to operate the equipme...

Page 15: ...ronic Equipment WEEE Directive and must be disposed of in a responsible manner Battery Directive 2013 56 EC Battery in the product complies with the European Battery Directive 2013 56 EC For proper recycling return the battery to your supplier or to a designated collection point ...

Reviews: