background image

M

MA

AIIN

N A

Accttiivviittyy  B

Baasse

ed

d  M

Maaccrro

oss

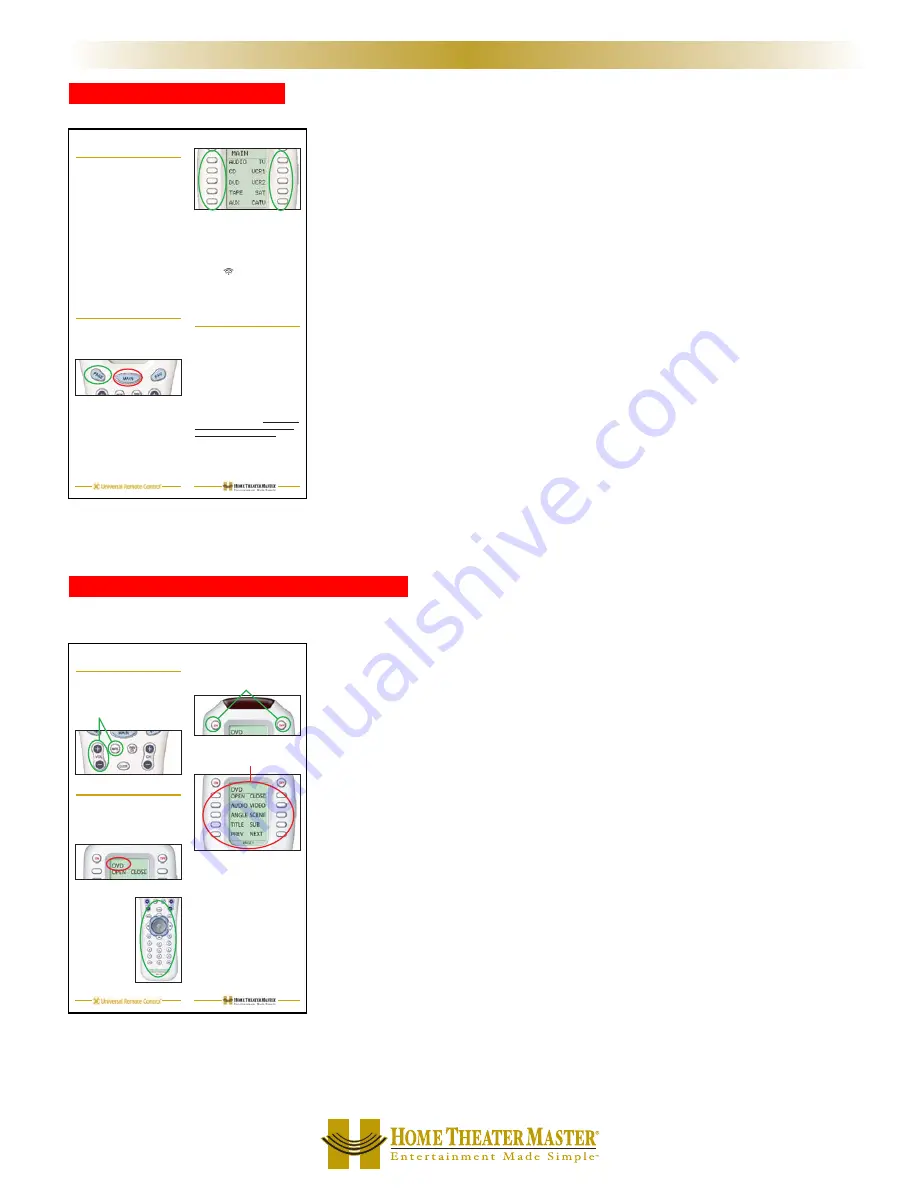
The device LCD buttons on MAIN are automatically programmed
with a navigational “jump” to the device they correspond to.

The device LCD buttons on the MAIN menu should be programmed
with a macro that issues every command necessary to reconfigure
the home theater for the activity (inputs, modes, play, channel etc. ).
This macro will be issued every time the client presses the button.
This is described in the manual.

Remember to train your power user clients to hold down the MAIN
button while they press a device LCD button.That way, the macro is
not sent, the MX-700/800 simply jumps to the device.

If you are willing to make your own summary sheet, you can program
the activity macro to only be issued if the client presses and holds

the button.This requires the use of the Advanced Programming
technique Press and Hold Macros on page 44.

M

MA

AIIN

N  P

Pu

un

ncch

h  T

Th

hrro

ou

uggh

h  V

Vo

ollu

um

me

e  aan

nd

d  M

Mu

utte

e

Use the Punch Through programming step (step #6) to program
Volume and Mute to operate the surround sound processor
regardless of what device is active.

It has been common in the past for installers to program a way for
the customer to watch TV using the internal speakers of the TV
rather than the surround sound system.There is a good way to
accomplish this on the MX-700/800 system.You could program the
TV’s internal volume on two of the LCD buttons on the TV device.

3

3

B

Baassiicc  P

Prro

oggrraam

mm

miin

ngg  G

Gu

uiid

de

elliin

ne

ess

M

X

8
0
0

M

X

7
0
0

M

X

2
0
0

R

E

M

O

T

E

S

Hold the remote

steady and

pointed at the

system until
the sound
and picture

have been

switched. 

The MAIN Menu buttons issue
MACROS that reset the sound and 
picture of your home theater to a new
activity.

TIP

– 

Hold the remote control

steady and pointed at the sys-
tem until  the         indicator
stops flashing.

If the sound or the picture still are
not correct,  repeat steps 1 - 4.

Select a DEVICE Only

1. Touch the MAIN button to make
sure that you are on the MAIN
Menu. Touch the Page button if you
don’t see the activity you want.

2. Press and hold the MAIN button.
While holding the MAIN button
down, touch the button next to the
desired screen label. The remote
control will now display the name of
the selected device and all buttons
will operate the device, however, the
sound and the picture of your sys-
tem have not been changed.

4

Using the MAIN Menu 

The MAIN Menu enables you to either
select a new Activity or simply select a
new Device to control.

When you select a new activity, the
Home Theater Master will issue a
MACRO (a timed sequence of many
commands from many different remote
controls). This MACRO was custom
programmed for your system by your
installer. It will issue all of the com-
mands necessary to switch the sound
and picture of your system. 

When you select a device, the Home
Theater Master becomes the remote
control you select WITHOUT affecting
the home theater.

Select a New ACTIVITY

1. Touch the MAIN button to make
sure that you are on the MAIN
Menu. Touch the PAGE button if you
don’t see the activity you want.

2. Point the Home Theater Master at
the system (or at the repeating
INFRARED sensor if one is
installed).

3. Touch the activity button next to
the desired screen label. For exam-
ple if you wish to watch a DVD
movie, touch the DVD button.

3

The Power ON and OFF buttons now
operate only the selected device (to
turn the entire system on/off, return to
the MAIN Menu).

The ten screen labeled buttons are
now labeled with any commands
that do not fit one of the buttons with 
printed labels.

Up to 40 screen labeled buttons are
available for each device. To view
the additional buttons, press the
PAGE button to display additional
pages. The Home Theater Master
can display up to four pages of
screen labeled buttons for each
activity or device! As you scroll
through the pages, notice that the
bottom title bar displays which page
you are viewing (PAGE 1, PAGE 2,
etc.).

6

Controlling the Volume

For your convenience, the VOLUME
Up, VOLUME Down and the MUTE
buttons will always control the sur-
round sound system, regardless of
what activity or device you are control-
ling. 

Operating any Device

You can see the name of the device at
the top of the screen. If it is not the
one you want, return to the MAIN
Menu and select a new device or
activity.

All of the printed
label buttons on the
remote operate just
like the original
remote control (with
the exception of
Volume Up, Volume
Down and Mute
which operate your
surround sound sys-
tem). 

5

Page 3 and 4 of the Owner’s Manual
describe how Activity macros automate
their system.

Page 5 of the Owner’s Manual describes
how volume always adjusts the surround
sound system. Page 5 and 6 describe
normal operation of any device.

T

TIIP

P

- Hold the remote control

steady and pointed at the system

until the 

indicator stops

flashing.

Summary of Contents for Home Theater Master MX-200

Page 1: ...2003 MXEditor Reference Manual Programming the MX800 MX 700 or MX 200 Remote Controls With MXEditor Software...

Page 2: ...R OPERATIONAL TECHNICAL OR EDITORIAL ERRORS OMISSIONS MADE IN THIS MANUAL The information in this manual may be subject to change without prior notice Home Theater Master is a registered trademark of...

Page 3: ...e e P Pr ro og gr ra am mm mi in ng g W Wi in nd do ow w 5 5 W WI IN ND DO OW WS S M ME EN NU US S T TO OO OL LS S A AN ND D D DE EF FI IN NI IT TI IO ON NS S 5 5 T Th he e M Me en nu u B Ba ar r a an...

Page 4: ...Y S ST TE EP P T TU UT TO OR RI IA AL L 1 16 6 P Pr ro og gr ra am mm mi in ng g O Ov ve er rv vi ie ew w 1 16 6 A New File Existing File on PC or in Remote 16 B Use SAVE AS 16 C Use the Program Menu...

Page 5: ...in ng g S St ta an nd da al lo on ne e 2 27 7 Stand Alone Learning Step by Step 27 I Im mp po or rt ti in ng g a an nd d E Ex xp po or rt ti in ng g D De ev vi ic ce es s 3 30 0 Importing Step by Ste...

Page 6: ...S St ta at tu us s M Me es ss sa ag ge es s f fo or r I Im mp pa at ti ie en nt t C Cl li ie en nt ts s w wi it th h L Lo on ng g M Ma ac cr ro os s 5 51 1 H He el lp pi in ng g C Co on nf fu us se e...

Page 7: ...n Stereo 3 5mm Plug Connection Pin 3 Pin 2 Host Transmit To Tip Pin 2 Pin 3 Host Receive To Middle Ring Pin 5 Pin 7 Host Ground To Base Ring K Ke ee ep p Y Yo ou ur r D Da at ta ab ba as se e U Up p t...

Page 8: ...n the system on you will make operation much smoother for your customers if you have them turn everything on first with one long macro Then after the system is on they can switch between activities li...

Page 9: ...e the device however the sound and the picture of your sys tem have not been changed 4 Using the MAIN Menu The MAIN Menu enables you to either select a new Activity or simply select a new Device to co...

Page 10: ...pad is a Home Theater Master exclusive control for both right and left handed operators When you are operating a device with any kind of on screen menu guide or display the thumbpad offers you easy on...

Page 11: ...and move IR commands via shortcuts The floating Macro and Favorite window is used to view and edit macros The information bar displays whether your keyboard is cap locked or num locked The important t...

Page 12: ...es You ll need a grouping of hard buttons and LCD pages for every remote control that you are replacing That is called a Device With the Create Name Devices window you will be able to create name and...

Page 13: ...ting the remote control to your computer H He el lp p M Me en nu u G Go o t to o w we eb bs si it te e This will open your internet browser connect to the internet and link you to the Home Theater Mas...

Page 14: ...An L flag indicates that the button is programmed with a learned IR code A learned code can be tapped or pressed and held for a sustained burst All buttons can be programmed with learned codes includ...

Page 15: ...EVICE Right click on a device to reveal the Device Context Menu I In ns se er rt t P Pa ag ge e will insert an additional page to the device to a maximum of 4 C Cu ut t will copy the entire device and...

Page 16: ...paste PAGES MX 700 800 Tree View or SideKick Via Tabs Switch between the two views by left clicking on the tabs MX 700 800 Tree View is useful for navigating while programming the MX 700 800 SideKick...

Page 17: ...emote L LE EA AR RN N Puts the software into learning mode if an MX 700 800 remote control is connected to the PC See p 23 C CO ON NT TI IN NU UE E When you are learning a number of IR codes use CONTI...

Page 18: ...ting it via the pull down lists under Device and IR Code A SHORTCUT is simply a duplicate of whatever is programmed in the button you select via the two pull down lists You C CA AN N T T program SHORT...

Page 19: ...n click on the button containing the macro you want copied All of the macro steps are inserted into the new button in one step Make any changes you want to the new macro it is independent of the origi...

Page 20: ...n of ALL O Ov ve er rv vi ie ew w o of f R Re ec ce ei iv ve er r R RF F O Op pt ti io on ns s By clicking on the RECEIVERS button in the bottom left corner you can extend the RF control window to dis...

Page 21: ...navigate to the folder that contains the ccf file 2 2 Use Tree View to Navigate to the Panel containing LEARNED IR codes you want 3 3 Click on the panel name in Tree View to make the panel appear in P...

Page 22: ...e Save As to rename the file before doing any programming Use the customer s name and a rev i e SmithTheaterRev1 mxf C C U Us se e t th he e P Pr ro og gr ra am m M Me en nu u The Program Menu is your...

Page 23: ...the Create and Name Devices window by clicking on the first item of the Program Menu or by clicking on the Toolbar icon as shown here T TI IP P Hover the mouse over the Toolbar buttons and a pop up la...

Page 24: ...ne to do any rearranging of devices 6 6 To delete a device simply select it by clicking on it once then click on the DELETE key of your keyboard or the D De el le et te e D De ev vi ic ce e button 1 1...

Page 25: ...ain it stays on the selected input Here are some important facts about Discrete commands S Se ec cr re et t D Di is sc cr re et te e C Co od de es s e ex xi is st t f fo or r s so om me e c co om mp p...

Page 26: ...ny that made the component i e B K Sony Krell 4 4 M Mo od de el l Select the Model or the Code Set number sometimes the actual model sometimes a generic assigned by us to a code set that operates many...

Page 27: ...s probably the fastest way to test all code sets usually learning codes is much quicker try that first G After you find the correct Code Set click on SAVE When you do the LCD Button Editor window pops...

Page 28: ...P Pa ar rt ti ia al l D Do ow wn nl lo oa ad d This quickly downloads all of the pre programmed codes from the database This stage of programming before any learning or macro programming has been acc...

Page 29: ...are two buttons to prevent confusion S Sa av ve e a an nd d C Ca an nc ce el l Only by clicking on SAVE will your work be saved No matter how many buttons you move or edit hitting CANCEL will discard...

Page 30: ...ag ge e f fo or r s sp pe ec ci ia al l p pu ur rp po os se es s M Mo ov vi in ng g T Th hr ro ou ug gh h P Pa ag ge es s I In n F Fa av vo or ri it te es s FAV or the Favorites device has five pages...

Page 31: ...R Codes One at a Time S Se el le ec ct t t th he e B Bu ut tt to on n Select the button that you want to teach to by single clicking it C Cl li ic ck k o on n t th he e L LE EA AR RN N S Sh ho or rt t...

Page 32: ...UE E s sh ho or rt tc cu ut t b bu ut tt to on ns s The combination activates the batch learning capability of MXEditor W Wa at tc ch h t th he e I IN NF FO O W Wi in nd do ow w When the info window s...

Page 33: ...f codes it is convenient to touch things up on the remote and then upload the corrected file S St ta an nd d A Al lo on ne e L Le ea ar rn ni in ng g S St te ep p b by y S St te ep p Before using the...

Page 34: ...he screen and the top line displays READY Teach the command If suc cessful the remote will display GOOD Repeat until all commands are learned 2 28 8 S St te ep p b by y S St te ep p T Tu ut to or ri i...

Page 35: ...un nd d s so ou un nd d c ca al li ib br ra at ti io on n R Re em me em mb be er r b bu ut tt to on ns s o on n h hi id d d de en n p pa ag ge es s c ca an n s st ti il ll l b be e a ac cc ce es ss s...

Page 36: ...l from the original configuration rather than the Manufacturer Model Category name you filed it as 5 5 Now select an EMPTY position on either MAIN page 1 or MAIN page 2 You cannot replace an existing...

Page 37: ...p info on shortcuts D Di is sc cr re et te e I IR R C Co od de es s v vs s T To og gg gl le e I IR R C Co od de es s Manufacturers program their products to respond to IR codes with one action or many...

Page 38: ...tiio on ns s R Re eq qu uiir re e B Bu ulllle et t P Pr ro oo of f R Re elliia ab blle e M Ma ac cr ro os s o or r a a h he ellp p lliis st t T Th he e u us se e o of f P Po oiin nt t P Pr ra ay y m m...

Page 39: ...On macros usually require extensive testing of delays and you can expect to do a lot of experimenting while programming 1 1 Select the Power On button on the MAIN page 2 2 Click on the RECORD icon 3 3...

Page 40: ...ample both the television and the receiver have discrete input codes and the client s favored activity is watching Satellite Select the RCVR by clicking its button on the MAIN menu Now click on the bu...

Page 41: ...ing its button on the MAIN menu The new step appears in the list 7 7 First turn the TV and the Receiver to the wrong input then turn off everything in the theater Point the connected MX 700 800 at the...

Page 42: ...fore they are responsive to new commands In a case like that you will need to add more delay between steps Select the Delay icon Now click on the preset amount of delay or enter any time between 1 sec...

Page 43: ...u are forced to workaround a DVD player or VCR without a discrete off command you will make the macro more reliable if you place the time consuming anchor the play command at the beginning of the macr...

Page 44: ...Surround Sound with 5 speakers with the TV on while the CD Activity selects Stereo with 4 speakers and forces the TV off For components that have play commands it is typically ok to have a Play comman...

Page 45: ...vorites snotty clients get 10 favorites Now you are ready to program 1 1 In Tree View click on the sign next to the Device SAT CABLE that you will need to program the favorites from This expands the d...

Page 46: ...ertainly require some delay between the two identical commands 6 6 Click on the SAVE icon and continue to the next Favorite until all are complete I In ns se er rt ti in ng g M Ma ac cr ro os s C Co o...

Page 47: ...ctions on all devices for the hard buttons Usually used only for Volume Up Down and Mute however you may find it convenient to punch through to the VCR transport controls on the TV device so that your...

Page 48: ...flag on every button affected on all the devices you programmed TV VCR1 MAIN 5 5 Repeat for any other groups of codes as you like Programming the SideKick 1 1 Switch from MX 700 800 Tree View to SideK...

Page 49: ...em and select the source you plan to use for the SideKick Drag them by clicking on the Simulator button a yellow drag and drop label will appear Keep the mouse button depressed and drag the mouse over...

Page 50: ...y you pick three favorites that are spread around the dial so that the client does not get frustrated trying to surf up and down through all of their channels By judiciously spreading out the three fa...

Page 51: ...klight button is pushed Downloading to MX 700 800 and SideKick You download to both remote controls the same way 1 1 Make sure the remote control has fresh batteries inserted correctly 2 2 Connect the...

Page 52: ...ight display an error message If this occurs do the following 1 1 Remove the batteries until the display fades away Then replace the batteries and connect to the PC 2 2 Do a PARTIAL Download 3 3 If su...

Page 53: ...S Si id de eK Ki ic ck k o on nl ly y f fr ro om m t th he e M MX X 7 70 00 0 8 80 00 0 1 1 Make sure the remote control has fresh batteries inserted correctly 2 2 Connect the cable between the PC an...

Page 54: ...nd IR com mands are sent from the MX800 The RF signals will also be issued as IR com mands by the MRF 200 IR Only IR commands are sent from the MX800 as a result the MRF 200 does not send any commands...

Page 55: ...E S You may rename areceiver to something more descriptive by first selecting the receiver s name cell then clicking on the Rename button If you want the Front Blaster turned OFF on any receiver rese...

Page 56: ...o issue the Macro When the client simply taps a MAIN activity button he she simply switches devices O On ne e B Bu ut tt to on n I Is ss su ue es s a a S Si in ng gl le e C Co od de e O OR R a a S Si...

Page 57: ...ramming to MAIN Page 2 Just drag and drop them using Create and Move Devices Program Menu 1 2 2 Now create new devices on MAIN Page 1 Duplicate the exact order of MAIN Page 2 3 3 Use LCD Button Editor...

Page 58: ...will not get the status message during the macro This can be resolved by opening the LCD Button Editor Program Menu Step 3 and checking off the HIDE check box for MAIN page 2 5 52 2 A Ad dv va an nc...

Page 59: ...e you have vented your feelings get out MXEditor and go to work There is a relatively simple way to make operation of a device like this much less confusing Here s how to go about it 1 1 Using LCD But...

Page 60: ...it controls as shown above Using this system of a list that helps your client through a difficult process you can create devices that help them through any complex process For example here is a help...

Page 61: ...gram them normally using the IR database imported devices or by learning the IR commands 2 2 In Tree View work from the bottom up Expand all of the devices then beginning with the last page of the las...

Page 62: ...xample system there are only two activities watching VCR or watching SAT so the only macros are Power On and Off which actually turn on four components the TV the VCR the Satellite receiver and the su...

Page 63: ...its input changed and had no discrete Input commands one would program the LCD button on MAIN that actually represents the TV device FIXTV and program the button with a shortcut to the TV device s In...

Page 64: ...ed d M Ma an ny y D DV VD D d di is sc cs s w wi il ll l f fr re ee ez ze e o on n t th he e o op pe en ni in ng g m me en nu u a an nd d a a P Pl la ay y c co om mm ma an nd d w wi il ll l n no ot t...

Page 65: ...programmed these macros can be deleted or left on a hidden page as you see fit Building A Device Library MXEditor s ability to import and export devices is a powerful programming accelerator Remember...

Page 66: ...on to navigate to the folder that contains the ccf file 2 2 Use Tree View to Navigate to the Panel containing LEARNED IR codes you want 3 3 Click on the panel name in Tree View to make the panel appea...

Page 67: ...s 6 6 C Co od de e S Se et t n nu um mb be er r 2 20 0 C Co om mm mu un ni ic ca at ti io on ns s M Me en nu u 7 7 C Co on nf fu us se ed d C Cl li ie en nt ts s 5 53 3 C Co on nn ne ec ct ti in ng g...

Page 68: ...M Me en nu u 6 6 F Fi ir rm mw wa ar re e V Ve er rs si io on n 7 7 F Fl la ag g 8 8 F Fl lu ut tt te er rT Te ec ch hn ni iq qu ue e 2 25 5 F Fr ro on nt t B Bl la as st te er r o of f M MR RF F 2 2...

Page 69: ...a ac cr ro o W Wi in nd do ow w 7 7 M Ma ac cr ro o W Wo on n t t W Wo or rk k 5 54 4 M Ma ac cr ro os s S St ta at tu us s M Me es ss sa ag ge es s 5 51 1 M MA AI IN N A Ac ct ti iv vi it ty y b ba a...

Page 70: ...3 R Re eq qu ui ir re em me en nt ts s 1 1 R RF F C Co on nt tr ro ol l 4 48 8 IROutput 48 Receiver 48 Signal 48 R RF F C Co on nt tr ro ol l O Ov ve er rv vi ie ew w 1 14 4 R Ri ig gh ht t C Cl li ic...

Page 71: ...T To og gg gl le e P Po ow we er r W Wo or rk ka ar ro ou un nd d 5 54 4 T To og gg gl le es s 1 19 9 5 53 3 T To oo ol lb ba ar r 7 7 T Tr ra ai in ni in ng g 2 2 T Tr re ee e v vi ie ew w 5 5 9 9 1...

Page 72: ...500 Mamaroneck Avenue Harrison NY 10528 Phone 914 835 4484 Fax 914 835 4532 www universalremote com...

Reviews: