32
OTE:
Upper right display should be flashing.
c.
Using keypad, enter "30".
d.
Depress and release "Pulse Width" on the keypad (the "30"will stop blinking).
e.
Depress and release "Pulse Rate" on the keypad.
OTE:
Lower right display should be flashing.
f.
Using keypad, enter "1200".
g.
Depress and release "Pulse Rate" on the keypad (the "1200" will stop blinking).
h.
Depress and release "Mode" on the keypad until lower left of display is "C".
i.
Depress and release "Store" on the keypad (all numbers will stop blinking).
OTE:
While setting alignment it may be necessary to lower or raise the pulse
width slightly to get a beam trace on the thermal paper without starting a
fire.
7.
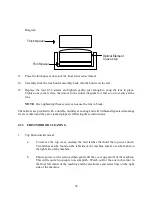
Take a small piece of thermal paper (approximately 4 inches) and put in front of beam
window (reference Figure 13). Set shutter switch to open. Depress the "Test" button.
OTE:
Depressing test button turns on laser, depressing again turns off laser.
DAGER:
When the laser is on, injuries can occur if a body part is placed in front of
the beam. Remember, the beam is invisible.
8.
If mirror #1 was previously cleaned, move to Step 9. Otherwise, remove, clean and install
the #1 mirror per the section on "First Mirror Cleaning".
9.
Adjust mirror #1, on the shutter support block, by turning it slightly left and right
(reference Figure 13) until a blue dot appears on the thermal paper approximately centered
through the center of the window. The blue dot will appear in a few seconds if the beam is
on and exiting the window. If you are unable to get a dot, increase pulse width by five or
ten using Steps a, b. c, d and i above. If there is still no beam, loosen the other two set
screws on the bottom and side of the shutter block and slightly rotate the shutter support
clockwise or counterclockwise while slightly rotating mirror #1 until a blue dot appears.
10. Move paper next to mirror #2 (reference Figure 13). Set the mirror #1 and shutter support
to get blue dot approximately centered on mirror #1.

