28
3.
Apply lens cleaning solution #1 to the window using the sprayer bottle. Let sit for one
minute.
4.
Use a clean, 100% cotton, swab to wipe off any remaining surface accumulation on the
window. Wipe one section of the window, then using a clean swab, wipe the next section.
Continue in this manner until the entire window surface is clean and dry. Do not use
excessive pressure or it may scratch the window. If the window becomes scratched, laser
radiation can be reflected inside the machine, reducing power and possibly ruining the
window.
4.3.5 SECOD MIRROR CLEAIG
1.
The second mirror is located in the front left corner of the machine and may be reached
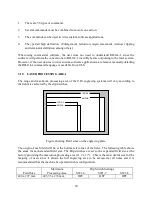
only if the top enclosure of the machine is off (reference Figure 12). To remove the top
enclosure, see section on "Top Enclosure Removal".
2.
Thoroughly dust off the #2 mirror using the oil free compressed air or the freon duster as
described in Section 1, Paragraph h.
3.
Double a piece of lens tissue (lengthwise) and place against the #2 mirror.
4.
Apply lens cleaning solution #1 to the tissue and mirror using the small plastic bottle. The
lens tissue should stick to the mirror and completely wet the surface. Let sit for one
minute.
5.
Final cleaning is done by gently pulling the wet tissue across the mirror surface in one
direction only, using doubled sheets of photographic lens tissue soaked onto the lens as in
Step 4.
6.
Dry mirror surface with a clean dry tissue.
OTE:
Never use the same tissue twice as dust build-up on the tissue may scratch the surface
of the mirror. Move the tissue across the mirror in one direction only.
4.3.6 THIRD MIRROR CLEAIG
1.
The third mirror is at the front of the movable (Y axis) arm. The top of the machine will
have to be removed to get to this mirror (reference Figure 12).
2.
Remove the 2-56 socket head cap screw holding the #3 mirror bracket and pull mirror and
bracket straight away from mirror holder (reference Figure 12). Clean the #3 mirror per
instructions for the #4 mirror (see Step 5). Replace mirror per instructions in Step 5.
4.3.7 FOURTH MIRROR CLEAIG

