Unitary products group AHC9V UP Installation Manual Download Page 15

271043-UIM-B-0707

Unitary Products Group

15

VENT SYSTEM

This furnace is certified to be installed with one of two possible vent
configurations.

1.

Horizontal vent system. This vent system can be installed com-
pletely horizontal or combinations of horizontal, vertical, or offset
using elbows.

2.

Vertical vent system. This vent system can be installed completely
vertical or a combination of horizontal, vertical, or offset using
elbows.

HORIZONTAL VENT APPLICATIONS AND 

TERMINATION

When selecting the location for a horizontal combustion air / vent termi-
nation, the following should be considered:

1.

Observe all clearances listed in vent clearances in these instruc-
tions.

2.

Termination should be positioned where vent vapors will not dam-
age plants or shrubs or air conditioning equipment.

3.

Termination should be located where it will not be affected by wind
gusts, light snow, airborne leaves or allow recirculation of flue
gases.

4.

Termination should be located where it will not be damaged or
exposed to flying stones, balls, etc.

5.

Termination should be positioned where vent vapors are not objec-
tionable.

6.

Horizontal portions of the vent system must slope upwards and be
supported to prevent sagging.

7.

Sealed combustion air systems must be installed so the vent and
the combustion air pipes terminate in the same atmospheric zone.
Refer to Figures 11 or 12.

VERTICAL VENT APPLICATIONS AND 

TERMINATION

Roof mounted vertical terminals may be field fabricated. Standard PVC/
SRD fittings may be used. If installing a vertical venting system through
any unconditioned space such as an attic or crawl space it must be
insulated.

1.

Observe all clearances listed in vent clearances in these instruc-
tions.

2.

Termination should be positioned where vent vapors are not objec-
tionable.

3.

Termination should be located where it will not be affected by wind
gusts, light snow, or allow recirculation of flue gases.

4.

Termination should be located where it cannot be damaged,
plugged or restricted by tree limbs, leaves and branches.

5.

Horizontal portions of the vent system must slope upwards and be
supported to prevent sagging.

6.

Sealed combustion air systems must be installed so the vent and
the combustion air pipes terminate in the same atmospheric zone.
Refer to Figures 11 or 12.

VENTING MULTIPLE UNITS

Multiple units can be installed in a space or structure as either a single
pipe configuration or a two-pipe configuration.

The combustion air side of the single pipe configuration shown in Figure
10 is referred to in these instructions as ambient combustion air supply.
Follow the instructions for ambient combustion air installations, paying
particular attention to the section on air source from inside the building.
The vent for a single pipe system must be installed as specified in the
venting section of these instructions with the vent terminating as shown
in Figure 10. Each furnace must have a separate vent pipe. Under NO
circumstances can the two vent pipes be connected together.

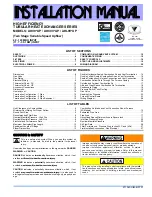
The combustion airside of the two-pipe configuration shown in Figure
11 can be installed so the combustion air pipe terminates as described
in outdoor combustion air or ventilated combustion air sections in these
instructions. Follow the instructions for outdoor combustion air or venti-
lated combustion air and the instructions for installing the vent system
with the vent terminating as shown in Figures 13 or 14. The two-pipe
system must have a separate combustion air pipe and a separate vent
pipe for each furnace. Under NO circumstances can the two combus-
tion air or vent pipes be connected together. The combustion air and
vent pipes must terminate in the same atmospheric zone.

 FIGURE 10:  

Termination Configuration - 1 Pipe

 FIGURE 11:  

Termination Configuration - 2 Pipe

MAINTAIN 12” MINIMUM CLEARANCE

ABOVE HIGHEST ANTICIPATED SNOW

LEVEL. MAXIMUM 24” ABOVE ROOF.

12” MIN.

12” MIN.

12” VERTICAL SEPARATION
BETWEEN COMBUSTION AIR
AND VENT

MAINTAIN 12”
MINIMUM
CLEARANCE
ABOVE
HIGHEST
ANTICIPATED
SNOW LEVEL

12” MINIMUM
BELOW OVERHANG

12”
SEPARATION
BETWEEN BOTTOM
OF COMBUSTION
AIR PIPE AND
BOTTOM OF VENT

MINIMUM

MAINTAIN 12”
MINIMUM CLEARANCE
ABOVE HIGHEST
ANTICIPATED SNOW
LEVEL OR GRADE,
WHICHEVER IS
HIGHER

 FIGURE 12:  

Termination Configuration - 2 Pipe Basement

12” MIN.

12” MIN.

OVERHANG

12” MINIMUM
BELOW
OVERHANG

12”
SEPARATION
BETWEEN BOTTOM
OF COMBUSTION
AIR PIPE AND
BOTTOM OF VENT

MINIMUM

MAINTAIN 12”
MINIMUM
CLEARANCE
ABOVE HIGHEST
ANTICIPATED SNOW
LEVEL OR GRADE,
WHICHEVER IS
HIGHER

Summary of Contents for AHC9V UP

Page 1: ...electrical and mechanical codes LIST OF SECTIONS SAFETY 1 DUCTWORK 4 FILTERS 6 GAS PIPING 7 ELECTRICAL POWER 8 COMBUSTION AIR AND VENT SYSTEM 12 CONDENSATE PIPING 18 SAFETY CONTROLS 19 START UP AND AD...

Page 2: ...ible materials as listed under Clearances to Combustibles in Table 1 Provide clearances for servicing ensuring that service access is allowed for both the burners and blower These models ARE NOT CSA l...

Page 3: ...or and the furnace must be located or protected to avoid physical damage by vehicles The furnace area must not be used as a broom closet or for any other storage purposes as a fire hazard may be creat...

Page 4: ...NOTE When attaching duct flange do not shoot the screw down into the casing Use the formed flange intended for duct flange attachment The duct system is a very important part of the installation If th...

Page 5: ...e presence of leaks in the heat exchanger This access cover shall be attached in such a manner as to prevent leaks TABLE 2 Minimum Duct Sizing For Proper Airflow Input Cabinet Airflow Return1 Rectangu...

Page 6: ...provided with that accessory for proper hole cut size SECTION III FILTERS FILTER INSTALLATION All applications require the use of a filter Filters must be installed external to the furnace cabinet DO...

Page 7: ...igure 1 dimensions The inlet to the gas valve lines up directly with the opening in the left side of the furnace casing To line up with the opening in the right side of the casing two street ells shou...

Page 8: ...5 1 4 1 3 39 1 0 37 0 34 0 31 1100 1 3 1 2 1 1 41 0 0 34 0 31 0 28 2500 LP 4 1 3 8 3 5 93 2 LP 1 03 0 95 0 87 PROPANE AND HIGH ALTITUDE CONVERSION KITS It is very important to choose the correct kit...

Page 9: ...o the terminal board on the ignition module as shown in Figures 5 and 6 Electronic thermostats may require the common wire to be connected as shown in Figures 5 and 6 Apply strain relief to thermostat...

Page 10: ...ight O Reversing Valve Energized in Cool TWO STAGE AIR CONDITIONING Comfort Alert Interface HUM Dehumidification Open on Humidity Rise C 24 Volt Common C 24 Volt Common R 24 Volt Hot W2 Second Stage H...

Page 11: ...W2 Delay on furnace to OFF HM Humidistat BSG Bonnet Sensor Bonnet Sensor Optional BS Bonnet Sensor AUX Auxiliary Heat E W1 First Stage Auxiliary Heat E W1 First Stage Auxiliary Heat W Auxiliary Heat Y...

Page 12: ...length listed in Table 8 is for the vent pip ing and the air intake piping separately For example if the table allows 65 equivalent feet for a particular model then the vent can have 65 equivalent fe...

Page 13: ...piping apply cement primer and the cement per the manufactures instructions Primer and cement must conform to ASTM D2564 for PVC or ASTM D2235 for ABS piping 7 All joints must provide a permanent air...

Page 14: ...ns 9 inches 23 cm for models 50 000 BTUH 15 kW 12 inches 30 cm for models 50 000 BTUH 15 kW C Clearance to permanently closed window 12 inches 30 cm 12 inches 30 cm D Vertical clearance to ventilated...

Page 15: ...systems must be installed so the vent and the combustion air pipes terminate in the same atmospheric zone Refer to Figures 11 or 12 VENTING MULTIPLE UNITS Multiple units can be installed in a space or...

Page 16: ...vent Care should be taken to locate side vented systems where trees or shrubs will not block or restrict supply air from entering the terminal Also the terminal assembly should be located as far as p...

Page 17: ...LE VENT GAS VENT SOFFIT VENT VENTILATED ATTIC TOP ABOVE INSULATION OPTIONAL INLET a OUTLET AIR a VENTILATED CRAWL SPACE GAS WATER HEATER VENTILATED ATTIC TOP ABOVE INSULATION GAS VENT GABLE VENT SOFFI...

Page 18: ...Air The ventilated attic space or a crawl space from which the combustion air is taken must comply with the requirements specified in AIR SOURCE FROM OUTDOORS in this instruction or in Section 5 3 Air...

Page 19: ...e controls are mounted on the burner box assembly If the temper ature in the burner box exceeds its set point the ignition control and the gas valve are de energized The operation of this control indi...

Page 20: ...ll start and come up to speed Shortly after inducer start up the hot surface igniter will glow for about 17 seconds b After this warm up the ignition module will energize open the main gas valve c Aft...

Page 21: ...3600 then divided by the time it took to measure 0 10 m3 of gas from the gas meter For Propane LP Gas multiply the Heat content of the gas MJ m3 or Default 93 15 times 0 10 m3 of gas measured at the...

Page 22: ...shown in Figure 21 The procedure below is used to adjust either the high fire manifold pressure or the low fire manifold pressure IMPORTANT The cap for the pressure regulator must be removed entirely...

Page 23: ...blown into the heated space The fan off timing may be adjusted by positioning the jumper on two of the four pins as shown in Figure 23 WITH BURNER BOX COVER IN PLACE WITH BURNER BOX COVER REMOVED FIG...

Page 24: ...een the R and W terminals The indoor fan motor is energized through the W1 heat terminal and runs on the speed selected on the HEAT tap of the control board Humidistat When a humidistat is installed i...

Page 25: ...T CODE STORAGE AND RETRIEVAL The control in this furnace is equipped with memory that will store up to five error codes to allow a service technician to diagnose problems more easily This memory will...

Page 26: ...A C 52 1 35 4 53 2 35 4 1560 1010 1620 1030 C B 44 2 28 6 45 9 29 2 1470 940 1500 960 B C 41 6 26 6 42 5 27 2 1370 890 1410 880 D B 38 8 25 2 39 9 24 9 1460 930 1490 920 C A 41 3 26 3 42 2 26 1 1250 7...

Page 27: ...in in2 cm2 In W C kPA In W C kPA In W C kPA 0 750 0 21 4 230 1484 0 01 0 00249 0 01 0 00249 0 15 0 03736 751 1000 21 25 28 32 330 2129 0 05 0 01245 0 05 0 01245 0 20 0 04982 1001 1250 28 33 35 40 330...

Page 28: ...Printed in U S A 271043 UIM B 0707 Copyright by York International Corp 2007 All rights reserved Supersedes 271043 UIM A 0407 Unitary 5005 Norman Products York OK Group Drive 73069 SECTION X WIRING D...

Reviews: