background image

5

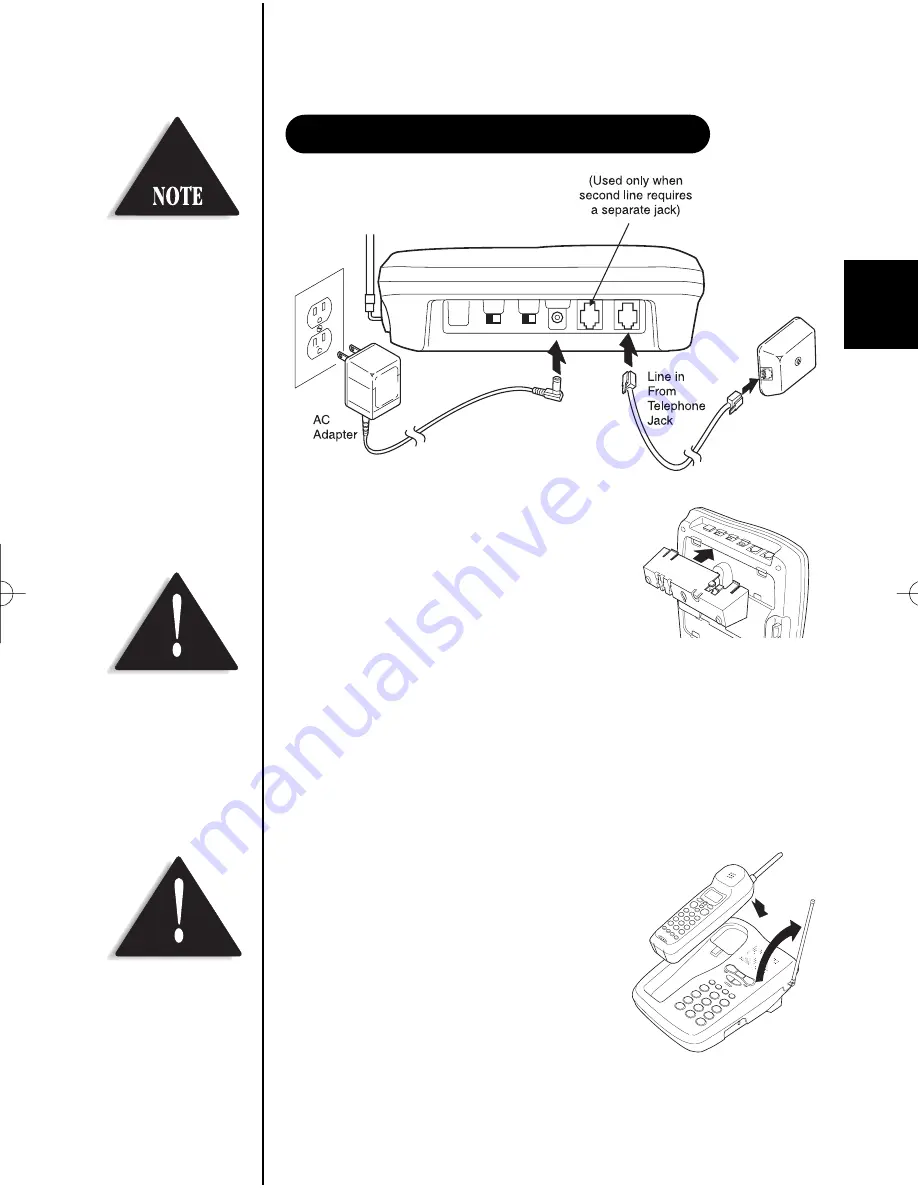
1. Snap the desktop/wall mount adapter         

into the top of the base as shown. 

2. Plug the AC adapter cord into the 10V DC

input jack on the back of the base.

3. Wrap the AC adapter cord around the strain

relief notch.

4. Plug the AC adapter into a standard 120V AC wall outlet.

5. Charge the battery (refer to CHARGING THE BATTERY PACK,

page 11).

6. Plug one end of the long telephone cord into the 

T

TE

ELL  LLIIN

NE

E  11//22

jack on

the back of the base.

7. Plug the other end of the cord into the telephone jack on the wall.

8. Set the base on a desk or tabletop.            

Place the handset on the base with the
keypad either facing up or down. Raise the
antenna to a vertical position. 

DESK/TABLETOP INSTALLATION

Before using your phone,
charge the Nickel-
Cadmium battery pack
for 15-20 hours. 

Place the power cord so
that it does not create a
trip hazard or where it
could become chafed and
create a fire or electrical
hazard.

Use only the Uniden AC
adapter supplied with
this phone. DO NOT use
an outlet controlled by a 
wall switch.

exs9660 Reference Guide.qxd  9/7/99  1:08 PM  Page 5

Summary of Contents for EXS 9660

Page 1: ...MANUAL S SP PE EC CT TR RU UM M S P R E A D T H E E X S 9 6 6 0 Digital Spread Spectrum provides the longest range the clearest sound and the best privacy OWNER S ...

Page 2: ...CONTROLS AND FUNCTIONS exs9660 foldout qxd 8 18 99 5 21 PM Page 1 ...

Page 3: ...ing a Call from the Base 18 Making a Call from the Handset 18 Using the Tone Feature 19 Flash and Call Waiting 19 Using Redial 20 Placing a Call on Hold 20 Using the Mute Feature 21 Using the Page Feature 21 2 Line Operation 22 3 Way Conferencing 23 4 Way Conferencing 24 Using Your EXS 9660 Intercom 25 Transferring a Call 26 Traveling Out of Range 27 Storing a Phone Number in Memory 28 Editing a P...

Page 4: ...utoScan l 40 Memory Dialing Locations l 80 Number Caller ID Memory l 32 Digit Redial l 2 way Page Intercom l Hearing Aid Compatible l Redial Flash and Pause l Pulse Tone Dialing l 7 Day Standby Battery Time l 4 Hour Talk Time Digital Spread Spectrum Technology utilizes a wider frequency band vs a single narrow band used in standard digital transmissions The result is a more secure conversation wit...

Page 5: ...o get the most from your phone please read this owner s manual thoroughly Be sure to complete and mail the product registration form You must have a two line subscription from your phone company to realize the capability of your two line phone If any of these items are missing or damaged contact the Uniden Parts Department at 800 554 3988 Hours are from 8 30 a m to 5 00 p m Central Time Monday thr...

Page 6: ...tlet which does not have a switch to interrupt its power l Keep the base and handset away from sources of electrical noise such as motors and fluorescent lighting l Be sure there is sufficient space to rotate the base antenna fully vertical l The base can be placed on a desk tabletop or mounted on a standard wall plate l You should charge your handset for 15 20 hours before connecting the phone li...

Page 7: ...NE E 1 1 2 2 jack on the back of the base 7 Plug the other end of the cord into the telephone jack on the wall 8 Set the base on a desk or tabletop Place the handset on the base with the keypad either facing up or down Raise the antenna to a vertical position DESK TABLETOP INSTALLATION Before using your phone charge the Nickel Cadmium battery pack for 15 20 hours Place the power cord so that it do...

Page 8: ...annel Wrap the cord around the strain relief notch 4 Plug the AC adapter into a standard 120V AC wall outlet 5 Plug one end of the short telephone cord into the T TE EL L L LI IN NE E 1 1 2 2 jack on the back of the base Plug the other end into a standard telephone jack If your second line has a separate jack plug the other cord into the base and wall jack WALL INSTALLATION 6 Place the power cord ...

Page 9: ...don t have a standard wall plate you can mount your phone directly to the wall Before doing this consider the following l Select a location away from electrical cables pipes or other items behind the mounting location that could cause a hazard when inserting the screws into the wall l Mount your phone near a working phone jack to avoid excessive cord lengths l Make sure the wall material is capabl...

Page 10: ...r into the bottom of the base as shown 3 Plug the AC adapter cord into the 10V DC input jack on the back of the base 4 Put the AC adapter cord inside the molded wiring channel Wrap it around the strain relief notch Plug the AC adapter into a standard 120V AC wall outlet 5 Plug one end of the long telephone cord into the T TE EL L L LI IN NE E 1 1 2 2 jack on the back of the base Plug the other end...

Page 11: ...se pull the handset retainer out of the slot Rotate clockwise 180 8 Flip the retainer from front to back Slide it back into the slot so that the lip of the retainer is up and the oval is down The retainer holds the handset in place Be careful not to insert the mounting screws into possible electrical hazards such as cables wiring or pipes ...

Page 12: ... Slide cover off 2 Install the nickel cadmium battery with the label down 3 Slide the battery cover forward until it snaps into place INSTALLING THE HANDSET BATTERY PACK 10 Use only Uniden Battery model BT 990 supplied with your phone ...

Page 13: ...from your authorized Uniden dealer 1 Position the battery pack so the contacts are face up 2 Slide the battery pack into the charging compartment until it locks into place 3 Charge the battery for 24 hours When charging is complete lift the latch to remove the battery pack To install the charged battery into the handset see INSTALLING THE HANDSET BATTERY PACK page 10 In the event of a power failur...

Page 14: ... phone until the Low Battery display flashes Then charge the battery for 15 20 hours With normal usage your battery should last about one year To maintain a good charge clean all charging contacts on the handset and base about once a month Use a pencil eraser or other contact cleaner DO NOT use liquids or solvents you may damage your phone Be sure the PULSE TONE switch is the TONE position unless ...

Page 15: ...volume settings for the handset earpiece high normal and low The handset earpiece volume can be adjusted only during a call To lower the volume press vol t To raise the volume press vol s The handset displays Volume High Volume Normal or Volume Low indicating the current volume setting t Base ringer volume The ringer control for the base of your EXS 9660 allows you to turn the ringer OFF or to sel...

Page 16: ... beltclip into the empty slot Press down until it clicks t To remove the beltclip 1 Pull back on the release tab Lift the beltclip up 2 Replace the slot cover You can store either the beltclip or the slot cover in the bottom of the base INSTALLING THE BELTCLIP 14 ...

Page 17: ...he phone experiences a power failure you must reset the digital security code by placing the handset in the base t To reset the digital security code 1 Restore power to the base 2 Place the handset on the base The status LED flashes to indicate that the digital security code is reset AUTOMATIC DIGITAL CODE SECURITY If you are using an optional headset you must still use the handset keypad for phon...

Page 18: ...Handset Off Base Handset On Base To answer a call AutoTalk On Pick up handset AutoTalk Off Press line 1 or line 2 Press line 1 or line 2 To make a call 1 Pickup handset 2 Press line 1 or line 2 3 Listen for dial tone 4 Dial number or 1 Pickup handset 2 Dial number 3 Press line 1 or line 2 To redial 1 Press line 1 or line 2 2 Listen for dial tone 3 Press redial or 1 Press redial 2 Press line 1 or l...

Page 19: ...he base rings The corresponding line 1 LED on the base flashes 2 Press the line 1 button and speak 3 When you finish the call press line 1 to hang up The base microphone is located under the phone Position yourself approximately 12 inches away from the base and speak clearly ANSWERING A CALL FROM THE BASE You may cancel an operation while using your phone by pressing exit You must have a 2 line su...

Page 20: ...u finish the call press line 1 to hang up t Off Hook Dialing 1 Pick up the handset 2 Press line 1 3 Dial the number on the keypad or use the memory feature See USING MEMORY DIALING page 34 4 When you finish the call press line 1 or return the handset to the base MAKING A CALL FROM THE HANDSET MAKING A CALL FROM THE BASE Call Line 1 ANSWERING A CALL FROM THE HANDSET AutoStandby automat ically hangs...

Page 21: ...to accept the call After a short pause you will hear the new caller To return to the original caller press flash again The flash function on the base and handset are independent of each other You can use your flash feature from either the handset or the base FLASH AND CALL WAITING USING THE TONE FEATURE 19 You may enter a pause in the dialing sequence during On Hook dialing You may not enter a pau...

Page 22: ...umber will not redial Use either the keypad on the handset or the keypad on the base 1 To place line 1 on hold at the base press hold The line 1 LED turns from green to red 2 To place line 1 on hold at the handset press hold The following screen appears 3 To pick up the call that is holding press line 1 on the base or handset Hold Line 1 PLACING A CALL ON HOLD USING REDIAL 20 Do not use the base a...

Page 23: ...to continue your conversation with the party on line 1 press mute or line 1 again The line 1 LED changes to green To locate the handset when it is off the base press page int com on the base The handset beeps for 60 seconds The following screen appears Press int com on the handset to connect to the base Press page int com again on the base or iin nt t c co om m on the handset to return to standby ...

Page 24: ...nsion In Use The Extension In Use feature prevents you from accidentally interrupting a call If you attempt to make a call and another phone is In Use on line 1 the handset LCD displays In Use The line 1 LED at the base blinks If you press line 1 you will hear a beep This warns you the line is In Use To make your call you must use line 2 If you want to join a conversation on an extension currently...

Page 25: ...inal caller back on the line 4 Press the conference button to the bring original call back on line The line 1 and line 2 LEDs turn green If the third person s number is busy or doesn t answer press line 2 to hang up Return to the original call by pressing line 1 5 To remove either caller from your conversation ask one of the parties to hang up Press the corresponding line button to end the call Fo...

Page 26: ...d 2 Press page int com on the base to contact the handset 3 Press int com on the handset to answer the page 4 Press conference at the base to bring the party at the handset in on the call line 1 and line 2 LEDs turn green The following screen appears 5 To remove either call from your conversation ask one of the parties to hang up Press the corresponding line button to end the call Conference Line ...

Page 27: ...he Base 1 Press int com on the handset If no answer press int com to disconnect 2 At the base press page int com to answer the page Speak within 12 inches of the base microphone To hang up at the handset Press int com To hang up at the base Press page int com USING YOUR EXS 9660 INTERCOM When a call is on h ho olld d at the handset and the base is paged the base will ring even when the RING VOL sw...

Page 28: ... with the intercom 4 On the base press line 1 to talk If no one is available to take the call at the base return to the caller by pressing line 1 or int com on the handset to take a message or complete the call t From Base to Handset 1 To transfer a call from the base to the handset press hold The line 1 LED turns red 2 On the base press page int com The status LED flashes on the base The followin...

Page 29: ...ilable to take the call at the handset return to the caller by pressing line 1 or p pa ag ge e iin nt t c co om m on the base to take a message or complete the call As you begin to move too far from the base you first hear a clicking sound As you travel further the noise increases If you travel out of range your call terminates TRAVELING OUT OF RANGE ...

Page 30: ...ling when you see the desired character Use the and keys to move right or left or to create a blank space The del key deletes characters as the cursor moves left 6 When you have finished entering a name press select The following screen appears The cursor flashes indicating the display is ready for a number to be entered Store Number z Store Name z Memory Store 01 02 STORING A PHONE NUMBER IN MEMO...

Page 31: ...LED blinks 2 Dial the number you wish to store 3 Press memory Enter the memory location number 0 9 on the keypad The status LED stops flashing A confirmation beep indicates the number is stored Memory 01 Stored When entering name numbers you may press pause to enter a pause in the dialing sequence The display shows a P The pause feature is useful for long distance calling credit card dialing or an...

Page 32: ... again to enter the Edit Memory mode The following screen appears A cursor flashes indicating that the display is ready to edit the name 6 Edit the name with the s and t keys Use the s and t keys to enter symbols Use the and keys to move the cursor left and right Store Name JOHN SMITH Edit Memory 01 Delete Memory 01 Go Back Memory Store 01 JOHN SMITH 02 UNIDEN EDITING A PHONE NUMBER IN MEMORY If y...

Page 33: ...ss del to remove an unwanted character Press and hold del to clear the entire number 9 Press select The handset beeps and displays the confirmation screen 10 The display then returns to the Memory Store screen You may select another number to edit return to step 3 or press exit to return to standby Memory 01 Stored Store Number 8175551z 31 Whenever you are using a menu screen you must press a key ...

Page 34: ... would like to delete The and keys toggle between the name display and the number display 4 Press select The following screen appears 5 Use the t key to move the cursor to Delete Memory 6 Press select 7 Use the s key to move the cursor to Yes 8 Press select There is a confirmation tone The following screen appears Memory 01 Deleted Delete Memory Yes No Edit Memory 01 Delete Memory 01 Go Back Edit ...

Page 35: ... return to step 3 or you may press exit to return to standby t From the Base 1 Press memory The status LED blinks 2 Press memory a second time Enter the memory location 0 9 of the number you wish to delete The status LED stops flashing A confirmation beep indicates the number has been erased 33 ...

Page 36: ...mory The handset displays your programmed memory locations 2 Use the s and t keys to select the memory location you would like to dial Or you may enter a memory location number 01 30 The following screen appears 3 Press line 1 The number dials 01 02 JOHN SMITH 03 UNIDEN 01 02 JOHN SMITH 03 UNIDEN USING MEMORY DIALING 34 ...

Page 37: ... line 1 2 Press memory Using the keypad enter the memory location number 01 30 The number dials t Dialing from the Base 1 Press line 1 The line 1 LED lights 2 Press memory Using the keypad enter the memory location number 0 9 The number dials 35 ...

Page 38: ... ID with Call Waiting performs the same as regular Caller ID on a call waiting number You must subscribe to CIDCW from your phone company to use this feature Area Code allows you to program your 3 digit area code number When reviewing Caller ID messages you will see only a seven digit number for calls received from inside your area code For calls from outside your area code you will see a full 10 ...

Page 39: ...ndby t Screening your calls Caller ID allows you to review caller information before answering your phone At the beginning of the second ring the display shows the line number that is being used name and phone number of the caller If your Caller ID service is number only the name does not appear on the second line If a name or number is not available the display shows a message such as Incomplete ...

Page 40: ...he name numbers The most recent message appears first with the date time call count name and phone number Press s to scan backwards 4 Once you have reviewed your oldest name number the following screen appears 5 Press exit to return to standby To review line 2 press caller id Use s or t to select line 2 Then press select Return to step 3 End of List 12 21 12 30PM 03 Smith John 817 555 1212 New Tot...

Page 41: ...ist 4 Select the name number that you would like to dial 5 Press line 1 The number automatically dials For long distance calling insert 1 by pressing 1 on the keypad before pressing line 1 12 21 12 30PM 03 Smith John 817 555 1212 New Total Line 1 00 02 Line 2 01 01 Once you have viewed all of your Caller ID name numbers and reach the End of List display the message list does not cycle back to the ...

Page 42: ...nd t keys to select a blank memory location where you would like to store the number If you want to replace an existing number with the Caller ID number skip to step 7 6 Press select A confirmation tone sounds The number is programmed 7 If you choose to replace an existing number with the Caller ID number press select The following screen appears 8 Use the s key to move the cursor to Yes Press sel...

Page 43: ...number that you would like to delete Press t to scan forward through the name numbers and s to scan backwards 4 Press del The following screen appears If you select No the Caller ID screen returns 5 Press select or del A confirmation tone sounds The Caller ID screen returns with the next name number displayed Delete Message Yes No 12 21 12 30PM 03 Smith John 817 555 1212 New Total Line 1 01 02 Lin...

Page 44: ...the number of new callers and total number of calls 2 Use s or t to move the cursor to line 1 or line 2 3 Press del to delete name numbers The following screen appears 4 Use the s key to move the cursor to Yes 5 Press select or del 6 A confirmation tone sounds The following screen appears 7 To delete Caller ID locations on Line 2 repeat steps 2 through 5 New Total Line 1 00 00 Line 2 00 01 Del All...

Page 45: ...a call when you hear the Call Waiting tone check the handset display for the name and number of incoming calls 2 Press flash to accept the incoming call See FLASH AND CALL WAITING page 19 for additional information Call Line 1 Smith John 817 555 1212 43 ...

Page 46: ...away from metal objects or appliances and try again Can t make or receive calls l Check both ends of the base telephone line cord l Make sure the AC adapter is plugged into the base and wall outlet l Disconnect the AC adapter for a few minutes then reconnect it l Place the handset back on the charging cradle for a few seconds The status LED blinks indicating that the phone has been reset The hands...

Page 47: ...n H Weight Approx 11 9 oz including optional battery Frequency 904 2 to 925 8 MHz 20 channels Power requirements Rechargeable Nickel Cadmium battery pack Size without antenna 2 1 4 in W x 1 3 4 in D x 7 1 4 in H Weight Approx 9 3 oz including battery Battery BT 990 Capacity 600 mAH 3 6V Talk mode 4 hours Standby mode 7 days Specifications features and availability of optional accessories are all s...

Page 48: ... at 1 800 297 1023 PLEASE DO NOT RETURN THIS PRODUCT TO THE PLACE OF PURCHASE Our Uniden representatives will be happy to help you with any matters regarding the operation of this unit available accessories or any other related matters Hours M F 7 00 a m to 7 00 p m CST Thank you for purchasing a Uniden product ...

Page 49: ...ents 4 511 761 4 523 058 4 595 795 4 797 916 5 381 460 5 426 690 5 434 905 5 491 745 5 533 010 5 574 727 5 650 790 5 660 269 5 661 780 5 663 981 5 671 248 5 717 312 5 754 407 5 768 345 5 787 356 5 838 721 1999 Uniden America Corporation All rights reserved Printed in China UCZZ01616BZ ...

Reviews: