- 8 -
1. 침봉높이의 조정 / Adjusting the needle bar height
2. 바늘과 가마의 타이밍 조정 / Adjusting the rotary hook position
조 정 / ADJUSTMENT
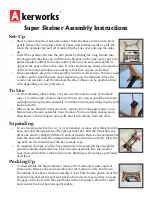
[침봉높이]
★ 미싱풀리를 천천히 돌리고, 바늘①을 최대로 내린 위치로 해주십시오. 이때 침봉②의 아래에서 두 번째
기선과 침봉 부싱(하)③의 A면이 일치하는 것을 확인해주십시오. (미싱바늘DB×1의 조정)
(나사④을 풀고, 침봉②의 아래에서 두 번째의 기선을 침봉 부싱(하)③의 A면에 맞춰주십시오. 조정후,
나사④을 확실히 채결해주십시오.)
★ Slowly turn the machine pulley to lower the needle ① to its lowest position. Make sure the second
reference line from the bottom on the needle bar ② aligns with surface A of the needle bar oil
rejector needle bar bush ③. (Needle: DB x #1)
To adjust the needle bar height, loosen the screw ④. Then align the second reference line from the
bottom of the needle bar ② with surface A of the needle bar oil rejector needle bar bush ③. Then
firmly tighten the screw ④.
[가마의 위치]
★ 미싱풀리를 미싱회전방향으로 천천히 돌리고, 침봉②의 가장 아래의 기선을 침봉붓싱(하)③의 A면에 맞춰주십시오. 이 상태
에서 가마의 칼끝⑤이 바늘①의 중심에, 또 바늘①의 구멍 위 가장자리와 가마 칼끝의 간격이 0~0.5mm 로 되어있는가를
확인해주십시오. (고정 나사⑥을 풀고, 가마의 칼끝⑤을 바늘①의 중심에 맞춘 후, 바늘①과 가마의 칼끝⑤과의 틈을
약0~0.05mm로 맞춰주십시오. 고정 나사⑥을 확실히 체결해주십시오.)
※ 가마를 바꾸었을 때는 반드시 가마 쪽의 급유조정을 해주십시오.
★ Align the bottom reference line of the needle bar ② with surface A of the needle bar oil rejector
needle bar bush ③ by turning the machine pulley slowly. At this time, make sure that the rotary
hook point ⑤ aligns with the needle cente ①, and that the gap between the top edge of the
needle ① hole and the rotary hook point ⑤ is 0~0.5mm. To adjust the gap, loosen the screw ⑥ and
then align the rotary hook point ⑤ with the needle center ①.
Adjust the gap between the rotary hook point ⑤ and the needle ① to 0~0.05mm. Then firmly tighten the screw ⑥.
※ Always perform the rotary hook lubrication adjustment after replacing the rotary hook.
Summary of Contents for LS2-H520
Page 2: ......
Page 4: ...5 off A S 33 2 40 25 OFF A S A S...
Page 14: ...4 OPERATION 3 Threading the needle...
Page 27: ...17 4 4 16 15 15 15 4 4 4 6 6 6 2...
Page 29: ...19 4 4 1 4 4 15 15 15 6 6...
Page 31: ...21 6 6 6 6 puff 15 19 23 4 22 19 23 19...
Page 33: ...23 6 1 22 6 24 24 24 24...
Page 35: ...25...