SonixTouch Q+ Service Manual
00.053.204, Revision A
Chapter 7: Field Service Components
7-19
7.3.2
Installing the Modulo
Equipment/Tools Required:
• 4mm Allen key
• 10mm wrench
• 7mm wrench
• #2 Phillips screwdriver
• cable ties.
To Install the Modulo:
1.
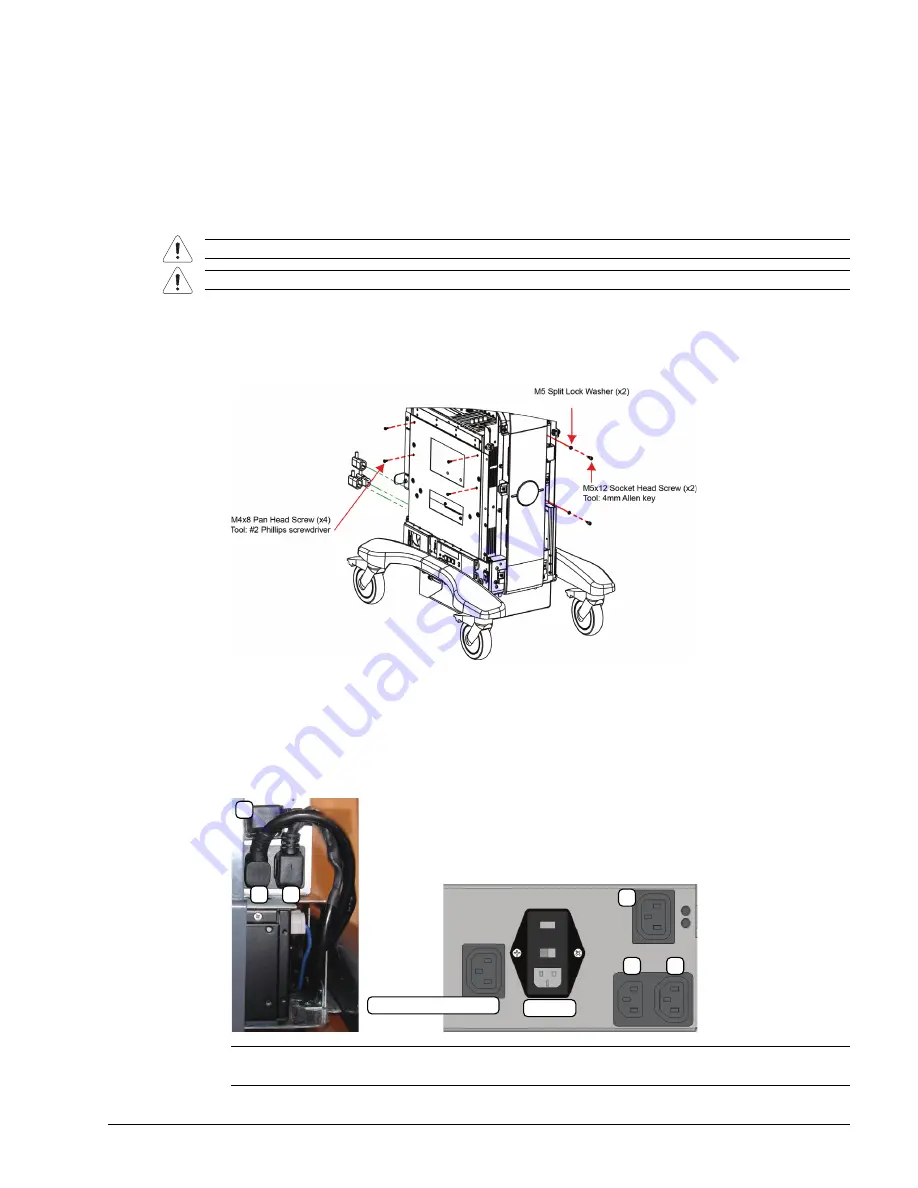
Slide the modulo into the side opening with the transducer connectors facing right.
2.
Push the modulo into position so the four bolt holes line up, then, using the #2 Phillips screwdriver, fasten the
four screws securing the modulo to the side system frame.
3.
Using the 4mm Allen key, fasten the two screws and washers securing the modulo to the front of the system
frame.
4.
Connect the three (bottom left rear) power cables connected to the modulo: LCD display power cable (
1
), UPS
input power cable (
2
) and UPS output power cable (
3
).
Warning:
Do not perform any internal system maintenance if the UPS breakers are turned on.
Caution:
Always wear a grounding strap when opening and working inside the modulo.
Note:
The LCD display power cable (1) is color coded with
green
tape.
Once power cable
1
is connected,
2
and
3
will fit only in their designated connectors.
System Power Connection
EMI Filter
1
2
3
1
2
3
Summary of Contents for SonixTouch Q+
Page 1: ...Analogic Ultrasound Service Manual SonixTouch Q Ultrasound System...
Page 2: ......
Page 4: ......
Page 14: ...Chapter 2 System Specifications 00 053 204 Revision A SonixTouch Q Service Manual 2 2...
Page 42: ...Chapter 4 Performance Testing 00 053 204 Revision A SonixTouch Q Service Manual 4 4...
Page 120: ...Chapter 8 DICOM 00 053 204 Revision A SonixTouch Q Service Manual 8 24...
Page 147: ......


