background image

34

KRMU000003

REV A - 07/20/01

CUSTOMIZE CHOICES MENU, 

continued

Using
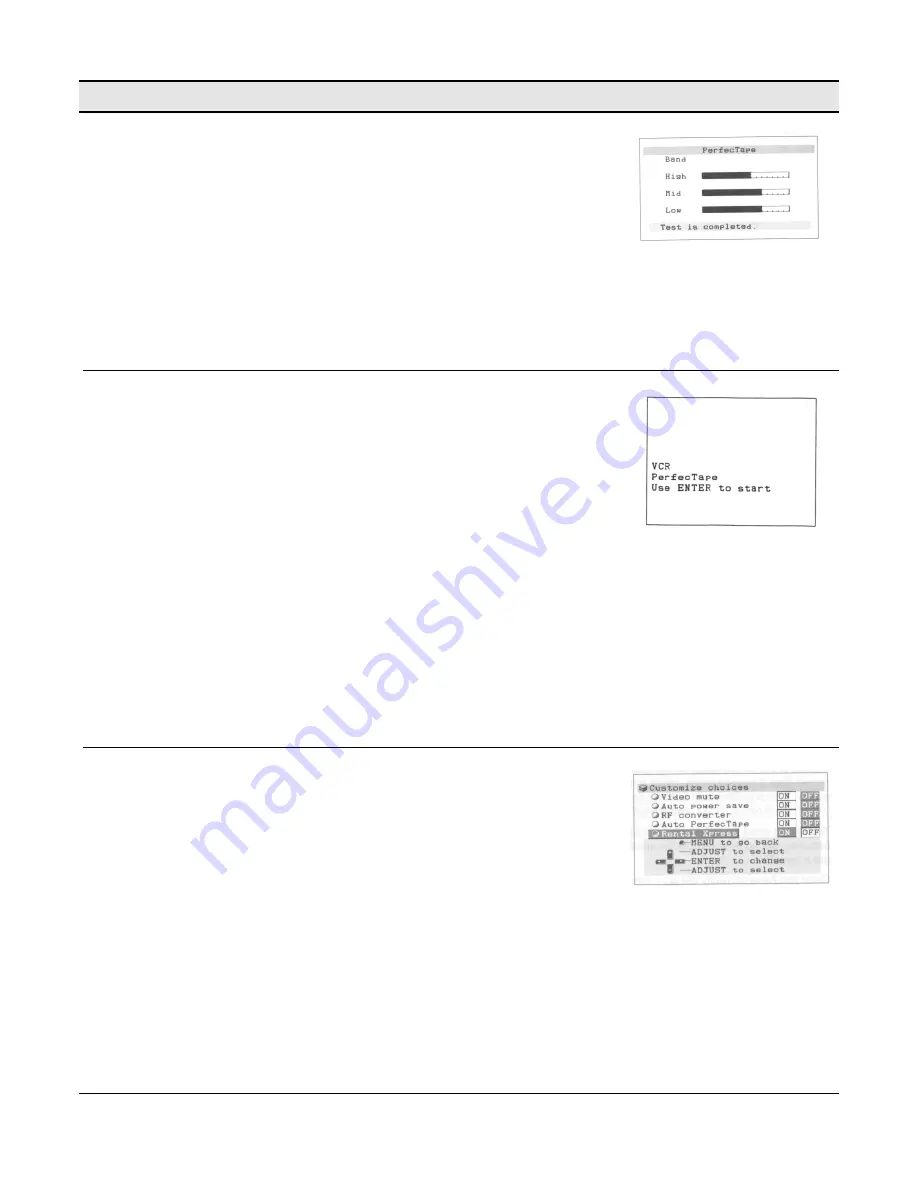
PerfecTape

®

Automatically

1.  Load a tape that has not been recorded into the VCR.

The VCR will display the testing status screen.  When
testing, the VCR records for one second, then evaluates
the recording it made.  The entire test takes about 8
seconds.  If you wish to cancel the test, press STOP on
the remote.

When the test is done, the VCR will display the rating of
your tape for 8 seconds, indicating that the VCR has set
its internal circuitry to make the best possible recording on
this tape.

Using
PerfecTape

®

Manually

1.  Load a tape that has its erasure prevention tab intact into

the VCR.

2.

Find a portion of the tape that is OK to record over; this
feature will record over one second of your tape.

3.

Press AUDIO/VIDEO on the remote control.  Function
menu appears.  Press AUDIO/VIDEO until the
PerfecTape function appears.

4.  Press ENTER on the remote to begin the test.  To cancel

the test, press STOP on the remote.

When the test is finished, the VCR will display the rating of
your tape for 8 seconds.  Turn off the display by pressing
STOP on the remote control.

If you wish to erase the settings, eject the tape.  The settings
will also be erased if the VCR loses power.  After the test is
finished, the PerfecTape function will not appear unless the
tape is ejected.

Rental
Xpress

When activated, the Rental Xpress feature will automatically
rewind the tape to the beginning, then eject and power off the
VCR after it has reached a blank section of 30 seconds or
longer on any tape with the erasure prevention tab removed.
To activate this feature:

1.  Press MENU on the remote control.  

VCR Main Menu

appears on your monitor.

2.  Use the ADJUST buttons on the remote to select

Customize choices

.  Press ENTER.

3.

Customize choices

 menu appears.

4.

Press the ADJUST buttons to select 

Rental Xpress

.

Press ENTER to select ON or OFF.

5.

Press MENU twice to turn off the menus.

Summary of Contents for KR4008EN

Page 1: ...A 07 20 01 KR4008EN Video Cassette Recorder INSTALLATION INSTRUCTIONS Ultrak Worldwide Support Center Sales Technical Support 1301 Waters Ridge Drive Lewisville TX 75057 800 796 2288 972 353 6400 FAX...

Page 2: ...T OF THIS PUBLICATION MAY BE REPRODUCED BY ANY MEANS WITHOUT WRITTEN PERMISSION FROM ULTRAK THE INFORMATION IN THIS PUBLICATION IS BELIEVED TO BE ACCURATE IN ALL RESPECTS HOWEVER ULTRAK CANNOT ASSUME...

Page 3: ...FUL INTERFERENCE TO RADIO OR TELEVISION RECEPTION WHICH CAN BE DETERMINED BY TURNING THE EQUIPMENT OFF AND ON THE USER IS ENCOURAGED TO TRY TO CORRECT THE INTERFERENCE BY ONE OR MORE OF THE FOLLOWING...

Page 4: ...triangle is intended to alert the user to the presence of uninsulated dangerous voltage within the product s enclosure that may be of sufficient magnitude to constitute a risk of electric shock to per...

Page 5: ...or bottom are provided for ventilation and to ensure reliable operation of the equipment and to protect it from overheating These openings must not be blocked or covered The openings should never be...

Page 6: ...erating instructions adjust only those controls that are covered by the operating instructions Improper adjustment of other controls may result in damage and will often require extensive work by a qua...

Page 7: ...e 10 Using Repaired Tapes 10 USING YOUR REMOTE CONTROL 10 Installing the batteries 10 Using the remote control to operate your TV 11 Setting your remote control to operate your TV 11 Operating your TV...

Page 8: ...gramming 24 Program Caution 24 Programs that End on the Day After 24 Program Skip Using Menus 24 Program Skip Using the POWER Button 25 Changing the Timer Recording Settings 25 Canceling a Timer Recor...

Page 9: ...Tape 33 Using PerfecTape Automatically 34 Using PerfecTape Manually 34 Rental Xpress 34 VCR B SIGNALS 35 To program the KR4008EN and remote to VCR B 35 To reprogram the KR4008EN and remote to VCR A 35...

Page 10: ...x KRMU000003 REV A 07 20 01 THIS PAGE INTENTIONALLY LEFT BLANK...

Page 11: ...tte recorder include Program conflict warning Advanced playback controls Automatic tracking Alfa 500 Precision High Speed Mechanism with 500x rewind fast forward speed Multiple searching techniques Re...

Page 12: ...2 KRMU000003 REV A 07 20 01 THIS PAGE INTENTIONALLY LEFT BLANK...

Page 13: ...trol sensor Receives signals from a remote control If using a remote control do not block this sensor CHANNEL Changes channels Adjusts tracking and picture vibration REW Rewinds a tape or reverse sear...

Page 14: ...ghts up when the current time or start time of OTR 2 is in the afternoon Turns off when it is in the morning Recording Speed Indicator LED lights when the recorder is in Extended Play EP mode Rear Pan...

Page 15: ...und to its previous volume Operates the TV only Number buttons Selects TV stations Sets quick search CM skip time QUICK PROGRAM Goes to Program to record menu Exits the programming screen INPUT Select...

Page 16: ...k Mode X2 Use double speed playback when playing a tape INDEX Begins index search forward and backward Controls the playback speed of a tape AUDIO VIDEO Selects the audio and video settings to be adju...

Page 17: ...connects to RD 4 Orange White 5V connects to BK 3 Blue White cathode connects to YL 2 Blue anode connects to GR 1 IMPORTANT Retain this sheet for future reference Control terminal box diagram and ins...

Page 18: ...8 KRMU000003 REV A 07 20 01 THIS PAGE INTENTIONALLY LEFT BLANK...

Page 19: ...akes it in If the VCR will not automatically take the tape in press EJECT and try again Your VCR will eject the tape if it is loaded improperly If the VCR ejects the tape remove the tape check to see...

Page 20: ...ill automatically stop to prevent damage to the tape Controlling Vibration during Still Frame If the picture vibrates during still frame press the CHANNEL buttons on the front panel until the picture...

Page 21: ...or the brand of your TV If none of the codes listed for the brand of your TV work then repeat step 3 several times using a different code button until one works The possible code buttons are 0 1 9 MUT...

Page 22: ...VCR to display on screen messages menus and functions in English or Spanish You will do this the first time you use the menus or set any audio and video functions 1 Make sure you are viewing the pictu...

Page 23: ...the ADJUST buttons to set the current year Press ENTER 6 Press the ADJUST buttons to set the date Press ENTER 7 The hour numbers and the am pm indicator will be blinking Press the ADJUST buttons to se...

Page 24: ...r each additional 30 minutes you want to add to the OTR timer up to 4 hours If you press the button 10 times you will see End on the front panel display The VCR will record until the end of the tape I...

Page 25: ...ent will be displayed Similarly if it is currently 2 40 3 00 the next half hour increment will be displayed Each time you press the button the start time is delayed by 30 minutes 4 Press REC REC LENGT...

Page 26: ...splay function work properly The VCR will display the functions and settings on your monitor The first section describes the functions The next section tells you how to adjust the functions Selecting...

Page 27: ...IMPORTANT If you have your VCR connected to a surround sound system set the audio monitor to Stereo Surround sound requires both left and right channels to create the rear channel effects While the V...

Page 28: ...cture set it to Sharp to sharpen it and set it to Normal when you do not want to use this feature Use Normal on new or high quality tapes If it is set to Auto the VCR will automatically select the ide...

Page 29: ...R IMPORTANT The KR4008EN only records from the video input jacks Only one video input jack can be used at a time IMPORTANT If you have already programmed 8 recording events Program memory is full will...

Page 30: ...JUST buttons to set the recording speed SP standard play EP extended play AUTO auto Auto speed programming is discussed in the Timer Recording Hints section IMPORTANT If you press ENTER when you set t...

Page 31: ...additional program lines press the ADJUST buttons to scroll the lines on the screen Canceling a Recording in Progress There are two ways to stop a recording in process Press STOP on the front panel or...

Page 32: ...ll appear IMPORTANT If the VCR memory is full Program memory is full will appear for 3 seconds and then the Recap screen will appear Use CANCEL to erase an entry before you can add another one 2 Compl...

Page 33: ...ram memory is full will appear on the screen If so you must erase a program before you can enter a new one If a Tape Runs Out or is Not Loaded If a tape runs out during timer recording the VCR ejects...

Page 34: ...VCR is still turned on 12 seconds before the start time of the recording that timer recording will be canceled Programs that End on the Day After If you want to start a recording at 11 00pm and end i...

Page 35: ...ng menu 4 Press ENTER repeatedly to select the item you wish to change Use the ADJUST buttons to change it The press ENTER repeatedly to return the altered program to the Recap screen 5 Press MENU twi...

Page 36: ...rmal playback press PLAY Using and on the Remote to Control the Playback Speed 1 While the VCR is playing a tape press or on the remote control Each press of changes the playback speed by one step in...

Page 37: ...g a tape Manual Tracking From time to time you might play a tape that has excess noise in the picture often looking like vibration or interference at the top or bottom o the screen To correct the pict...

Page 38: ...arch visually search Counter zero stop direct to start of recording Index search find specific index points Search to blank find the beginning of the blank section Quick Search CM Skip Quick search le...

Page 39: ...visual search speed increases Using speed search for long stretches of tape may cause the video heads to become dirty faster The fastest way to move through the tape is without a picture which allows...

Page 40: ...d index marks manually at any point during recording Automatic Index Marks Whenever recording is begun from the STOP mode an index mark is automatically added to the tape A message will indicate that...

Page 41: ...back will begin 3 Press STOP to cancel the repeat IMPORTANT While the VCR is rewinding to the beginning of the tape you cannot use repeat playback counter zero stop or index search DISPLAYING THE TIME...

Page 42: ...rrectly depending on your tape DISPLAYING THE CURRENT TIME The current time is shown in the front panel display or the monitor If you have not set the clock or if there has been a power failure longer...

Page 43: ...menu use the ADJUST buttons to select Auto power save Press ENTER to set to ON 4 Press MENU twice to turn off the menus PerfecTape PerfecTape tests the quality of video tapes you will record on After...

Page 44: ...PerfecTape function appears 4 Press ENTER on the remote to begin the test To cancel the test press STOP on the remote When the test is finished the VCR will display the rating of your tape for 8 seco...

Page 45: ...am the KR4008EN and remote to VCR A Make sure that the KR4008EN is plugged in but turned OFF On the VCR front press SP EP and FF at the same time To confirm that the VCR responds to VCR A signals A ap...

Page 46: ...o turn the power ON If a tape is loaded the tape protecting function will work and 99 will appear on the front panel display to begin countdown Wait about 1 minute until it reaches 00 to show the tape...

Page 47: ...heck the quality of the video tape Playback is noisy or snowy Clean the video heads using a dry type video head cleaning cassette Do not use a wet type cleaning cassette as it may damage your VCR Exce...

Page 48: ...More than 45 dB SP More than 46 dB EP TIMER PROGRAM CAPACITY 1 month programmable 8 programs MEMORY BACKUP TIME Approximately 3 minutes MAXIMUM RECORDING TIME 120 minutes with T 120 video cassette SP...

Reviews: