background image

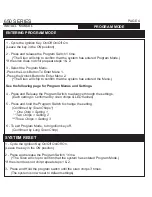
Cycle the Ignition Key 
ON/OFF ON/OFF ON
(Leaving the key ON)

Press and release the 
Program Switch 1 time. 

Siren will chip to confirm 
program mode entered

Press Unlock Button on
Remote to Select Menu 2

1 CHIRP

SETS OPTION 1 – SECURE VALET - 

 The LED/ Program Switch must 

be held for 15 seconds to place the system into Valet Mode.  

SETS OPTION 2 – STANDARD VALET- 

The LED/ Program Switch must be 

held for 5 seconds to place the system into Valet Mode.

SETS OPTION 1 – 30 SECOND- 

The park light output will flash for all 

functions and will stay active for 30 seconds when unlock is pressed.

SETS OPTION 2 –


Trunk Release- 

The park light output will act as a 

positive trunk output. The trunk output acts as a negative park light. 

SETS OPTION 3 – Normal Operation- 

The park lights will flash for all 

alarm functions. 

CHANGE SETTING 1 - 
GOTO SETTING 2 - 

PRESS & RELEASE THE VALET SWITCH

PRESS & HOLD THE VALET SWITCH UNTIL THE SIREN CHIRP(S)

CHANGE SETTING 2 - 

PRESS & HOLD THE VALET SWITCH UNTIL THE SIREN CHIRP(S)

GOTO SETTING 3 - 

PRESS & RELEASE THE VALET SWITCH

1 CHIRP

1 CHIRP

2 CHIRP

2 CHIRP

3 CHIRP

DEFAULT SETTING

DEFAULT SETTING

STEP 2 - SELECT / CHANGE PROGRAM SETTINGS

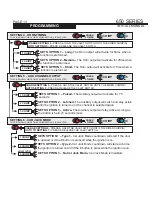
SETS OPTION 1 – Pulsed Output- 

The channel 3 output will pulse for .75 seconds 

when activated.

SETS OPTION 2 –


Latched Output- 

The channel 3 output will latch on when activated. 

Turning the ignition on will cancel the latch.

 SETS OPTION 3 – 

Active Output- The channel 3 output will stay on as long as the 

button is held for a maximum of 5 seconds.

CHANGE SETTING 2 - 

PRESS & HOLD THE VALET SWITCH UNTIL THE SIREN CHIRP(S)

GOTO BACK TO SETTING 1 - 

PRESS & RELEASE THE VALET SWITCH

1 CHIRP

2 CHIRP

3 CHIRP

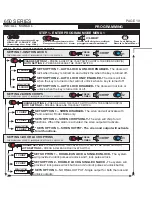
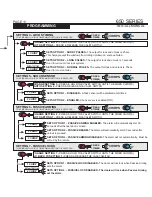
STEP 1 - ENTER PROGRAM MODE - MENU 2

SETTING 1 - VALET SETTINGS

THE SIREN WILL CHIRP 1 TIME WHEN SETTING 1 IS SELECTED

PRESS 

1 TIME

X1

1 CHIRP

SETTING 2 -  PARKING LIGHT OUTPUT

THE SIREN WILL CHIRP 2 TIMES WHEN SETTING 2 IS SELECTED

PRESS 

2 TIMES

X2

2 CHIRP

SETTING 3 - AUX CHANNEL OUTPUT

THE SIREN WILL CHIRP 3 TIMES WHEN SETTING 3 IS SELECTED

PRESS 

3 TIMES

X3

3 CHIRP

DEFAULT SETTING

SYSTEM PROGRAMMING - 

Menu 1

PAGE 12

650 SERIES

INSTALL  MANUAL

PROGRAMMING

SYSTEM PROGRAMMING - 

Menu 1

PAGE 13

650 SERIES

INSTALL MANUAL

PROGRAMMING

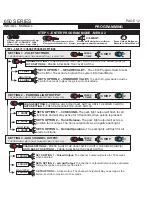
SETS OPTION 1 – Long- 

The Horn output will activate for 50ms when a 

function is preformed.  

SETS OPTION 2 –Medium - 

The Horn output will activate for 20ms when 

a function is preformed.

SETS OPTION 1 – Pulsed- 

The Auxiliary output will activate for .75 

seconds.

SETS OPTION 2 –


Latched- 

The Auxiliary output will Latch and stay active 

until the ignition is turned on or the channel is selected again.

SETS OPTION 3 – Active- 

The Auxiliary output will stay active as long as 

the button is held. (5 seconds max).

CHANGE SETTING 4 - 
GOTO SETTING 5 - 

PRESS & RELEASE THE VALET SWITCH

PRESS & HOLD THE VALET SWITCH UNTIL THE SIREN CHIRP(S)

CHANGE SETTING 5 - 

PRESS & HOLD THE VALET SWITCH UNTIL THE SIREN CHIRP(S)

GOTO SETTING 6 - 

PRESS & RELEASE THE VALET SWITCH

1 CHIRP

1 CHIRP

2 CHIRP

2 CHIRP

3 CHIRP

DEFAULT SETTING

SETS OPTION 1 – Type 1- 

Car Jack Mode countdown will start if the door 

is opened or if the # button is pressed while the ignition is on.

SETS OPTION 2 –


Type 2- 

Car Jack Mode countdown will start each time 

the ignition is turned on and if the # button is press while the ignition is on.

 SETS OPTION 3 – No Car Jack Mode-

 Car Jack Mode is disabled.

CHANGE SETTING 6 - 

PRESS & HOLD THE VALET SWITCH UNTIL THE SIREN CHIRP(S)

GOTO TO SETTING 7 - 

PRESS & RELEASE THE VALET SWITCH

1 CHIRP

2 CHIRP

3 CHIRP

SETTING 4 - HORN TIMING

THE SIREN WILL CHIRP 4 TIMES WHEN SETTING 4 IS SELECTED

PRESS 

4 TIMES

X4

4 CHIRP

SETTING 5 -  AUX CHANNEL OUTPUT

THE SIREN WILL CHIRP 5 TIMES WHEN SETTING 5 IS SELECTED

PRESS 

5 TIMES

X5

5 CHIRP

SETTING 6 - CAR JACK MODE

THE SIREN WILL CHIRP 6 TIMES WHEN SETTING 6 IS SELECTED

PRESS 

6 TIMES

X6

6 CHIRP

DEFAULT SETTING

SETS OPTION 3 – Short- 

The Horn output will activate for 10ms when a 

function is preformed.

3 CHIRP

DEFAULT SETTING

Summary of Contents for 650 Series

Page 1: ...ct to the following conditions 1 This device may not cause harmful interference and 2 This device must accept any interference received including interference that may cause undesired operation CAUTIO...

Page 2: ...Car Operation PAD LOC System Programming Page 10 14 Program Menu1 Program Menu 2 Shock Sensor Programing Page 15 Increase Sensitivity Decrease Sensitivity Diagnostics Page 16 Diagnostics Chart Quick...

Page 3: ...RAMMING Menu 1 PAGE 3 650 SERIES INSTALL MANUAL WIRE DIAGRAM FOR MORE DETAILED INFORMATION ON PROGRAMMING WIRING DIAGRAMS DOOR LOCK CONFIGURATION AND OTHER INFORMATION PLEASE VISIT WWW ULTRASTARTERS C...

Page 4: ...Each setting is Confirmed by siren chirps LED flashes 5 Press and hold the Program Switch to change the setting Confirmed by Siren Chirps One Chirp Setting 1 Two Chirps Setting 2 Three Chirps Setting...

Page 5: ...E DOOR LOCKS SIREN CHIRPS DISABLED DOUBLE UNLOCK SINGLE LOCK PULSES 0 25 SECOND PULSES SENSOR DISABLED FULL PASSIVE ARMING PASSIVE DOOR LOCKS DISABLED SIREN CHIRPS ENABLED DOUBLE LOCK SINGLE UNLOCK PU...

Page 6: ...2 Brown Siren Output Pin 3 Red Constant 12volt Input Pin 4 Black System Ground Input Pin 4 Orange Wire Ground When Armed 250ma Output Pin 7 Green Wire Negative Door Pin Input Pin 8 Blue Wire Hood Swi...

Page 7: ...IS PRESSED PIN 4 ORANGE PIN 3 GRAY PIN 2 WHITE BLUE CONTINUOS OUTPUT WHEN THE LOCK BUTTON IS PRESSED OUTPUT WHEN THE UNLOCK BUTTON IS HELD FOR 3 SECONDS OUTPUT FOR FACTORY HORN HONK ACTIVATION PIN 1 P...

Page 8: ...SENSOR FULL TRIGGER INPUT FOR AUXILIARY SENSOR PIN 1 BLUE WARN AWAY INPUT FOR AUXILIARY SENSOR PROGRAMMING SWITCH STATUS LED Plug the Program Switch into the Blue connector on the alarm module This s...

Page 9: ...ill Chirp 1 time to confirm remote has been programmed If siren does not chirp press button again 5 Press Release LOCK button on 1st Remote to be Programmed for Normal Operation If remote s are to be...

Page 10: ...NTIL THE SIREN CHIRP S CHANGE SETTING 2 PRESS HOLD THE VALET SWITCH UNTIL THE SIREN CHIRP S GOTO SETTING 3 PRESS RELEASE THE VALET SWITCH 1 CHIRP 1 CHIRP 2 CHIRP 2 CHIRP 3 CHIRP 3 CHIRP DEFAULT SETTIN...

Page 11: ...PULSES The output for lock and unlock is 75sec Used for most vehicles 1 CHIRP 2 CHIRP 3 CHIRP DEFAULT SETTING SETTING 4 LOCKS TIMING THE SIREN WILL CHIRP 4 TIMES WHEN SETTING 4 IS SELECTED PRESS 4 TI...
Page 12: ...THE VALET SWITCH UNTIL THE SIREN CHIRP S GOTO SETTING 3 PRESS RELEASE THE VALET SWITCH 1 CHIRP 1 CHIRP 2 CHIRP 2 CHIRP 3 CHIRP DEFAULT SETTING DEFAULT SETTING STEP 2 SELECT CHANGE PROGRAM SETTINGS SE...
Page 13: ...WITCH 1 CHIRP 1 CHIRP 2 CHIRP 2 CHIRP 3 CHIRP DEFAULT SETTING SETS OPTION 1 Type 1 Car Jack Mode countdown will start if the door is opened or if the button is pressed while the ignition is on SETS OP...
Page 14: ...NG 6 PRESS RELEASE THE VALET SWITCH 1 CHIRP 1 CHIRP 2 CHIRP 2 CHIRP DEFAULT SETTING SETS OPTION 1 When Disarmed The output will switch to ground when the alarm is disarmed SETS OPTION 2 2nd Unlock Thi...

Page 15: ...hes Chirps is the most sensitive setting Each time the unlock button is pressed and released the sensitivity will Decrease by 1 level This is confirmed by a series of park light flashes Siren Chirps 1...

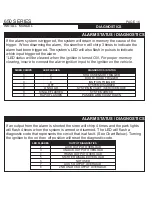
Page 16: ...If the alarm system is triggered the system will retain in memory the cause of the trigger When disarming the alarm the siren horn will chirp 3 times to indicate the alarm had been triggered The syste...

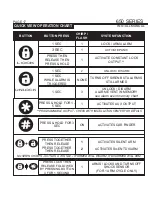
Page 17: ...ESS HOLD FOR 1 5 SEC 1 ACTIVATES AUX OUTPUT PROGRAMMABLE OUTPUT CHECK WITH INSTALLATION CENTER FOR DETAILS PRESS HOLD FOR 3 SEC ON ACTIVATES CAR FINDER PRESS TOGETHER THEN RELEASE PRESS TOGETHER THEN...

Page 18: ...SEC 2 UNLOCK DISARM 1 SEC WHILE ALARM IS TRIGGERED NONE TURNS OFF SIREN BUT ALARM IS STILL ARMED 1 SEC 3 UNLOCK DISARM ALARM EVENT IN MEMORY see alarm event memory chart PRESS HOLD FOR 1 5 SEC 1 ACTI...

Page 19: ...within ten 10 days of the date of purchase to the address listed on the card the unit s date code or serial number is defaced missing or altered the unit has been modified or used in a manner contrar...

Page 20: ...technical support support ultrastarters com additional product information www ultrastarters com TM...

Reviews: