background image

6

Assembly Instructions

26

30

32

27

33

28

25

29

31

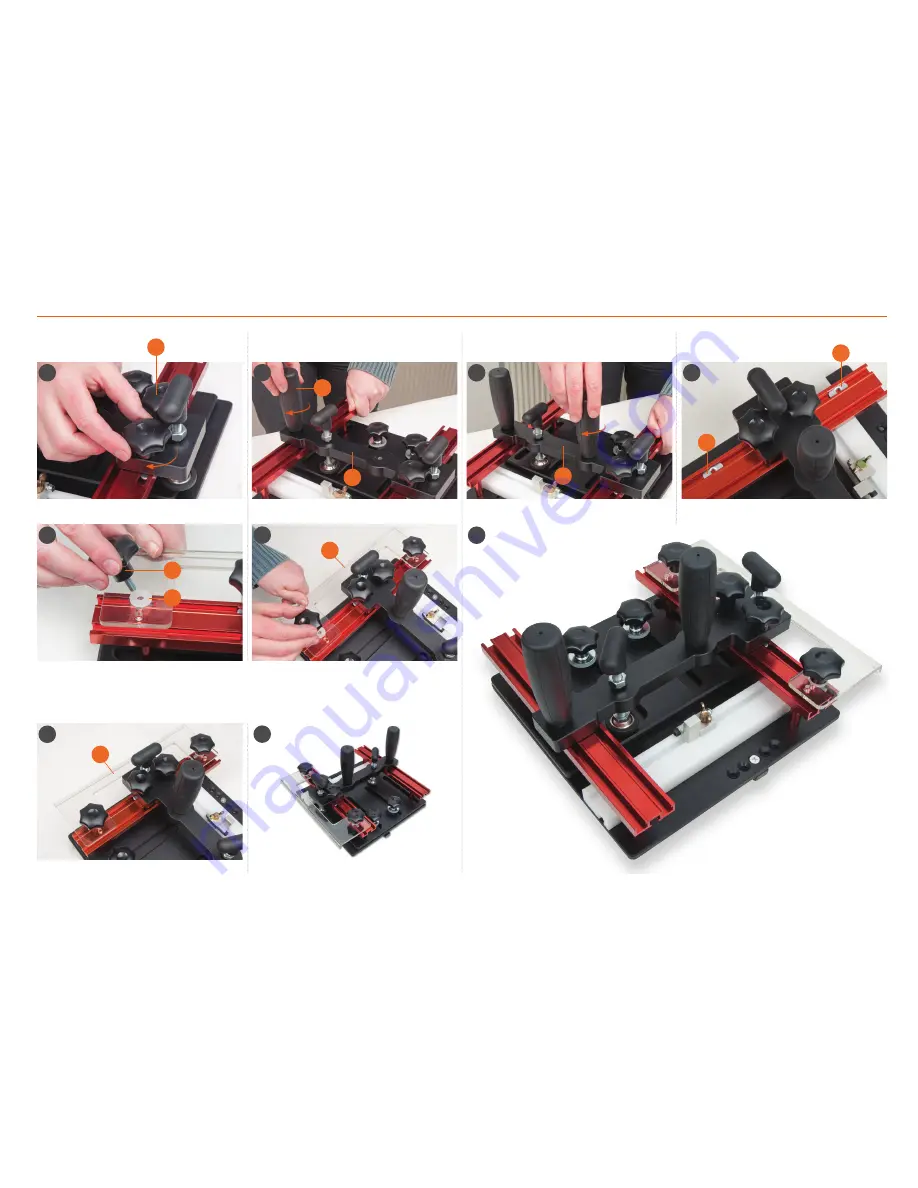
Insert the two clamping knobs (K) down through the 

holes in assembly (B), into the oval nuts (N), see above

Perspex assembly (D) assembled

Professional Coping Sled assembled

Place a nylon washer (Q) over each threaded knob (L). Line up one of the three holes to either side of Perspex chip guard (D) 

with the threaded oval nuts (N) and introduce the threaded knobs (L) down through assembly (D) and into the oval nuts (N). 

lightly tighten the chip guard (D), but not too tight to avoid cracking the Perspex  

Locate the two handles (I), insert the handle with the longest 

thread through the hole in assembly (B) into the oval nut (N)

Screw the other handle (I) into the remaining 

hole in the assembly (B) and lightly tighten   

Insert the two remaining oval nuts (N) as described in step 23  

on either side of assembly (B) as shown above

I

B

Q

D

D

L

B

N

N

K

Summary of Contents for 102946

Page 1: ...ustable for zero play Work pieces firmly held horizontally and vertically eliminating kickback Vertical clamp close to the point of cut minimises vibration Nylon rear fence prevents tear out and will...

Page 2: ...uides smoothly across the router bit The Coping Sled secures your work piece both horizontally and vertically A slotted top plate holds the work firmly against the sled s rear fence This plate prevent...

Page 3: ...3 Parts Breakdown P A B C D E F G H I J K N O Q R S L M...

Page 4: ...above Repeat the procedure for the two large washers S Locate the two top plate clamping knobs M and screw them onto the Phillips screw threads P Move the T bar a so the countersink holes b are not ob...

Page 5: ...in the base C Introduce the height spacer tubes down over the four threads as shown Put to hand three oval nuts N and the two threaded knobs K Turn the assembly over and tighten all the fixings Remove...

Page 6: ...rd D with the threaded oval nuts N and introduce the threaded knobs L down through assembly D and into the oval nuts N lightly tighten the chip guard D but not too tight to avoid cracking the Perspex...

Page 7: ...erspex chip guard Nylon sled fence Top plate Guide rail Operating handle Clamping beam Clamping beam locking knob T Bar Top plate clamping knob Hold down clamp Fence guide clamping knob Adjustable sto...

Page 8: ...ugh the body of the sled lining up parallel to with the nylon fence The fence on the router table acts as a length stop The end grain face of the workpiece should hit the router fence squarely with no...

Page 9: ...e boards together as soon as they have been machined T slot cutter to make replacement wooden breakout fence boards T slot track will allow the sled to be use if you are making your own table 9 8 Do a...

Page 10: ...16 905M06065 Flat Head Screw M6x65 4 17 21310007 Spacers Tubes 4 18 21310008 Top Tracks 2 19 21310009 Guide 1 20 21310010 Nylon Washer 2 21 940M06016 Lock Knob M6xl6 2 22 21310011 Fence Oval Nuts 5 23...

Page 11: ...11 Notes...

Page 12: ...designs and ideas Please dispose of packaging for the product in a responsible manner It is suitable for recycling Help to protect the environment take the packaging to the local recycling centre and...

Reviews: