Ugolini MINI GEL PLUS Operator'S Manual Download Page 16

16

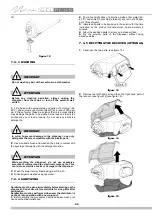
The functions of the keys on the keypad are as follows:

The following symbols are present on the display:

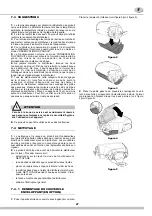
FOR DISPENSER OPERATION

Set the ON/OFF switch to I. The red LED B will be on.

Hold down key A until the dispenser starts up.
Use keys E or H to select the desired dispenser operating mode:

In machines with several tanks, pressing the key relating to

the activated operating mode will then make it possible to

switch off both mixing and freezing of the corresponding

tank. Pressing one of the two keys (E) or (H) makes it

possible to reactivate the corresponding function.

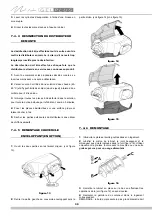
7. 2  ADDITIONAL FUNCTIONS

ADJUSTING THE DENSITY

During operation in ICE CREAM OR CRUSHED ICE DRINK

PREPARATION mode, you can regulate the density of the

product from a minimum value of 1 to a maximum value of 10

using the C and D keys. Within the 1 to 5 range, you can

regulate the density in steps of 0.5, while in the 5 to 10 range,

you can regulate the density in steps of 1. The setting made at

the factory is 8, which is ideal for preparing ice cream. The

settings that should be made to prepare other products are

indicated below:

Crushed-ice drink: set density to a value of between 1 and 3.

Sorbet: set density to a value of between 2 and 4.

Water-based ice cream: Adjust the density  between 6 and 8.

Ice cream-based milk: Adjust the density between 8 and 10.
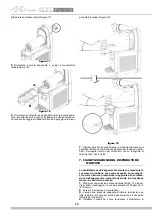
WASHING MODE

When the dispenser is in STORAGE mode, holding down key E

for three seconds activates WASHING mode, during which the

display shows “--.--”.  In this mode, the mixer rotates but cooling

is not enabled.

Use this function while washing and sanitising the machine to

prevent the sanitising solution from being cooled.

When any key is pressed, the dispenser exits WASHING mode

and returns to STORAGE mode.

TEMPERATURE ALARM

The temperature shown on the display is usually fixed. If the “O”

symbol blinks and appears on the display, this means that the

product has remained for some time above its maximum storage

temperature and so the product should be inspected to

determine whether it has deteriorated.

To reset the alarm and return to the fixed display, hold down key
H for three seconds.

PRODUCT READY ALERT

During the preparation of the product, LED G flashes. When the

product is ready, LED H stops flashing.

KEY LOCK

The keypad can be locked to prevent access to the dispenser

commands. To do this, hold down keys E and H at the same

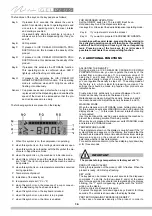
time for two seconds. A keyboard lock is signalled by the display

blinking, the “T” symbol appearing together with the “BLOC”

writing on the display.

All the controls are locked at this point. 

To unlock the keypad, hold down again keys E and H for three

seconds. The unlock is shown when the display flashes.

PROTECTION AGAINST EXCESSIVE DENSITY

In the case of excessive density of the product, in order to

Key A

If pressed for 2 seconds, this allows the user to
switch from standby mode to operating mode and
vice versa. In operating mode, the mixer rotates
and cooling is enabled. 
If pressed briefly while the machine is running, it
allows users to turn the dispenser lights, if any, on
and off.

Key B

LED operation

Key C

If pressed in ICE CREAM OR GRANITA PRO-
DUCTION mode, this increases the density of the
product.

Key D

If pressed in ICE CREAM OR GRANITA PRO-
DUCTION mode, this decreases the density of the
product.

Key E

If pressed, this activates the STORAGE function.
This operating mode is confirmed when LED F
lights up, either flashing or continuously.

Key H

If pressed, this activates the ICE CREAM OR
GRANITA PRODUCTION function. This operating
mode is confirmed when LED G lights up, either
flashing or continuously.

Sensor I Cup presence sensor: detects when a cup or cone

is placed under the dispensing tap and enables the
speed of the mixer to be increased so that the pro-
duct is dispensed more easily.
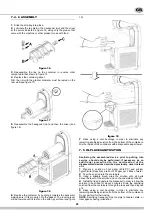
J

When this symbol is on, the compressor is operating.

K

when this symbol is on, the cooling solenoid valve is open.

L

when this symbol is on together with the M symbol, the ma-

chine is in SuperService mode.

M when this symbol is on, the machine is in Service mode.
N when this symbol is on and the display shows the indica-

tion “COU”, the lid is not present and the machine cannot

be operated.

O when this symbol is on, a temperature alarm has occurred

during operation.

P

Temperature of product.

Q Indication of the density set.
R temperature scale set (°C or °F).
S

when this symbol is on, the presence of a cup or cone un-

der the dispensing tap has been detected.

T

when this symbol is on, the keyboard is locked.

U when this symbol is on, an alarm is in progress.
V

when this symbol is on, the timer is enabled.

Key E

If you just want to store the product.

Key H

If you want to prepare ICE CREAM OR GRANITA

IMPORTANT

The product storage temperature is factory set at 2 °C.

Summary of Contents for MINI GEL PLUS

Page 1: ...MANUALE D ISTRUZIONE OPERATOR S MANUAL CARNET D INSTRUCTIONS GEBRAUCHSANWEISUNG MANUAL DE INSTRUCCIONES...

Page 2: ...2 3 PLUS 230V 50Hz mit den folgenden Normen ber einstimmen Gem den EWG Richtlinien 2014 30 CE 2014 35 CE 2006 42 CE DECLARACI N DE CONFORMIDAD CE Nosotros Ugolini S p A Via Mario Ugolini 3 27010 Torr...

Page 3: ...istema che questo ha adottato per consentire la raccolta separata dell apparecchiatura giunta a fine vita L adeguata raccolta differenziata per l avvio successivo dell apparecchiatura dismessa al rici...

Page 4: ...to apparecchio destinato all utilizzo per applicazioni domestiche e simili 2 Per un corretto funzionamento la temperatura ambiente deve essere compresa tra 5 e 32 C 3 Utilizzare l apparecchio esclusiv...

Page 5: ...ume Per questo motivo i contenitori non devono essere riempiti fino alla massima capacit Per la preparazione di granite considerare un aumento di volu me pari a circa il 10 Per la preparazione di gela...

Page 6: ...are la dentit tra 6 e 8 Posizione 0 il distributore spento Posizione I il distributore abilitato al funzionamento ma si trova in Modalit Stand by La sola spia B risulta accesa Tasto A Se premuto per 2...

Page 7: ...alla densit impostata in modalit PREPARAZIONE IMPORTANTE La temperatura di conservazione del prodotto regolata in fabbrica a 2 C ABILITAZIONE AL FUNZIONAMENTO IMPORTANTE Affinche sia possibile utiliz...

Page 8: ...e lavaggio sono fondamentali per garantire la per fetta conservazione del gusto del prodotto e la massima effi cienza del vostro distributore Le procedure descritte nel seguito devono essere consider...

Page 9: ...tura per la chiusura di sicurezza del coperchio ruotare la chiave in senso antiorario per sbloc care il tasto di apertura vedere figura 6 figura 6 2 Per smontare il contenitore necessario spingere ver...

Page 10: ...o vedere figura 12 figura 12 7 4 3 LAVAGGIO 1 Riempire una bacinella con circa 4 5 litri di acqua calda 45 60 C e ipoclorito di sodio candeggina con una percentuale di 200 ppm per 2 litri d acqua Una...

Page 11: ...are all aria su una superficie pulita le parti sanitizzate 5 Asciugare le parti esterne del distributore senza usare panni abrasivi 7 4 5 RIMONTAGGIO RECOVER OPZIONALE 1 Aprire le due parti facendo sc...

Page 12: ...un tovagliolo di carta del tipo usa e getta 7 5 SANITIZZAZIONE DEL DISTRIBUTORE MONTATO La sanitizzazione dell apparecchio montato precedente la sua messa in funzione pu essere eseguita se necessario...

Page 13: ...a polvere accumulatasi sul filtro del condensatore posto sul lato posteriore della macchina vedere figura 21 figura 21 4 In caso di rumore anomalo scollegare il refrigeratore e rivolgersi all assisten...

Page 14: ...toxic liquids to the appliance 3 TECHNICAL CHARACTERISTICS We reserve the right to amend this manual without notice 4 INTRODUCTION Read this instruction booklet carefully in order to familiarise your...

Page 15: ...our it into the machine containers after making sure that it is homogeneous and that the powder is well dissolved 6 Using the controls see Chapter 7 1 DESCRIPTION OF CONTROLS 7 The dispenser must oper...

Page 16: ...n be locked to prevent access to the dispenser commands To do this hold down keys E and H at the same time for two seconds A keyboard lock is signalled by the display blinking the T symbol appearing t...

Page 17: ...viously be enabled for the operation by set ting the regulation parameter PA09 to ON To perform this operation do as follows Start the machine in Service Mode by enabling the main switch and keeping p...

Page 18: ...TCH to OFF 7 4 1 DISASSEMBLING THE RECOVER OP TIONAL 1 Place the right hand part of the recover on a surface Place the container inside it see figure 2 see figure 3 figure 2 figure 3 2 Put the left ha...

Page 19: ...ut of the evaporator cylinder Then remove the hexagonal joint see figure 9 figure 9 4 Remove the gasket from its housing see figure 10 figure 10 5 Disassemble the tap by following the order given see...

Page 20: ...l soap 2 Pour about eight litres of a solution made of hot water 45 60 C and sodium hypochlorite bleach at a ratio of 200 ppm per 2 litres of water 3 Immerse all parts to be sanitised in the solution...

Page 21: ...the containers Dry the inside of the containers with a disposable paper towel 7 5 IN PLACE SANITIZATION Sanitising the assembled device prior to putting into service should only be performed if neces...

Page 22: ...machine because unexpected start again would be possible 6 It needs to fix everything back in the initial position after any repairmen like screws and covers 8 1 MAINTENANCE TO BE CARRIED OUT BY QUALI...

Page 23: ...plications domestiques ou similaires 2 Pour garantir son bon fonctionnement la temp rature ambiante doit tre comprise entre 5 et 32 C 3 Utiliser l appareil exclusivement pour refroidir les liquides in...

Page 24: ...uivre attentivement les instructions du fabricant 4 Si l on utilise des ingr dients naturels pour la pr paration des granit s par exemple du jus de citron d orange ou du caf faire fondre 150 250 gramm...

Page 25: ...0 le distributeur est teint Position I le distributeur est habilit fonctionner mais il est en mode Veille Seul le voyant B est allum Touche A son enclenchement pendant 2 secondes permet de basculer d...

Page 26: ...r le param tre PA09 Presser la touche A afin d activer la modification de ce param tre l afficheur montrera le message OFF Presser la touche C l afficheur montrera le message ON Presser de nouveau la...

Page 27: ...lleurs que le flux d air n est pas obstru par la pr sence de cloisons de bo tes ou autres aux alentours du distributeur Pr voir un espace de 15 cm au moins autour du distributeur Pour finir v rifier q...

Page 28: ...antihoraire pour d verrouiller la touche d ouverture voir figure 6 figure 6 2 Pour d monter le bac pousser le levier pr vu cet effet voir figure 7 vers le haut puis extraire le bac voir figure 8 figu...

Page 29: ...ectement Ne pas utiliser de d tergents abrasifs 2 Utiliser une brosse adapt e et laver soigneusement avec la solution d tergente toutes les pi ces en contact avec la boisson IMPORTANT Ne pas laver les...

Page 30: ...e fabricant environ 5 minutes 4 Poser les pi ces d sinfect es sur une surface propre et laisser s cher l air 5 S cher les parties ext rieures du distributeur sans utiliser de chiffons abrasifs 7 4 5 R...

Page 31: ...R MONTE La d sinfection de l appareil mont avant sa mise en service peut tre effectu e si besoin est il s agit uniquement d une mesure de pr caution suppl mentaire qui vient s ajouter la d sinfection...

Page 32: ...re de la machine voir figure 21 figure 21 4 Si l appareil est bruyant d brancher le refroidisseur est contacter le Service apr s vente 5 En cas de panne d brancher la machine tant donn qu elle peut r...

Page 33: ...HEN SICHERHEIT 1 Dieses Ger t ist f r Hausinstallationen und hnliche Anwendungen bestimmt 2 F r seinen korrekten Betrieb muss die Umgebungstemperatur zwischen 5 und 32 C liegen 3 Das Ger t ausschlie l...

Page 34: ...Inhalt gef llt werden Bei der Herstellung von Granita ist eine Volumenzunahme von 10 zu ber cksichtigen Bei der Herstellung von Speiseeis ist eine Volumenzunahme von 30 zu ber cksichtigen 3 Falls vor...

Page 35: ...die K hlung ist in Betrieb Wenn die Taste w hrend des Betriebsmodus kurz gedr ckt wird schaltet sich die Beleuchtung des Di spensers ein oder aus wenn diese vorhanden ist Taste B LED Betrieb Taste C...

Page 36: ...st tigt SCHUTZ VOR ZU FESTER KONSISTENZ Falls die Konsistenz des Produktes zu fest wird werden die K hlung und der R hrarm f r 90 sekunden gestoppt um Sch den am Dispenser zu vermeiden und das Display...

Page 37: ...DER ABDECKUNG OPTIONAL 1 Die rechte Seite der Abdeckung auf eine Fl che legen Den UHRZEITEINSTELLUNG Zuerst muss die Uhrzeit eingestellt werden Hierzu m s sen gleichzeitig die Tasten C und D bet tigt...

Page 38: ...Entfernen des Deckels des Beh lters die obere Taste dr cken und den Deckel nach vorne gleiten lassen Falls sich ein Sicherheitsverschluss am Deckel befindet den Schl ssel gegen den Uhrzeigersinn dreh...

Page 39: ...nn den Sechskantanschluss entfernen Bild 9 Bild 9 4 Die Dichtung entfernen Bild 10 Bild 10 5 Den Zapfhahn entfernen dabei die angegebene Reihenfolge beachten Bild 11 Bild 11 6 Den Tropfenf nger entfer...

Page 40: ...inem Verh ltnis von 200 ppm je 2 Liter Wasser vor 3 Tauchen Sie alle Teile die desinfiziert werden sollen f r die vom Produkthersteller angegebene Zeit etwa 5 Minuten in die L sung ein 4 Die Teile ans...

Page 41: ...h lter mit einem Papiertuch abtrocknen 7 5 DESINFEKTION DES MONTIERTEN DISPENSERS Die Desinfektion des montierten Ger ts vor der Inbetriebnahme kann falls erforderlich als weitere Vorsichtsma nahme zu...

Page 42: ...er Kundendienst verst ndigt werden 5 Bei einem Ausfall den Stecker der Maschine ausstecken da ein unvorhergesehener Start m glich ist 6 Nach jeglichen Reparaturen m ssen alle Teile wie Schrauben und A...

Page 43: ...a su correcto funcionamiento la temperatura ambiente debe estar comprendida entre 5 y 32 C 3 Utilice el aparato exclusivamente para enfriar los l quidos indicados 4 No introduzca sustancias o l quidos...

Page 44: ...las instrucciones del fabricante 4 Si se utilizan productos naturales para la preparaci n de granizados por ejemplo zumo de lim n naranja o caf diluir 150 200 gramos de az car por cada litro de produ...

Page 45: ...ha permanecido durante un cierto tiempo por encima de la temperatura m xima de conservaci n y que por lo tanto es oportuno verificar su eventual deterioro Para poner a cero la alarma y volver a la vis...

Page 46: ...evamente la tecla A para confirmar el valor y volver a la lista de los par metros Para salir de la programaci n de los par metros pulsar las teclas C y D contempor neamente o no pulsar ninguna tecla d...

Page 47: ...les con rejillas Asegurarse tambi n de que el flujo de aire no se vea obstaculizado por la cercan a de paredes cajas u otro Dejar un espacio libre de por lo menos 15 cm alrededor del distribuidor Comp...

Page 48: ...de las agujas del reloj y desbloquear la tecla de apertura ver figura 6 figura 6 2 Para desmontar el recipiente es necesario empujar hacia arriba la palanca correspondiente A ver figura 7 y luego saca...

Page 49: ...3 LAVADO 1 Llene un recipiente con unos 4 litros de agua caliente 45 60 C e hipoclorito de sodio lej a en una proporci n de 200 ppm por 2 litros de agua de hecho una soluci n demasiado concentrada pue...

Page 50: ...secar las partes desinfectadas sobre una superficie limpia 5 Secar las partes externas del distribuidor sin utilizar trapos abrasivos 7 4 5 MONTAJE DEL RECUPERADOR OPCIONAL 1 Abra las dos partes debe...

Page 51: ...UIDOR MONTADO La desinfecci n del aparato montado precedente a su puesta en funcionamiento se puede llevar a cabo en caso necesario s lo como ulterior precauci n adem s de la desinfecci n del aparato...

Page 52: ...ver figura 21 figura 21 4 En caso de ruidos an malos desconecte el enfriador y consulte al servicio t cnico 5 En caso de falla desconecte la m quina para evitar su reencendido imprevisto 6 Despu s de...

Page 53: ...53...

Page 54: ...54 NOTE NOTES NOTES ANMERKUNGEN NOTAS...

Page 55: ...55 NOTE NOTES NOTES ANMERKUNGEN NOTAS...

Page 56: ...02425 00099 R6 9 21B18...

Reviews: