background image

Ubee Interactive

Using the Advanced Gateway Settings DMZ Host Option

Ubee DVW3201B Advanced Wireless Voice Gateway Subscriber User Guide • July 2012

55

4. Go to 

Tools

>>

Client


List

. Your PC and other devices are listed. Note the MAC 

address and IP address of the Home Gateway, VoIP Phone, or other device to put in 
the DMZ. For more information, refer to 

Using the Client List Option on page 83

.

5. Go to 

Gateway

>>

Static


Lease

. Enter the MAC address and IP address of a Home 

Gateway (or other device you wish to be in the DMZ).

6. Click 

Apply

. For more information, refer to 

Using the DHCP Static Lease Option on 

page 39

. A static lease ensures that the device is assigned the same IP address so it 

is always available on the network, especially if devices are powered on/off or 
disconnected and reconnected.

7. Go to 

Gateway

 > 

Advanced

 > 

DMZ


Host

. Enter the IP address you just configured in 

the Static Lease section.

8.  Test the device to ensure Internet access is available and the device is functional (for 

example, connect to the Internet from a PC connected to the Home Gateway, or make 
calls from a VoIP phone).


Steps

To expose an IP address to the WAN:

1. Click the 

Gateway 

link from the top of the screen.

2. Click 

DMZ Host 

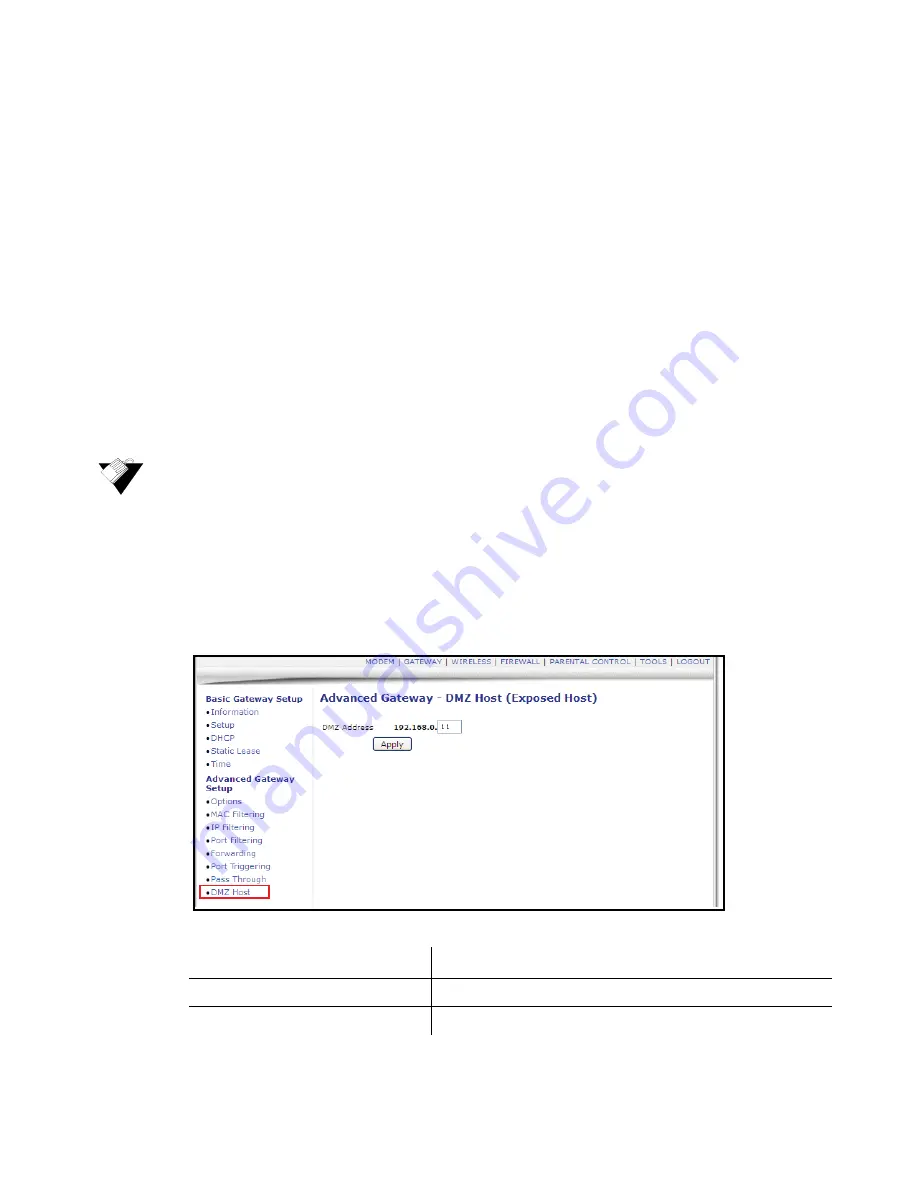
from the left side of the screen. The 

DMZ Host 

fields are explained 

following this screen example.

Note:

 The following example shows the DMZ Host set up for a dual Xbox 

configuration.


Label

Description

DMZ Address

Defines the IP address of the host to be exposed.

Apply

Saves all screen changes when clicked.

Summary of Contents for DVW3201B

Page 1: ...Street Suite 200 Englewood CO 80112 1 888 390 8233 Sales email amsales ubeeinteractive com Support email amsupport ubeeinteractive com July 2012 DVW3201B Advanced Wireless Voice Gateway Firmware Vers...

Page 2: ...ts This material is protected by the copyright laws of the United States and other countries It may not be reproduced distributed or altered in any fashion by any entity either internal or external to...

Page 3: ...e Front Panel 8 1 8 2 Understanding LED Behavior 9 2 Installing the DVW3201B 11 2 1 Setting Up and Connecting the DVW3201B 11 2 2 Connecting Devices to the Network 12 2 2 1 Connecting an Ethernet Devi...

Page 4: ...ng Option 51 5 12 Using the Advanced Gateway Settings Pass Through Option 53 5 13 Using the Advanced Gateway Settings DMZ Host Option 54 5 13 1 Using DMZ Host Best Practices 54 6 Understanding the Wir...

Page 5: ...ance standards and physical specifications Provides information used by the following MSO entities Office of the CTO Procurement Network Engineering and Test Organizations Physical Environmental Engin...

Page 6: ...rge ESD can permanently damage semiconductor devices Always follow ESD prevention guidelines for equipment handling and storage Use only the power cord supplied with the device Do not attach the power...

Page 7: ...ated with minimum distance 20cm between the radiator your body This device has been designed to operate with an antenna having a maximum gain of 2 dBi Antenna having a higher gain is strictly prohibit...

Page 8: ...ubject to change 1 RJ11 Cable Telephone Sample image actual appearance subject to change 1 AC Power Cord 10A 125V Sample image actual appearance subject to change 1 Lithium ion Battery Model SMPCM9 Ra...

Page 9: ...RJ45 cable Each ETH port on the back panel of the device has an LED to indicate its status when an Ethernet device is connected When an Ethernet device such as a computer is connected to the cable mo...

Page 10: ...002MHZ Modulation 64 256 QAM Channel B W 6 MHz Maximum Data Rate per Channel up to 8 channels DOCSIS 30 Mbps 64 QAM 42 Mbps 256 QAM EuroDOCSIS 41 Mbps 64 QAM 55 Mbps 256 QAM Total Max Bandwidth 8 Chan...

Page 11: ...nspection SPI DoS Attack Protection WPS WPA WPA2 WPA PSK 64 128 bit WEP Encryption DHCP Client Server Static IP network assignment RIPv1 v2 Ethernet 10 100 1000 BaseT full duplex auto negotiate functi...

Page 12: ...SSID the device does not revert to this default SSID when the device is reset except when a manual reset is performed through the Web UI see Understanding the Tools Menu on page 81 The MAC address ca...

Page 13: ...egistered OK Blinks Unable to register or lock Blinks When a firmware upgrade is in progress the DS US and TEL1 LEDs blink first one then the other for a few seconds Then DS US and TEL1 and TEL2 LEDs...

Page 14: ...3201B using RJ45 cables Each Ethernet port on the back panel of the device has an LED to indicate its status when an Ethernet device is connected WPS button top of device White Located on top of the c...

Page 15: ...telephone provider service porting the telephone number and other tasks to minimize downtime during the transition Typically the service provider initially configures and connects the device The inst...

Page 16: ...3 or ETH4 port to the cable modem 7 Connect a coaxial cable from the CABLE port on the device to the cable wall outlet or to a cable splitter connected to the wall outlet 8 Connect an analog telephone...

Page 17: ...reless Networks The device is shipped with a default SSID The SSID is the name of the wireless network broadcast from the device so that wireless clients can connect to it 3 Double click your SSID in...

Page 18: ...to minimize downtime during the transition Steps To connect a telephone line 1 Connect an analog telephone to the TEL1 or TEL2 jack on the back panel of device using the supplied RJ11 telephone cable...

Page 19: ...tivity Issues If your PC is connected to a hub or gateway connect the PC directly into an Ethernet port on the cable modem If you are using a cable splitter remove the splitter and connect the cable m...

Page 20: ...Troubleshooting the Installation Ubee Interactive 16 Ubee DVW3201B Advanced Wireless Voice Gateway Subscriber User Guide July 2012...

Page 21: ...or the DVW3201B from a Web browser such as Internet Explorer on a Windows computer Default values are shown in the steps below Some regions may change default values using the cable modem or XML confi...

Page 22: ...e Gateway Subscriber User Guide July 2012 5 Click OK The Cable Modem screen of the Web interface is displayed Subscriber Options 3 2 Logging Out of the Web Interface Log out when finished using the We...

Page 23: ...ess point Enables layer 2 protocols in which usually one Public IP address is automatically assigned to the subscriber from the cable company s DHCP servers In this mode the first device to connect to...

Page 24: ...through the Telnet Command Line Interface CLI Refer to Using the Routing Setup Option on page 92 for more information NAT Router Operates in NAT Router mode when enabled Combines functionality found i...

Page 25: ...ing the Status Option on page 23 Using the Downstream Option on page 23 Using the Upstream Option on page 25 Using the Operation Config Option on page 26 Using the Event Log Option on page 27 Using th...

Page 26: ...Code Version Defines the boot software code version of the device Software Version Defines the general software version of the device Hardware Version Defines the internal version number that identifi...

Page 27: ...ider to the local computer downstream channels Steps To view downstream information 1 Click the Modem link from the top of the screen 2 Click the Downstream link from the left side of the screen Field...

Page 28: ...tream channel Channel Id Displays the downstream channel ID Modulation Displays the modulation method required for the downstream channel to lock on to by the cable modem This method is determined by...

Page 29: ...e RxMER dB Displays the Receiver Modulation Error Ratio used to quantify the performance of a digital radio receiver in a communications system using digital modulation Correctable Codewords Displays...

Page 30: ...side of the screen Field explanations are listed below the following screen example Modulation Displays the current cable modem upstream modulation type QPSK QAM8 QAM16 QAM32 QAM64 QAM128 QAM256 Symb...

Page 31: ...eline Privacy Displays highlighted device configurations such as PHS Enabled DOCSIS Mode Displays the DOCSIS version of the device Primary Downstream Service Flow SFID Displays the frequency ID of the...

Page 32: ...h two lines off hook One upstream and one downstream channel Steps To view battery information 1 Click the Modem link from the top of the screen 2 Click the Battery Info link from the left side of the...

Page 33: ...ery temperature in Fahrenheit and Celsius Estimated Time Remaining Displays how much time is left on the battery in minutes Low Battery Time Displays low battery time in minutes Battery Displays if a...

Page 34: ...Using the Battery Info Option Ubee Interactive 30 Ubee DVW3201B Advanced Wireless Voice Gateway Subscriber User Guide July 2012...

Page 35: ...39 Using the Time Option on page 40 Using the Advanced Gateway Setup Options on page 41 Using the Advanced Gateway Setup MAC Filtering Option on page 44 Using the Advanced Gateway Setup IP Filtering O...

Page 36: ...iber User Guide July 2012 5 1 Using the Gateway Information Option The Information option allows you to view basic information for the device Steps To view gateway information 1 Click the Gateway link...

Page 37: ...the DNS server IP address DHCP Remaining Time Displays the time remaining on the DHCP lease before it expires Refresh Updates the information to its most current state when you click Refresh Local Se...

Page 38: ...are explained following this screen example Private IP Range Displays the private IP address assigned to the DHCP client Public IP Range Displays the Public IP DHCP Server Range System Up Time Display...

Page 39: ...required as explained below DHCP The WAN interface is set to a DHCP client and the IP address is assigned by the service provider s DHCP server Static IP For Static IP you must manually enter the IP a...

Page 40: ...dress configuration in the Gateway Basic Setup option 5 2 2 Using the LAN IPv6 Option When the CMTS supports IPv6 address configuration the LAN IPv6 option is available The LAN IPv6 screen displays th...

Page 41: ...settings 1 Click the Gateway link from the top of the screen 2 Click DHCP from the left side of the screen The DHCP fields are explained following this screen example Label Description IP Address Dis...

Page 42: ...lic addresses can be recognized on the network Number of CPEs Defines the maximum number of customer premises equipment CPE that can connect to the network through the DVW3201B Lease Time Defines the...

Page 43: ...resses 1 Click the Gateway link from the top of the screen 2 Click Static Lease from the left side of the screen The Static Lease fields are explained following this screen example Note The following...

Page 44: ...ake effect Steps To configure system time 1 Click the Gateway link from the top of the screen 2 Click Time from the left side of the screen The Time fields are explained following this screen example...

Page 45: ...le Label Description Enable SNTP Enables Yes or disables No the SNTP feature Current Time Displays the current system time System Start Time Displays the accumulated time since the system was started...

Page 46: ...ehind the router PPTP PassThrough Forces the router to redirect the PPTP request to the local host when enabled Nat fails this attempt if Internet users initialize a PPTP VPN request to a host located...

Page 47: ...mpler protocol generally used for automated file transfers Kerb88 Enables or disables the Kerberos network authentication protocol which allow nodes to communicate over a non secure network using tick...

Page 48: ...iltering from the left side of the screen The MAC Filtering fields are explained following this screen example SIP Enables or disables the session initiation protocol application layer gateway SIP ALG...

Page 49: ...ng 2 Log in to the cable modem Web user interface Refer to Accessing the Web Interface on page 17 3 Go to Tools Client List Your PC and other devices are listed Note the MAC address and IP address of...

Page 50: ...ch does not require setting a static lease Refer to Using the Advanced Gateway Setup MAC Filtering Option on page 44 Steps To filter IP addresses 1 Click the Gateway link from the top of the screen 2...

Page 51: ...Steps To configure port filters 1 Click the Gateway link from the top of the screen 2 Click Port Filtering from the left side of the screen The Port Filtering fields are explained following this scree...

Page 52: ...documentation associated with the application You may also refer to http portforward com for more information The following tasks are recommended as best practices for setting up forwarding rules a E...

Page 53: ...ress in the Local IP field Notice how the same IP is entered in 4 rows one row for each port used by the Xbox Define ports used by the Xbox in the Internal Port field Define the same ports used by the...

Page 54: ...ort Defines the ending port number listened to by the server host located in your LAN External Public Interface IP Designates another router on the network through which to forward data Normally this...

Page 55: ...ers to specific devices on the LAN This allows for special applications that require specific port numbers with bi directional traffic to function properly Applications such as video conferencing voic...

Page 56: ...ort 7070 Port 7070 is a trigger port and causes the device to record John s computer IP address The DVW3201B associates John s computer IP address with the target port range of 6970 7170 2 The Real Au...

Page 57: ...fic to a server on the WAN Start Port Defines a port number or the starting port number in a range of port numbers End Port Defines a port number or the ending port number in a range of port numbers T...

Page 58: ...ublic Internet This may be used when applications do not work with port triggers or other networking strategies 5 13 1 Using DMZ Host Best Practices The following instructions are best practices when...

Page 59: ...ned the same IP address so it is always available on the network especially if devices are powered on off or disconnected and reconnected 7 Go to Gateway Advanced DMZ Host Enter the IP address you jus...

Page 60: ...Using the Advanced Gateway Settings DMZ Host Option Ubee Interactive 56 Ubee DVW3201B Advanced Wireless Voice Gateway Subscriber User Guide July 2012...

Page 61: ...n on page 65 Steps To access the wireless menu 1 Access the Web interface Refer to Accessing the Web Interface on page 17 2 Click the Wireless link from the top of the screen 6 1 Using the Wireless Ra...

Page 62: ...to a maximum of 600 Mbit s with the use of four spatial streams when at a channel width of 40 MHz 802 11 N Support Required Defines whether 802 11n support is required on or not off On forces the gate...

Page 63: ...APs avoid channels that contain radar systems Used for 802 11h only In Network Radar Check Defines the number of seconds to check for radar when switching to a new channel after a network has been est...

Page 64: ...AP Wireless cards connect to the master network and change their channel to match The master must accept the credentials of the managed network for it to be associated Ad hoc Communicates directly wi...

Page 65: ...tion allows you to configure a variety of wireless security settings Steps To configure wireless security options 1 Click the Wireless link from the top of the screen 2 Click Primary Network from the...

Page 66: ...ssword entered into wireless gateway and wireless client As long as the passwords match a client is granted access to the wireless LAN This is the default residential subscriber setting and uses TKIP...

Page 67: ...te It encrypts unicast and multicast communications in a network Both the wireless stations and the DVW3201B must use the same WEP key Data Encryption can be set to WEP 128 bit 64 bit or Disable Share...

Page 68: ...P UUID Defines the universal unique identifier UUID for this access point PIN Defines the Personal Identification Number for this access point WPS Add Client Add a client Activates wireless protected...

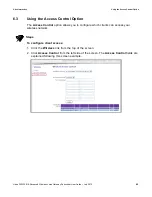
Page 69: ...ng the Access Control Option The Access Control option allows you to configure which clients can access your wireless network Steps To configure client access 1 Click the Wireless link from the top of...

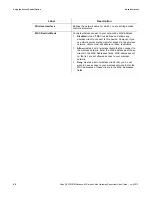
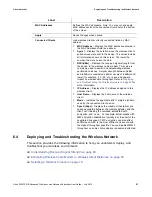
Page 70: ...wireless client to connect to this device However if you use other security mechanisms for access to the wireless network clients must still adhere to those restrictions Allow creates a list of wirele...

Page 71: ...wer the number the more current its data RSSI dBm Displays the received signal strength from the device to the wireless cable modem This value is commonly used to assist in troubleshooting wireless pe...

Page 72: ...to determine how far a wireless cable modem can be placed from wireless client devices Environmental variances include the capabilities of wireless clients and the types of material through which the...

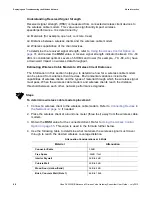
Page 73: ...u may resolve and prevent some performance issues 7 To check the wireless signal strength and speed use the following steps for a Windows computer connected wirelessly to the wireless cable modem If t...

Page 74: ...s on another channel and so on This is done by configuring the channel on each wireless access point individually if you have multiples If you have control over only one wireless device in an environm...

Page 75: ...specific sites Note Firewall menu options are not available when the device is in Bridge mode Topics See the following topics Using the Content Filter Option on page 71 Using the Event Log Option on p...

Page 76: ...ed on an ID found in the Cookies Filter Java Applets Stops Java applets from being launched on connected computers Java is a programming language and development environment for building downloadable...

Page 77: ...tion Activates the firewall function Protection against incoming connection requests on routed subnet Protects all the routed subnets connected to the device Apply Saves the configuration when clicked...

Page 78: ...Log from the left side of the screen The Remote Log fields are explained following this screen example Label Description Permitted Connections Logs all access attempts that are allowed by the firewal...

Page 79: ...t log to view Internet activity Topics See the following topics Using the Parental Control User Setup Option on page 75 Using the Basic Option on page 77 Using the Tod Filter Option on page 79 Using t...

Page 80: ...ng user choose the user from the User Settings pop up menu To add a new user add the user name and click Add To activate the user check Enable To remove a user select the user from the pop up menu and...

Page 81: ...have created a content rule that defines a black list and white list select the White List Access Only checkbox to force the wireless modem to execute the policy for the selected user Time Access Rule...

Page 82: ...policy from the list and click Remove Policy Keyword List Displays keywords you can use to block Web site addresses URLs containing those words Add Keyword Adds a keyword to the keyword list Enter the...

Page 83: ...en example Allowed Domain List DIsplays domains you can assign to users to visit only the sites allowed Add Allowed Domain Adds allowed domains to the list Enter the name and click Add Allowed Domain...

Page 84: ...time to block To block all day check All Day to eliminate all access during the days selected To block a specific time enter the time range in the fields provided in a 24 hour clock 00 00 24 00 forma...

Page 85: ...he User Defaults Option on page 85 Steps To access the tools menu 1 Access the Web interface Refer to Using the Web User Interface on page 17 2 Click the Tools link from the top of the screen 9 1 Usin...

Page 86: ...rom the left side of the screen The Trace Route fields are explained following this screen example Label Description Ping Test Parameters Ping Target Defines the IP address to which you want to send a...

Page 87: ...to trace a route MAX Hops Defines the maximum number of hops Hops are the number of routers that the trace route traverses Time out Defines the time out interval 100 10000 in milliseconds Start Test...

Page 88: ...eps To change the password for the user login 1 Click the Tools link from the top of the screen 2 Click Password from the left side of the screen The Password fields are explained following this scree...

Page 89: ...on page 8 for the default values 1 Click the Tools link from the top of the screen 2 Click User Defaults from the left side of the screen The User Defaults fields are explained following this screen...

Page 90: ...ory Defaults to Firewall and Parental Control Restores settings to factory defaults Select Yes to restore the device to default settings for the Firewall and Parental Control settings This operation d...

Page 91: ...t addressed to a computer on the local subnet Demilitarized Zone DMZ Allows one IP address or computer to be placed in between the firewall and the Internet usually for gaming and video conferencing T...

Page 92: ...ally a router that connects hosts on a local network to other networks sometimes with different incompatible communication protocols Headend A main facility to process and distribute Internet communic...

Page 93: ...single IP address for access to the Internet NAT enables a LAN to use one set of IP addresses for internal traffic and a second set of addresses for external traffic and provides a type of firewall by...

Page 94: ...o determine if the user is allowed to access the network Time Division Multiple Access TDMA A method in which cable modems must time share the upstream channel because there are many cable modems and...

Page 95: ...ol for wireless home networks Created by the Wi Fi Alliance this protocol allows home users to easily set up wireless security and add new devices without needing to enter long passwords Wireless Loca...

Page 96: ...Ubee Interactive 92 Ubee DDW3612 Wireless Cable Modem Gateway Subscriber User Guide July 2012...

Reviews: