PAGE 4 OF 8
1214 IH-2289
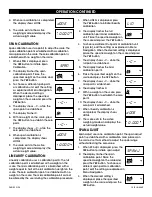
4. The display shows --C-- while the
span point is established.
5. When span adjust is completed,
the display shows dONE.
6. The scale exits to the active
weighing mode and displays the
actual weight value.
CaliBratiOn test
Calibration test is used to compare a known calibration
weight against the stored span calibration data.
nOte: Calibration test is always available (even
when lft is set to On).
1. When tESt is displayed, press the YES
button to initiate calibration test.
2. The display flashes 0. With no
weight on the scale, press the YES
button to record the current zero
point.
3. The display shows --t-- while the
zero point is recorded.
4. The display flashes the span
calibration weight using the value
from the last calibration. The
example shows test weight of 30 kg.
5. Place the specified test weight on
the scale and press the YES button.
6. The display shows --t-- while the
data is processed.
7. The display flashes the actual
difference between the calibration
data and the test weight.
8. The example shows a 0.010
kg difference. The result of the
calibration test is printed.
9. After 5 seconds, calibration test
ends and the scale returns to
the active weighing mode and
displays the current weight.
ZerO OPeratiOn
Zero can be set under the following conditions:
• Automatically at power on
(initial zero).
• Semi-automatically (manually) by
pressing the ON/ZERO OFF button.
• Semi-automatically by sending the zero command
(Z or alternate zero command).
Press the ON/ZERO OFF button to zero the weight display.
The scale must be stable to accept zero operation.
manual tare
When weighing an item that must be
held in a container, taring stores the
container weight in memory.
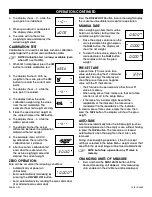
1. Place the empty container on the
scale (example 0.5 kg) and press
the TARE button. The display will
show the net weight.
2. To clear the tare value, empty the
scale and press the TARE button.
The display will show the gross
weight.
Pre-set tare
A pre-set tare (PT) is a known tare
value entered using the xT command
(example 1.234 kg). The display will
show the pre-set tare as a negative
value with the PT Indicator on.
• The PT value will supersede any other tare or PT
value in memory.
• When using pre-set tare, make sure that auto-tare
function is set off in the Setup Menu.
• If the tare entry includes digits beyond the
readability of the Indicator, the tare value is
rounded off to the readability of the Indicator.
To clear a pre-set tare value, empty the scale, then
press the TARE button. The display will show the gross
weight.
autO-tare
Auto-Tare automatically tares the initial weight (such as
a container) placed on the empty scale, without having
to press the TARE button. The tare value is cleared
automatically when the weight on the scale is fully
removed.
During checkweighing operation, if the On Accept
setting is selected in the Setup Menu, weight values that
are within the accept range will be tared automatically.
nOte: auto-tare supersedes any Pt value in
memory.
Changing units Of measure
1. Press and hold the PRINT UNITS button until the
desired measuring unit appears. Only measuring
units enabled in the Unit Menu will be displayed.
OPeratiOn COntinueD
--t--
--t--
dONE
tESt
0
kg
0.010
kg
30
kg
. 30.010
kg
--C--
. O.000
kg
net
. O.000
kg
*
g
O.000
kg
. 0.500
kg


