PAGE 3 OF 8
1214 IH-2289
OPeratiOn COntinueD
4. When zero calibration is completed,
the display shows dONE.
5. The scale exits to the active
weighing mode and displays the
actual weight value.
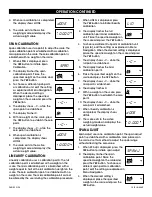
sPan CaliBratiOn
Span calibration uses two points to adjust the scale. The
span calibration point is established with a calibration
mass placed on the scale. The zero calibration point is
established with no weight on the scale.
1. When SPAN is displayed, press
the YES button to initiate Span
Calibration.
2. The display flashes the span
calibration point. Place the
specified weight on the scale and
press the YES button.
3. To choose a different span point
or calibration unit, edit the setting
as explained in Menu Navigation.
When the desired setting is
displayed, place the specified
weight on the scale and press the
YES button.
4. The display shows --C-- while the
span point is established.
5. The display flashes 0.
6. With no weight on the scale, press
the YES button to establish the zero
point.
7. The display shows --C-- while the
zero point is established.
8. When span calibration is
completed, the display shows
dONE.
9. The scale exits to the active
weighing mode and displays the
actual weight value.
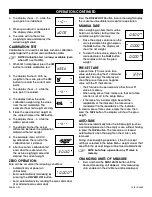
linearity CaliBratiOn
Linearity calibration uses 3 calibration points. The full
calibration point is established with a weight on the
scale. The mid calibration point is established with a
weight equal to half of the full calibration weight on the
scale. The zero calibration point is established with no
weight on the scale. The mid calibration points cannot
be altered by the user during the calibration procedure.
1. When LINEAr is displayed, press
the YES button to initiate linearity
calibration.
2. The display flashes the full
calibration point and calibration
unit. Place the specified weight on
the scale and press the YES button.
3. To choose a different full point or calibration unit
(kg or lb), edit the setting as explained in Menu
Navigation. When the desired setting is displayed,
place the specified weight on the scale and press
the YES button.
4. The display shows --C-- while the
full point is established.
5. The display flashes the mid
calibration point.
6. Place the specified weight on the
scale and press the YES button.
7. The display shows --C-- while the
mid point is established.
8. The display flashes 0.
9. With no weight on the scale, press
the YES button to establish the zero
point.
10. The display shows --C-- while the
zero point is established.
11. When linearity calibration is
completed, the display shows
dONE.
12. The scale exits to the active
weighing mode and displays the
actual weight value.
sPan aDjust
Span adjust uses one calibration point. The span adjust
point is established with a calibration mass placed on
the scale. Use this method to adjust the span range
without affecting the zero value.
1. When SP.Adj is displayed, press the
YES button to initiate span adjust.
2. The display flashes the span
calibration point. Place the
specified weight on the scale and
press the YES button. To choose a
different span point or calibration
point, edit the setting as explained in
Menu Navigation.
3. When the desired setting is
displayed, place the specified
weight on the scale and press the
YES button.
SPAN
--C--
--C--
L IN
dONE
30
kg
0
kg
30
kg
25
kg
. O.000
kg
--C--
--C--
--C--
dONE
15
kg
0
kg
. O.000
kg
SP.AdJ
30
kg
25
kg
dONE
. O.000
kg


