


PAGE 2 OF 8
1214 IH-2289
OPeratiOn
turning inDiCatOr On/Off
1. To turn the Indicator on, press the
ON/ZERO OFF button. The Indicator
performs a display test followed by a
series of informational displays and
then enters the active weighing mode.
2. To turn the Indicator off, press and hold the ON/ZERO
OFF button until OFF is displayed.
menu navigatiOn
TO ENTER THE MENU MODE
1. Press the TARE MENU button until
MENU is displayed. When the button
is released, the Legal for Trade status
is displayed, followed by the first
menu.
yes
Allows entry into the displayed menu.
Views menu item setting.
Accepts the displayed setting.
nO/BaCK
Skips by the displayed menu.
Rejects the displayed setting and
advances to the next available item.
eXit
Exits from menu directly to the current
application.
2. For menu items with numeric settings
such as Capacity, the current setting
is displayed with all digits flashing.
Press the NO button to begin editing.
3. The first digit is displayed flashing.
4. Press the NO button to increment
the digit or press the YES button to
accept the digit and move to the
next digit.
5. Repeat this process for all digits.
6. Press the YES button when the last
digit has been set.
7. The new setting is displayed with all
digits flashing. Press the YES button
to accept the setting or press the NO
button to resume editing.
8. This method also applies to setting Check Weigh
under and over targets.
9. For End menu items, pressing the YES button
advances to the next menu, while pressing the NO
button returns to the top of the current menu.
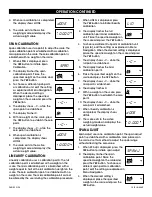
CaliBratiOn menu
Three calibration processes are available:
Zero Calibration, Span Calibration and Linearity
Calibration. (See Figure 1)
1. Make sure that appropriate calibration masses are
available before beginning calibration.
2. Make sure that the scale base is level and stable
during the entire calibration process.
3. Calibration is unavailable with LFT set to ON.
4. Allow the Indicator to warm up for approximately 5
minutes after stabilizing to room temperature.
5. To abort calibration, press the EXIT button anytime
during the calibration process.
6. When any selection within the GMP menu is enabled,
calibration results are automatically printed.
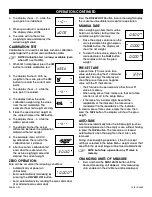
ZerO CaliBratiOn
Zero calibration uses one calibration point. The zero
calibration point is established with no weight on
the scale. Use this calibration method to adjust for a
different pre-load without affecting the span or linearity
calibration.
1. When ZErO is displayed, press the YES
button to initiate Zero Calibration.
2. The display flashes 0 and the
calibration unit. Press the YES button
to establish the zero point.
3. The display shows --C-- while the
zero point is established.
MENU
000000
0
00000
1
00000
10000
0
100000
Figure 1
Zero Perform
Span Perform
Linearity Perform
Cal Test
Perform
Geographic
Adjustment
Set 00...
set 12
... Set 31
End Calibration Exit CALIBRATE menu
ZErO
--C--
0
kg
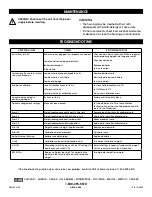
CaliBratiOn values
mODel #
sPan CaliBratiOn
POints (kg.)
linearity CaliBratiOn
POints (kg.)
H-2289
50
25, 50
H-2290
100
50, 100
H-2291
250
125, 250


