background image

SAFETY • 

INSTALLATION & INTEGRATION


• OPERATING INSTRUCTIONS • MAINTENANCE • SERVICE


USER GUIDE


u-line.com


 Anti-Tip Bracket 1


General Installation


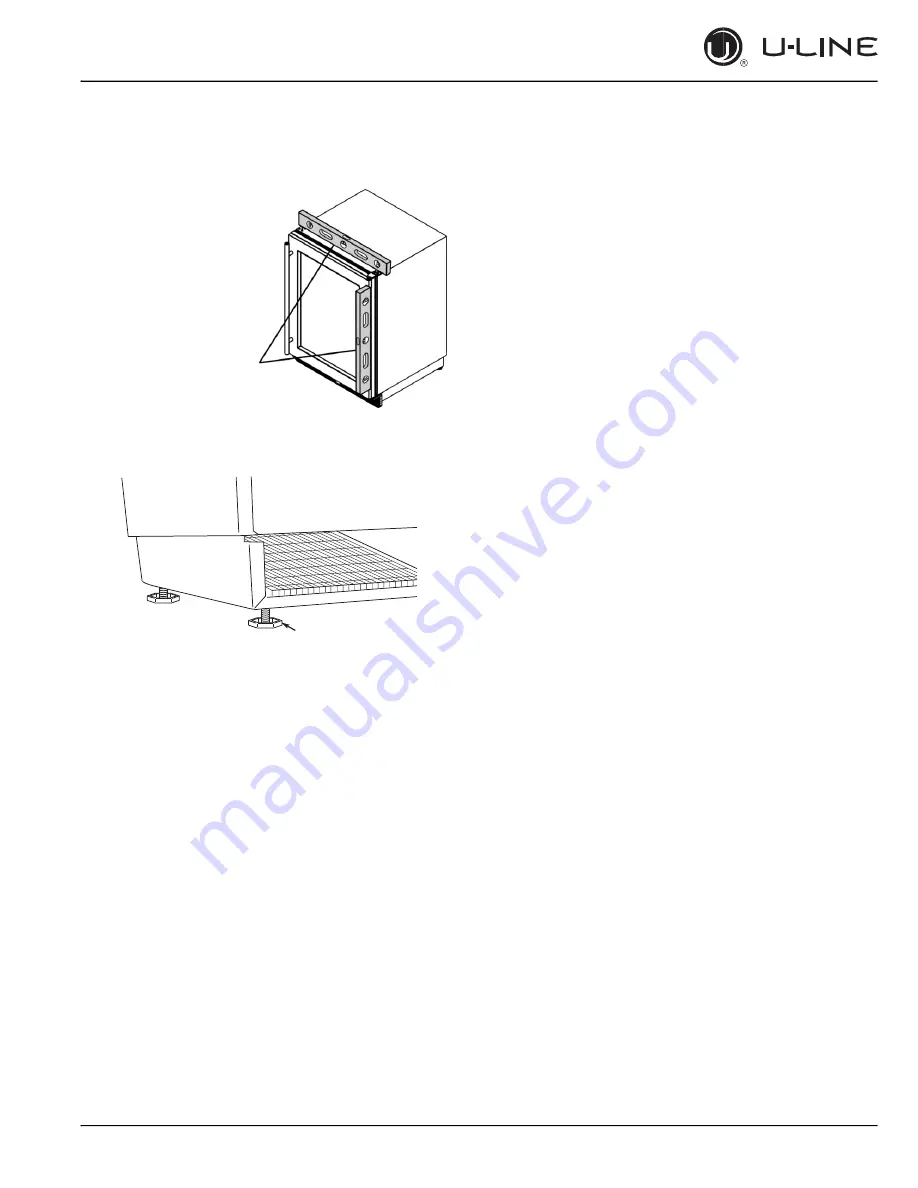
LEVELING INFORMATION 

1.


Use a level to 
confirm the unit is 
level. Level should 
be placed along top 
edge and side edge 
as shown.


1


2.


If the unit is not level, adjust the legs on the 
corners of the unit as necessary.


3.


Confirm the unit is level after each adjustment and 
repeat the previous steps until the unit is level.


INSTALLATION TIP 

If the room floor is higher than the floor in the cutout 
opening, adjust the rear legs to achieve a total unit 
rear height of 1/8" (3 mm

) less than the opening’s 

rear height. Shorten the unit height in the front by 
adjusting the front legs. This allows the unit to be 
gently tipped into the opening. Readjust the front legs 
to level the unit after it is correctly positioned in the 
opening.


INSTALLATION 

1.


Plug in the power/electrical cord.


2.


Gently push the unit into position. Be careful not to 
entangle the cord.


3.


Re-check the leveling, from front to back and side 
to side. Make any necessary adjustments. The 

unit’s top surface should be approximate

ly 1/8" (3 

mm) below the countertop.


4.


Remove the interior packing material and wipe out 
the inside of the unit with a clean, water-
dampened cloth.


Turn to Adjust


Summary of Contents for 1224RF

Page 1: ...OPERATING INSTRUCTIONS MAINTENANCE SERVICE 1000 Series 1224RF 24 Refrigerator Freezer SAFETY INSTALLATION INTEGRATION OPERATING INSTRUCTIONS MAINTENANCE SERVICE Contents Intro Safety Safety and Warni...

Page 2: ...uctions First Use Control Operation Sabbath Mode Airflow and Product Loading Interior Shelves Maintenance Cleaning Cleaning Condenser Extended Non Use WELCOME TO U LINE Congratulations on your U Line...

Page 3: ...DAMAGE INJURY CONCERNS In the unlikely event property damage or personal injury is suspected related to a U Line product please take the following steps 1 U Line Customer Care must be contacted immedi...

Page 4: ...hout this guide are safety items labeled with a Danger Warning or Caution based on the risk type DANGER Danger means that failure to follow this safety statement will result in severe personal injury...

Page 5: ...ren may not easily climb inside If the unit is being removed from service for disposal check and obey all federal state and local regulations regarding the disposal and recycling of refrigeration appl...

Page 6: ...ambient temperatures may reduce the unit s ability to reach low temperatures and or reduce ice production on applicable models For best performance keep the unit out of direct sunlight and away from h...

Page 7: ...extension cord to connect power to the unit Always keep your working area dry NOTICE Electrical installation must observe all state and local codes This unit requires connection to a grounded three p...

Page 8: ...been designed for either freestanding or built in installation When built in your unit does not require additional air space for top sides or rear However the front grille must NOT be obstructed and...

Page 9: ...SAFETY INSTALLATION INTEGRATION OPERATING INSTRUCTIONS MAINTENANCE SERVICE USER GUIDE u line com Product Dimensions...

Page 10: ...rical receptacles placed according to each unit s electrical specifications requirements Side by Side Installation with Bracket 1 Slide both units out so screws on top of units are easily accessible 2...

Page 11: ...h four screw 1215 models only have three screws but same screws are used in both applications unit with two screws removed in step 2 using a T 25 Torx driver Tighten screws fully 4 Gently push unit in...

Page 12: ...adjust the rear legs to achieve a total unit rear height of 1 8 3 mm less than the opening s rear height Shorten the unit height in the front by adjusting the front legs This allows the unit to be ge...

Page 13: ...rille When using the unit the grille plinth strip base fascia must be installed WARNING DO NOT touch the condenser fins The condenser fins are SHARP and can be easily damaged Removing the grille 1 Dis...

Page 14: ...alled adjacent to cabinets Stainless Steel and black and white models require 2 1 8 54 mm door clearance to accommodate the handle if installed next to a wall Integrated models require 1 4 6 mm cleara...

Page 15: ...nditions It is not designed for excessive force Do not use the door to move the unit in out of the cutout during installation If your unit is already undercounter it might need to be moved out forward...

Page 16: ...ALIGN AND ADJUST THE DOOR Remove grille Remove the grille see GRILLE PLINTH INSTALLATION section of this guide 1 Loosen do not remove top and bottom hinge screws 2 Align door squarely with cabinet 3 M...

Page 17: ...epare door for reinstallation 1 Remove gasket This will reveal mounting holes for the magnet assembly 2 Remove plunger bracket from door with T 10 TORX driver Be sure to only remove the two screws hol...

Page 18: ...ly used when unit is not installed in surrounding cabinetry To install the kit 1 Remove grille see GRILLE PLINTH INSTALLATION section 2 Place shell accessory over front and back of cabinet base aligni...

Page 19: ...SAFETY INSTALLATION INTEGRATION OPERATING INSTRUCTIONS MAINTENANCE SERVICE USER GUIDE u line com Free Standing Kit 1...

Page 20: ...the unit to run overnight before loading with product As warm air rises the temperature inside the unit tends to be slightly warmer at the top and slightly cooler at the bottom When plugged in the uni...

Page 21: ...ne and beverage centers only Adjust refrigerator set point Press and release When the F or C in the display is flashing press to adjust the set point temperature View temperature in unit Press togethe...

Page 22: ...a full list of Star K certified U Line units at www star k org To enable Sabbath Mode 1 Press 4 and hold for ten seconds and release the F C symbol will flash briefly at the end of the ten second peri...

Page 23: ...SAFETY INSTALLATION INTEGRATION OPERATING INSTRUCTIONS MAINTENANCE SERVICE USER GUIDE u line com Sabbath Mode 1...

Page 24: ...s highest efficiency Do not block the front grille or the unit will not perform as expected Do not install the unit behind a door When loading your unit leave space between the evaporator and product...

Page 25: ...m unit by pulling out 3 Insert the shelves as follows 1 To move to a different position in the unit insert shelf at an angle approximately 15 20 over the rib in the side of the unit where you want to...

Page 26: ...clean it quickly with Bon Ami or Barkeepers Friend Cleanser and a nonabrasive cloth Always clean with the grain Always finish with Claire Stainless Steel Polish and Cleaner or comparable product to pr...

Page 27: ...E The drain pan was not designed to capture the water created when manually defrosting To prevent water from overflowing the drain pan place towels or other absorbent materials over the interior drain...

Page 28: ...power to the unit before cleaning the condenser WARNING DO NOT touch the condenser fins The condenser fins are SHARP and can be easily damaged NOTICE DO NOT use any type of cleaner on the condenser u...

Page 29: ...llow ice to thaw naturally 4 Clean and dry the interior of the unit Ensure all water has been removed from the unit 5 The door must remain open to prevent formation of mold and mildew Open door a mini...

Page 30: ...noises Listed below are common refrigeration components with a brief description of the normal operating sounds they make NOTE Your product may not contain all the components listed Compressor The com...

Page 31: ...set point Ensure unit is not located in excessive ambient temperatures or in direct sunlight Ensure the door is closing and sealing properly Ensure the interior light has not remained on too long Ensu...

Page 32: ...product with U Line within two months from the date of purchase at u line com providing proof of purchase Five Year Sealed System Limited Warranty For five years from the date of original purchase U L...

Page 33: ...residential or designated marine use only The warranties apply to units operated outside only if designed for outdoor use by model and serial number Replacement water filters light bulbs and other co...

Page 34: ...SAFETY INSTALLATION INTEGRATION OPERATING INSTRUCTIONS MAINTENANCE SERVICE USER GUIDE u line com Wire Diagram 1...

Page 35: ...part the servicer is authorized to replace the part in question The part that caused the damage must be returned to U Line in its entirety The part must be clearly labeled with the serial number of th...

Page 36: ...n year The number between the dashes 12 represents the production month In most cases warranty status can be verified by the production date information within the serial number Alternatively a Proof...

Page 37: ...SAFETY INSTALLATION INTEGRATION OPERATING INSTRUCTIONS MAINTENANCE SERVICE USER GUIDE u line com Warranty Claims 1...

Page 38: ......

Page 39: ...pped at no charge after U Line confirms warranty status Please provide the model serial number part number and part description Some parts will require color or voltage information If U Line requires...

Page 40: ...up Lower than normal Complete Restriction In deep vacuum Room temperature cool Room temperature cool Room temperature cool Room temperature cool No refrigeration Lower than normal No Gas 0 PSIG to 25...

Page 41: ...ndings are not shorted check the S and R to ground EMU45HSC Refrigerant R134a Voltage 115 VAC Frequency 60 Hz Run Cap 12 F 160 VAC Start Winding 56 Ohm at 77 F Run Winding 6 7 Ohm at 77 F LRA 6 5 A FL...

Page 42: ......

Page 43: ...1 800 779 2547 for assistance NORMAL OPERATING SOUNDS All models incorporate rigid foam insulated cabinets to provide high thermal efficiency and maximum sound reduction for its internal working comp...

Page 44: ...heck Display unplugged Verify that both ends of the display wiring are firmly connected Display wiring broken or damaged Perform continuity test of wiring and replace as needed Internal Lights Not Wor...

Page 45: ...d out as being faulty but the unit continues to have operating issues it is most likely due to a configuration error Configuration errors can be cleared by restoring the unit to its factory default se...

Page 46: ...SAFETY INSTALLATION INTEGRATION OPERATING INSTRUCTIONS MAINTENANCE SERVICE Troubleshooting Extended 4 USER GUIDE u line com Switch Closed Magnet Away From Switch Door Open Switch Open...

Page 47: ...temperature Navigates through service menu LED activated with button activation 3 Down Button Decreases temperature Navigates through service menu LED activated with button activation 4 Light Button A...

Page 48: ...is would cause the cabinet to push itself 3 cooler To view pure thermistor readings you must go into the service menu and choose the correct option To view the thermistor temperature push and release...

Page 49: ...THERMISTOR 3 ZONE FREEZER This shows the pure thermistor reading with no offsets taken into account 4 Does not apply to this model 5 THERMISTOR 1 ZONE OFFSET DO NOT MAKE AN ADJUSTMENT TO THIS WITHOUT...

Page 50: ...minutes 19 INDIVIDUAL COMPONENT TOGGLE Display Relay Output 0 Exit 2 Relay 2 3 Relay 3 4 Relay 4 5 Relay 5 6 Relay 6 7 Relay 7 8 DC Output 1 9 DC Output 2 10 DC Output 3 11 DC Output 4 12 DC Output 5...

Page 51: ...D 10 2224RGL 01 2260RDC 51 1224WC 15 2224WC 03 2260WC 53 CLR1215 18 2224ZWC 59 2260ZWC 58 CO1224F 19 ADA24R 17 PROGRAMMING THE UNIT TO CORRECT MODEL NUMBER 1 Disconnect the unit from power source 2 Pu...

Page 52: ...SAFETY INSTALLATION INTEGRATION OPERATING INSTRUCTIONS MAINTENANCE SERVICE USER GUIDE u line com...

Page 53: ...SAFETY INSTALLATION INTEGRATION OPERATING INSTRUCTIONS MAINTENANCE SERVICE USER GUIDE u line com...

Page 54: ...SAFETY INSTALLATION INTEGRATION OPERATING INSTRUCTIONS MAINTENANCE SERVICE USER GUIDE u line com...

Page 55: ...encounter a dirty thermistor connection you should replace the thermistor and the thermistor harness Thermistor error information can be found in the Control Operations Service section This unit has...

Page 56: ...5 2224 2260 WC ZWC 12 45 45 7 1215 1224 2218 2245 2224 2260 R RSOD RDC BEV DC DWR RGL 12 45 42 6 CO29 F 12 18 n a CO1224 F 12 18 45 7 1224FZR Freezer Mode 6 45 42 6 1224FZR Refrigerator Mode 12 45 42...

Page 57: ...aporator REPLACING EVAPORATOR FAN MOTOR 1 Disconnect unit from power source 2 Remove two screws from fan cover 3 Remove two screws holding fan bracket to liner 4 Unplug fan connection 5 Remove two nut...

Page 58: ...SAFETY INSTALLATION INTEGRATION OPERATING INSTRUCTIONS MAINTENANCE SERVICE USER GUIDE u line com Remove Fan and Cover 1...

Reviews: