background image

Setting up


9

.05


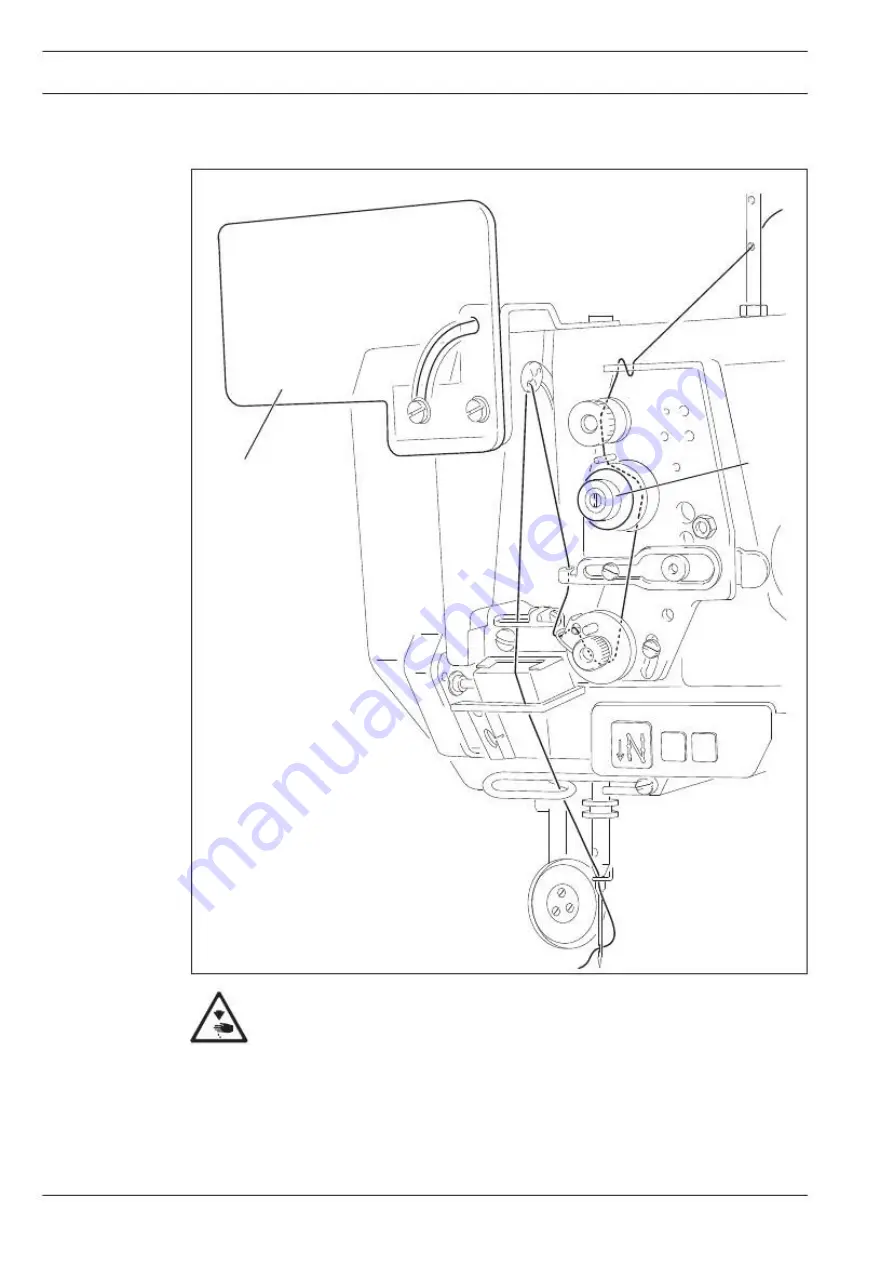
Threading the needle thread and regulating its tension on


model 571 and 591


1


2


Fig. 9 - 05


129-037


Switch the machine off!


Danger of injury if the machine is started accidentally!


● Tilt up the eye guard 

1.


● Thread the needle thread as shown in Fig. 

9-05.


● On model 

571 

the needle is threaded from the 

right to the left, 

and on model 

591 

from


  the 

left to the right.


● Adjust the needle thread tension by turning milled screw 

2.


34


Summary of Contents for TW1-571

Page 1: ...TW1 571 574 591 POSTBED SEWING MACHINE INSTRUCTION MANUAL...

Page 2: ......

Page 3: ...571 574 591 Instruction Manual This manual applies to all machines of the mentioned type from the following serial number onward 1000011 4153 3 570590 2 2...

Page 4: ...This Instruction Manual is valid for all models and subclasses listed in the chapter Specifications...

Page 5: ...4 7 Controls 15 7 01 On off switch 15 7 02 Keys on the machine head only for machines with 911 15 7 03 Bobbin thread monitoring with stitch counting only with EcoDrive 16 7 04 Pedal 16 7 05 Lever for...

Page 6: ...ading the needle thread and regulating its tension 574 35 9 07 Setting the stitch length 36 9 08 Adjusting the stitch counter for the bobbin thread control 36 10 Care and maintenance 37 10 01 Servicin...

Page 7: ...sewing tools e g needle roller presser needle plate and bobbin when threading the machine when leaving the machine unattended and during mainte nance work the machine is to be separated from the power...

Page 8: ...personnel at all times The Instruction Manual must be read before operating the machine for the rst time The operating and specialist personnel is to be instructed as to the safety equipment of the ma...

Page 9: ...in the machine which may limit its safety 1 05 02 Specialist personnel Specialist personnel are persons with a specialist education in the elds of electrics electro nics and mechanics They are respons...

Page 10: ...ew ing head Machine can tip over backwards when tilted 2 3 4 1 5 Fig 1 01 63 021 129 030 Switch the machine off before tilting it backwards Danger of injury if the machine is started accidentally Do n...

Page 11: ...ine post to the right of the needle with driven feed wheel and roller presser and synchronized needle The machines are used for sewing lockstitch seams in the leather and upholstery industries Any and...

Page 12: ...r 725 2800 cuts min Connection data Operating voltage 230 V 10 50 60 Hz Max power consumption 1 2 kVA Fuse protection 1 x 16 A inert Noise data Emission sound level at the workplace at appropriate spe...

Page 13: ...r similar strengths of other types of thread 3 02 Possible models and subclasses TYPICAL 571 591 Model A For sewing lightweight materials TYPICAL 571 591 Model B For sewing medium weight materials TYP...

Page 14: ...arious plastic materials The electrical equipment comprises plastic materials and copper The machine is to be disposed of according to the locally valid pollution control regulati ons if necessary a s...

Page 15: ...machines are only transported in an upright position 5 03 Disposal of packing materials The packing materials of this machine comprise paper cardboard and VCE bre Proper dis posal of the packing mate...

Page 16: ...uction manual work to be carried out or important information is accentuated by symbols These symbols have the following meanings Note information Cleaning care Lubrication Maintenance repairs adjustm...

Page 17: ...turning switch 1 Machines with Typical PicoDrive Operate main switch 2 to switch the machine on or off 7 02 Keys on the machine head only for machines with 911 As long as key 1 is pressed during sew...

Page 18: ...de 1 ashes After the thread has been trimmed and the bobbin changed the stitch counting begins anew Presetting the number of stitches see description in the instruction manual for the motor 1 Fig 7 03...

Page 19: ...lifting roller presser The roller presser can be raised by tur ning lever 1 1 Fig 7 05 7 06 Knee lever The roller presser can be raised by pres sing the knee lever 1 in the direction of the arrow 1 Fi...

Page 20: ...th is set by pressing key 1 and turning the balance wheel see Chap ter 9 07 Setting the stitch length 1 Fig 7 07 7 08 Swing out roller presser When the roller presser is raised it can be swung out by...

Page 21: ...ide 2 moves into its operating position Switch off edge guide Raise edge guide 2 and let it click into po sition The edge guide 2 is out of operation Raise lever 4 The edge guide swings backwards Chan...

Page 22: ...ves into its operating position Switch off edge guide Raise edge guide 2 and let it click into position The edge guide 2 is out of operation Raise lever 4 The edge guide swings backwards Changing the...

Page 23: ...Controls 7 11 Control panel only on machines with Typical Eco drive or Typical Pico drive The description can be found in the separate instruction manual for the control panel 21...

Page 24: ...Installation The site where the machine is installed must be provided with suitable connections for the electric current see Chapter 3 Speci cations It must also be ensured that the standing surface...

Page 25: ...he accessories using screw 2 Do not operate the machine wi thout tilt lock 1 Danger of crus hing between sewing head and table top 1 Fig 8 02 8 01 03 Fitting the machine cover Slide the slots of the l...

Page 26: ...Remove the wedge from motor shaft 4 Attach angle bracket 5 with screws 6 Fit toothed belt wheel 7 to the motor shaft 4 so that the point of the screw is located in the groove of the motor shaft Screw...

Page 27: ...this position t toothed belt 1 Swing the bearing plate 2 of the motor so that the toothed belt is tensioned In this position tighten screws 3 8 02 04 Mounting the belt guard of the ange motor Attach b...

Page 28: ...Installation and commissioning 8 03 Connecting the plug in connections and earth cables P44 PD L P40 ED A A X1 X1 B B X5 X2 X4 X3 X4 X3 X7 X6 X7 X2 X5 X8 1 Fig 8 08 26...

Page 29: ...A Connect earth point A to earth point B with earth cable Fasten the earth cable from plug X1 to earth point B 8 04 Connecting the safety switch Connect plug 1 of safety switch 2 as shown in Fig 8 09...

Page 30: ...cted in the junction box If there are any discrepancies the machine must not be operated under any cir cumstances Before starting up the machine for the rst time have specialists check whether paramet...

Page 31: ...parameter has to be altered operate the TE Speed key and then switch off the machine and switch it on again Then select service level C again as de scribed above By pressing the corresponding key sele...

Page 32: ...machine off and then on again Select parameter 800 by pressing the corresponding keys Check whether the value is set at 1 balance wheel turns towards the operator and alter if necessary Select parame...

Page 33: ...f the machine Danger of injury due to unintentional starting of the machine Only use needles from the system intended for the machine see Chapter 3 Speci cations TYPICAL 571 und 591 Raise the roller p...

Page 34: ...Switch on the bobbin winder while at the same time pressing bobbin winder spindle 2 and lever 3 The bobbin lls up during sewing The tension of the thread on bobbin 1 can be adjusted with knurled screw...

Page 35: ...Insert bobbin case 2 Close the latch and close the post cap 574 is shown in Fig 9 03 Fig 9 03 129 036 9 04 Threading the bobbin case Adjusting the bobbin thread tension Insert the bobbin into the bob...

Page 36: ...itch the machine off Danger of injury if the machine is started accidentally Tilt up the eye guard 1 Thread the needle thread as shown in Fig 9 05 On model 571 the needle is threaded from the right to...

Page 37: ...the machine off Danger of injury if the machine is started accidentally Tilt up the eye guard 1 Thread both needle threads as shown in Fig 9 06 The left needle is threaded from the right to the left...

Page 38: ...1 and turn the balance wheel to and fro until the stitch length required is shown on the scale 2 opposite the bottom edge 3 of the belt guard recess 9 08 Adjusting the stitch counter for the bobbin t...

Page 39: ...horter inter vals are recommended 10 02 Cleaning Clean the hook hook compartment and toothed wheel 3 daily several times if in continuous use Switch the machine off Danger of injury if the machine is...

Page 40: ...ration pour a few drops of oil into the hook race see arrow Fig 10 02 10 04 Oil bowl for hook lubrication Check the oil level before each use There must always be oil in re servoir 1 If required re ll...

Page 41: ...ar Tilt the sewing head back onto the support Fig 10 04 shows the bevel gears of the 574 To set the sewing head upright press tilt lock 1 backwards and set the sewing head up right using both hands Us...

Page 42: ...ive and control unit P44 PD L The selection of the user level and the alteration of parameters is described in the sepa rate instruction manual for the drive unit 10 07 01 Parameter list 700 700 0 0 1...

Page 43: ...tiplier for the xed value 200 stitch count User level 0 User level 1 Technician level 11 Service level Selected machine class Rotating direction of the motor Main drive reduction ratio 0 1 1 571 and 5...

Page 44: ...Mounting the table top 11 11 01 Mounting the table top Tilted work base 2x dowel pins 12 x 37 11 02 Table top cutout 42...

Page 45: ...1 03 Mounting the table top with Typical EcoDrive and control unit P 40 ED Stand position 906 3550 005 895 Controlbox P 40 ED 91 263 432 95 Vers 02 12 03 View Underside table top Controlunit for 725 7...

Page 46: ...Mounting the table top 11 04 Mounting the table top with Typical PicoDrive and control unit P44 PD L Stand position 906 3550 005 895 Controlbox P 44 PD L Speedcontrol unit 44 View Underside table top...

Page 47: ...threading key Single stitch key Start inhibitor switch Knife motor transformer RS 232 interface PC plug Sewing motor plug Incremental transmitter plug Incremental transmitter plug Synchronizer PD3 plu...

Page 48: ...plug Thread trimmer 900 Automatic presser foot lift 910 Backtacking device 911 roller presser Backtacking device 911 feed wheel Backtacking device 911 needle Thread tension release FSL Automatic pres...

Page 49: ...Ministop long incremental transducer Speedcontrolunit for software download Control unit P40 ED Control package P40 ED LS Light barrier power switch VR1 Roller presser release VR2 Feed switch over VR...

Page 50: ...Circuit diagrams 11 05 03 Version 18 06 07 91 191 524 95 Part 1 Circuit diagrams 91 191 524 95 48...

Page 51: ...91 191 524 95 Part 2 Version 18 06 07 Circuit diagrams 49...

Page 52: ...ve Ministop long incremental transducer Speedcontrolunit for software download Control unit P44 PD L Control package P44 PD L LS Light barrier power switch VR1 Roller presser release VR2 Feed switch o...

Page 53: ...91 191 534 95 Part 1 11 05 05 Version 12 03 08 Circuit diagrams Circuit diagrams 91 191 534 95 51...

Page 54: ...Circuit diagrams Version 12 03 08 91 191 534 95 Part 2 52...

Page 55: ...er 30 mm 4 0 mm wide toothed TYPICAL 571 574 TYPICAL 591 TYPICAL 571 574 591 91 176 329 05 TYPICAL 574 91 176 321 05 11 108 093 15 91 173 664 15 11 108 093 15 91 173 664 15 91 165 344 15 2x 11 330 082...

Page 56: ...73 15 95 774 856 05 11 108 852 15 95 774 853 05 95 774 880 05 99 137 151 45 91 171 049 05 91 171 042 05 95 774 464 25 91 700 996 15 571 725 574 725 591 725 11 173 168 15 11 130 167 15 91 119 202 04 00...

Page 57: ...Notes...

Page 58: ...e for EcolabellingProduct CertificateforEnergy ConservationProduct VETRON TYPICAL EUROPE GmbH Clara Immerwahr Str 6 67661 Kaiserslautern Germany Tel 49 6301 320 75 0 Fax 49 6301 320 75 11 info vetront...

Reviews: