


http://www.tyan.com
14
3.4 Replacing the Power Supply .................................................. 70
3.5 Replacing the Front Panel Board ........................................... 71
3.5.1 Front Panel Board Features ............................................ 72
3.6 Replacing the USB Board ....................................................... 73
3.6.1 USB Board Features ....................................................... 74
3.6 Replacing the HDD Backplane Board .................................... 75
3.6.1 HDD BP Board Features ................................................. 78
3.7 Replacing Power Distribution Board ....................................... 82
3.7.1 Power Distribution Board Features ................................. 83
3.7.2 Connector Definitions ...................................................... 84
3.8 Replacing the Riser Card ....................................................... 85
3.8.1 Riser card Features ......................................................... 86
3.9 Replacing the Fan .................................................................. 87
3.10 Replacing the Motherboard .................................................... 89
Appendix I: How to recover UEFI BIOS ........................................ 91
Appendix II: Installing IO Plate for OCP Card .............................. 93
Appendix III: Cable Connection Tables ........................................ 95
Appendix IV: Fan and Temp Sensors ........................................... 99
Appendix V: FRU Parts Table ...................................................... 103
Appendix VI: Technical Support ................................................. 105
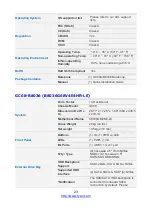
Summary of Contents for GC68-B8036
Page 1: ...1 http www tyan com GC68 B8036 GC68A B8036 Service Engineer s Manual ...
Page 2: ...2 http www tyan com ...
Page 33: ...http www tyan com 33 1 5 5 Chassis Dimensions ...
Page 34: ...http www tyan com 34 1 5 6 Block Diagram S8036 ...
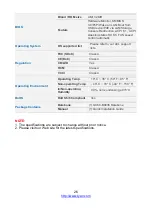
Page 36: ...http www tyan com 36 NOTE ...
Page 42: ...http www tyan com 42 4 Use a screw driver to fasten the rear top cover ...
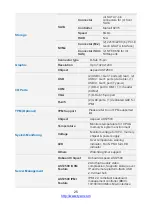
Page 47: ...http www tyan com 47 Memory Population table ...
Page 53: ...http www tyan com 53 5 Insert the drive tray into the chassis and close the lever ...
Page 55: ...http www tyan com 55 4 Insert the drive tray into the chassis and close the lever ...
Page 60: ...http www tyan com 60 4 Insert the M 2 card into the slot Pull the latch to lock the M 2 card ...
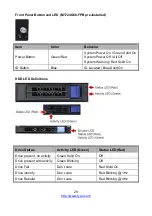
Page 64: ...http www tyan com 64 Front ...
Page 66: ...http www tyan com 66 3 Fasten the chassis ear to the front surface of chassis ...
Page 68: ...http www tyan com 68 NOTE ...
Page 90: ...http www tyan com 90 2 Unscrew the motherboard to lift it up for replacement ...
Page 100: ...http www tyan com 100 BIOS Temp Sensor Name Explanation ...


