


http://www.tyan.com
91
Appendix I: How to recover UEFI BIOS
Important Notes:
The emergency UEFI BIOS Recovery process is only used to rescue a system with a
failed or corrupted BIOS image that fails to boot to an OS. It is not intended to be
used as a general purpose BIOS flashing procedure and should not be used as such.
Please do not shutdown or reset the system while the BIOS recovery process is
underway or there is risk of damage to the UEFI recovery bootloader that would
prevent the recovery process itself from working. In no event shall Tyan be liable for
direct, indirect, incidental, special or consequential damages arising from the BIOS
update or recovery.
The BIOS Recovery file is named xxxx.cap, where the 'xxxx' portion is the
motherboard model number. Examples: 5630.cap, 7106.cap, 7109.cap, etc. Please
make sure that you are using the correct BIOS Recovery file from Tyan's web site.
BIOS Recovery Process
1.
Place the recovery BIOS file (xxxx.cap) in the root directory of a USB disk.
2.
Ensure that the system is powered off.
3.
Insert the USB disk to any USB port on the motherboard or chassis.
4.
Power the system on while pressing “Ctrl” and “Home” simultaneously on the
keyboard. Continue to hold these keys down until the following Tyan screen is
displayed on the monitor:
Summary of Contents for GC68-B8036
Page 1: ...1 http www tyan com GC68 B8036 GC68A B8036 Service Engineer s Manual ...
Page 2: ...2 http www tyan com ...
Page 33: ...http www tyan com 33 1 5 5 Chassis Dimensions ...
Page 34: ...http www tyan com 34 1 5 6 Block Diagram S8036 ...
Page 36: ...http www tyan com 36 NOTE ...
Page 42: ...http www tyan com 42 4 Use a screw driver to fasten the rear top cover ...
Page 47: ...http www tyan com 47 Memory Population table ...
Page 53: ...http www tyan com 53 5 Insert the drive tray into the chassis and close the lever ...
Page 55: ...http www tyan com 55 4 Insert the drive tray into the chassis and close the lever ...
Page 60: ...http www tyan com 60 4 Insert the M 2 card into the slot Pull the latch to lock the M 2 card ...
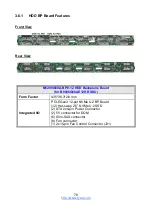
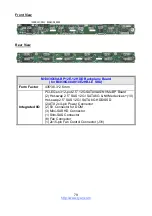
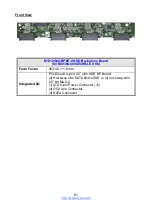
Page 64: ...http www tyan com 64 Front ...
Page 66: ...http www tyan com 66 3 Fasten the chassis ear to the front surface of chassis ...
Page 68: ...http www tyan com 68 NOTE ...
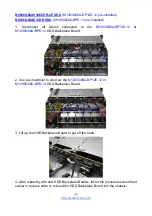
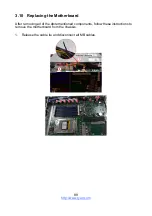
Page 90: ...http www tyan com 90 2 Unscrew the motherboard to lift it up for replacement ...
Page 100: ...http www tyan com 100 BIOS Temp Sensor Name Explanation ...


