background image

56

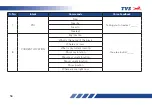
S. No.

Intent

Commands

Voice Feedback

12

VOLUME DECREASE

Decrease volume

Volume Decreased

Volume down

Decrease sound

Reduce volume

13

SETTING HIGH SPEED 

ALERT ENABLE

Enable high speed alert

High speed alert setting enabled

14

SETTING HIGH SPEED 

ALERT DISABLE

Disable high speed alert

High speed alert setting disabled

15

END NAVIGATION

Cancel navigation

Navigation ended

End navigation
Exit navigation

Stop navigation

Summary of Contents for RONIN

Page 1: ...OWNERS MANUAL WELCOME TO THE UNSCRIPTED LIFE ...

Page 2: ......

Page 3: ... 7 RUNNING IN INFORMATION 8 ANTI LOCK BRAKING SYSTEM 9 SAFE RIDING TIPS 14 KNOW YOUR TVS RONIN 18 RIDING YOUR TVS RONIN 76 MAINTENANCE 82 WARRANTY AND SERVICES 107 EXPRESS SERVICE 113 EXPERT ON WHEELS 114 PICKUP AND DROP 115 TECHNICAL SPECIFICATIONS 116 GENERAL INFORMATION 122 ...

Page 4: ... s Area Offices flip over for addresses Or Toll Free Number 1800 258 7111 Email customercare tvsmotor com Disclaimer TVS Motor Company or any of its officials Authorized Main dealer Authorized Dealer do not ask customers for bank card wallet details authentication In case you face any such claim please report to the relevant local authorities immediately ...

Page 5: ... 2 MC Nichols Road Chetpet Chennai 600 031 Phone 044 28361651 28361654 Email AO Chennai tvsmotor com AO Madurai tvsmotor com TAMILNADU 2 2 TVS Motor Company Limited No 10 2nd floor Shree Shanmugapriya Towers Kannuswamy Street Behind Hotel Annapoorna R S Puram Coimbatore 641 002 Phone 0422 4350060 2541035 Email AO Coimbatore tvsmotor com KERALA 3 TVS Motor Company Limited Ambady Towers Second Floor...

Page 6: ...ity Near Brindhavan Dhaba Hosangabad Road Bhopal 462 026 Phone 0755 2499406 2499306 Email AO Bhopal tvsmotor com AO Indore tvsmotor com RAJASTHAN 1 2 10 TVS Motor Company Limited Plot No 17 18 2nd Floor of National Motors Building Jhotwara Industrial Area Jaipur 302 012 Phone 0141 5150901 5150902 Email AO Jaipur tvsmotor com AO Udaipur tvsmotor com DELHI HARYANA 11 TVS Motor Company Limited D 3 D ...

Page 7: ...e Plaza Rasulgarh Bhubaneshwar 751 010 Phone 0674 2580019 Email AO Bhubaneshwar tvsmotor com NORTH EAST STATES 18 TVS Motor Company Limited 147 Udayan Ganesh Guri Opp Punjab National Bank R G B Road Guwahati 781 005 Phone 0361 2202030 2202031 Email AO Guwahati tvsmotor com ...

Page 8: ... experience the virtual configurator which lets you add a whole range of accessories Plus you can now download the TVS SmartXonnect App only in the TVS Ronin TD variant and pair it with your bike to unlock all its smart features This instruction manual will help you learn all about your new bike and how to make the most of its state of the tech features Also be sure to get your bike serviced ONLY ...

Page 9: ... you about all the hazards associated with operating or maintaining the vehicle you must use your own judgement You will find important safety information in following form in this manual These words carry the following connotations Disregarding this message might result in injury to the rider or deadly accidents Warning This message indicates special procedures or precautions to be followed to av...

Page 10: ...s publication TVS Motor Company Limited may however incorporate modifications or improvements on its vehicles at any time without notice and therefore in such events it is possible that the relevant part of the owner s manual does not apply to your vehicle Prior permission of TVS Motor Company Limited is required for quoting copying or reproducing any part of this owner s manual Accessories shown ...

Page 11: ...parts The first free service at 750 1000 km is most important During running in period all the engine components and other parts will have set in All adjustments to be restored all fasteners to be tightened Engine cum transmission oil to be replaced Timely performance of the first free service will ensure optimum service life and performance from the engine Replacing the engine cum transmission oi...

Page 12: ...ced is only a result of luck or extreme training as is the case of professional stunt riders who drift Preventing the wheels from slipping due to excessive braking force compensates losing control and help the rider to maneuver the vehicle and to avoid accidents So what the ABS does is actually limiting the braking force exerted by the rider by either squeezing the lever and keep the wheel spinnin...

Page 13: ...g brake application Vehicles fitted with ABS uses the conventional brake system during normal operation But during hard stop the brake pedal lever feels different i e a rapid pulsation in the brake pedal lever This is absolutely normal It is not necessary to have this pulsation feel every time the brake is applied Pulsations are felt only during wheel locking tendency occurs due to the modulation ...

Page 14: ...skidding just like normal braking system Always apply both front and rear brake for better performance The TVS RONIN does an automatic self check every time whenever the ignition lock of the bike is turned ON The ABS warning lamp provided on the instrument cluster blinks and informs you that the ABS is under check This ABS warning lamp goes OFF once the bike reaches 10 km h speed and above in dual...

Page 15: ...r ring is facing upwards ABS helps only in improving the vehicle control It is always good to remember not to exceed the physical limits of the vehicle stability It is rider s responsibility to ride at a suitable speed while taking care of conditions and road surface ABS will not compensate for errors in the judgement or improper brake use in the various situation ABS never eliminates the danger o...

Page 16: ...visable to apply more front brake and less of rear brake Use of non genuine brake pads tyres disc etc leads to poor braking performance and unsafe riding conditions Never open HECU on your own it is a very sensitive part of ABS and needs to be handled only by the trained personnel Contact your nearest TVS Motor Company Authorised Main Dealer Authorised Dealer Note Do not ride the vehicle in condit...

Page 17: ...e uncomfortable and unsafe when riding a two wheeler Choose good quality two wheeler riding apparel Know your limits Ride within the boundaries of your own skill at all times Knowing these limits and staying within them will help you to avoid accidents Two wheeler safety starts with wearing a good quality helmet One of the most serious injuries that can happen is a head injury Always wear an ISI a...

Page 18: ...gal force Avoid abrupt application of brake or sudden steering by all means Braking For safe riding it is very important to master the braking techniques 1 Close release the throttle 2 Hold the vehicle upright as you apply the brake 3 Progressive application of brakes is safer 4 Never declutch while braking at higher speeds 5 Apply both the brakes 6 Do not pump the brakes One hand riding is danger...

Page 19: ... accessories can lead to unsafe operating conditions Your friendly Dealer will assist you in selecting quality accessories and installing them correctly While selecting the accessories make sure the accessories should not obstruct lighting steerability suspension level and ground clearance Please ensure that if the tank cover is used it is not getting en trapped between fuel tank and fuel tank cap...

Page 20: ...charging crankcase emissions into the atmosphere Blow by gas is returned to the combustion chamber through the air cleaner Evaporative Emission Control System The TVS RONIN is equipped with an evaporative emission control system which consists of a canister and associated piping This system prevents the escape of fuel vapors from the fuel tank Your vehicle is tested and certified for emission whic...

Page 21: ...engraved on the left side crankcase assembly near cylinder block as shown VEHICLE IDENTIFICATION NUMBER The frame and engine serial numbers are the only means of identifying your vehicle from others of the same model and type They are also required to assist your Dealer for ordering parts or referring to special information ...

Page 22: ...ne cut off switch 7 Front brake lever 8 Throttle grip 9 Hazard switch 10 Electric starter switch 11 Fuel tank cap 12 Horn switch 13 Turn signal lamp switch 14 High low beam switch 15 Clutch lever 16 Rear view mirror L 17 Pass by switch 18 Info switch 2 3 5 4 9 13 18 17 16 8 11 12 14 15 7 6 1 Applicable for Connected instrument cluster version only 10 ...

Page 23: ...HICLE LEFT SIDE 1 Front wheel axle 2 Gear shift lever 3 Side stand 4 Rider foot rest L 5 Center stand 6 Chain inspection window 7 Pillion foot rest L 8 Rear wheel axle 9 Reflex reflector 10 Cover frame L 10 8 1 3 4 5 2 6 7 9 ...

Page 24: ...ation of spark plug 7 Gauge oil level 8 Rear brake pedal 9 Rider foot rest R 10 Master cylinder rear 11 Oil reservoir rear 12 Pillion foot rest R 13 Muffler assembly 14 Disc plate rear 15 Wheel speed sensor rear 16 Caliper assembly rear 17 Reflex reflector 18 Cover frame R 11 3 2 4 1 18 5 6 7 8 9 14 15 10 12 13 17 16 Applicable for Dual channel ABS version only ...

Page 25: ...embly 3 Oil cooler 4 Tank guard 5 Position lamp 6 Turn signal lamp front R REAR 1 Turn signal lamp rear R 2 Reflex reflector 3 Number plate lamp 4 Turn signal lamp rear L 5 Tail lamp assembly 6 Pillion handle License plates are mandatory accessory will be charged extra 2 1 3 6 5 4 1 2 4 3 5 6 ...

Page 26: ... 3 LOCK position TVS RONIN s steering can be locked in both left and right directions To lock the steering turn the handlebar all the way to the left or right direction Push the key IN and turn it to the LOCK position and take out All the electrical circuits are turned OFF in this position Insert the control key into the lock push the key IN and turn it to OFF or ON position to unlock the steering...

Page 27: ...hen the ignition switch is turned ON the instrument cluster performs a self check and the details like ride mode ODO will be displayed in the cluster s display Incase of connected instrument cluster the cluster displays the product name RONIN followed by a greeting message HAVE A SAFE RIDE will be displayed Wait till the cluster s display becomes static Note Before turning the ignition key to ON p...

Page 28: ...ition automatically on starting the engine The head lamp beam high low can be controlled using the beam control switch Press the top end of switch for High beam and bottom end for Low beam Clutch lever position can be set to your convenience Refer page no 74 for details Pass by system will not work if the head lamp is glowing in High beam Note Failure to switch the turn signal lamp ON or OFF at th...

Page 29: ... grip in counter clockwise from its idle position to increase the engine speed and vice versa to reduce 4 Electric starter switch Press the electric starter switch to start the engine Ensure the transmission is in neutral or else press the clutch lever completely and side stand is retracted before engaging the electric starter switch 4 1 2 6 3 Ensure to turn ON the engine cut off switch before sta...

Page 30: ...n the instrument cluster To shift the transmission from neutral to first gear push the gear shift lever down To change it to the second gear lift the lever up Never shift gears without disengaging the clutch and releasing the throttle Failure to comply will lead to rough shift or jerk while shifting the gears Remember to return to neutral position before restarting the engine or when in gear disen...

Page 31: ...n wards gradually Independent use of rear or front brake reduces the overall braking efficiency In extreme conditions braking with only rear or front brake may lock the wheel which would result in skidding or toppling of vehicle Braking performance is affected adversely with wet surfaces loose surfaces and overheating of brake system due to unnecessary continuous application of brakes For safety e...

Page 32: ...l the engine is started It will go OFF once the engine is started Non ConnectedType INSTRUMENT CLUSTER Your TVS RONIN is provided with a fully digital instrument cluster with lots of features and various modes The connected type instrument cluster has the mobile app for Smart Phones and navigation assist etc The non connected type comes without mobile app and navigation assist ConnectedType 1 3 4 ...

Page 33: ...en after starting the engine it indicates that there may be an error in the system Contact the nearest TVS Motor Company Authorised Main Dealer Authorised Dealer immediately for rectification 3 Turn signal indicator left Flashes when the left side turn signal indication is activated 4 Low fuel indication Low fuel indicator blinks to alert the rider that fuel has reached below recommended level and...

Page 34: ... self check This lamp goes OFF once the vehicle reaches 10 km h speed and above in dual channel vehicle and 6 km h speed and above in single channel vehicle If this lamp glows continuously even after reaching the specified speed have your vehicle checked atTVS Motor Company Authorised Main Dealer Authorised Dealer refer page no 11 for more details 11 Gear shift indicator 12 Tachometer 13 Digital c...

Page 35: ...cified RPM based on the ride modes and smooth engine operation When no shift indication is available it indicates your present operating condition is in optimal range for the said gear UP SHIFT DOWN SHIFT If the battery is disconnected and reconnected during service You may need to reset the time as explained in page no 40 Incase of connected instrument cluster the time get set automatically on co...

Page 36: ...l bar is between 1 to 8 and in LFI blink condition In empty and 9 bar condition will be displayed In addition to above conditions in which DTE cannot be calculated not limited to fuel sensor error will be displayed If you notice an error message instead of speed indication when the vehicle is in move Contact nearest TVS Motor Company Authorised Main Dealer Authorised Dealer Note 15 ODO Trip A B DT...

Page 37: ...ity of fuel available in the fuel tank All the nine bars will be displayed when the fuel in the tank reaches above 10 3 liters approximately full tank When the fuel reaches half tank 6 1 liters approx the fuel gauge displays only four bars as shown When the ignition switch is turned ON with the engine kill switch ON condition priming noise of fuel pump may be heard which is absolutely normal Frequ...

Page 38: ...d reset Get the vehicle serviced atTVS Motor Company Authorised Main Dealer Authorised Dealer 19 Notification area only in connected type cluster A general purpose notification area where ride mode information error message service due connectivity information and warnings are displayed Service reminder works only based on the distance km covered by the vehicle This is only a reminder indicator Cu...

Page 39: ...d to keep track and follow the service schedule Note Service reminder and battery low pop ups can be cancelled by pressing the Info switch on the handle bar Note 20 Ride Modes TVS RONIN has two different ride modes select the desired ride mode by pressing the mode switch in the right hand switch assembly refer page no 26 or by pressing the mode switch of the instrument cluster The two ride modes a...

Page 40: ...intervention is earlier and safe braking will be felt At the end of self check active ride mode information will be displayed on the LCD segment Mode changes are effected only when the throttle is closed after a mode change request To guide you to do the same A message CLOSE THROTTLE will be popped up in the notification area of the connected instrument cluster A message Cl trl will be displayed i...

Page 41: ...ument cluster A message Ch Err will be displayed in the odo meter display area of the non connected instrument cluster Note MODE AND SET BUTTONS The Mode A and Set B buttons are provided to change between various modes and to set the some of the digital display functions of the instrument cluster The sequence of modes and their selections are explained in detail below Short press the Mode button t...

Page 42: ...rned OFF when the meter is in ODO or TRIP meters then the respective meters will be displayed in the next ignition ON 1 In ODO mode press the Mode button once and twice to enter and meters respectively To reset any of the trip meter while ensuring the display is in TRIP A or TRIP B press and hold the Set button for a few seconds 2 In TRIP B meter mode press the Mode button once to enter DTE mode T...

Page 43: ... clock blinks 6 Press the Mode button to change the hour format AM or PM in 12 hour mode 7 Press the Set button to set AM or PM and now the hours digit of the clock blinks 8 Now press the Mode button to increase the hours while hour digits are blinking 9 On pressing the Set button again the hours of the clock is set and the minute digit blinks 10 Now press the Mode button to increase the minutes w...

Page 44: ...nes with the single instrument cluster the previous connected phone has to be forgotten by clicking Forget This Device from Bluetooth settings in the Phone Also ensure to forget the instrument cluster from the local application memory If the vehicle battery is reset or fuse is blown there is a possibility of failed Bluetooth connection then too Forget This Device from Bluetooth settings in the Pho...

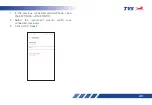
Page 45: ...er which was connected previously 3 Click on the Forget this device Steps to unpair in android Phone If the user needs to connect multiple android Phones with the single instrument cluster the previous android Phone has to be forgotten using unpair from Bluetooth settings in the following manner ...

Page 46: ...43 43 1 In the previous connected android Phone open the SETTINGS BLUETOOTH 2 Select the instrument cluster which was connected previously 3 Click on the Unpair ...

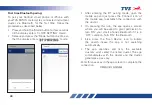
Page 47: ...pen the mobile app and just press the Connect icon of the mobile app to establish the connection with the cluster On pressing this icon the app opens a screen where you will be asked to grant permission to turn ON your smart phone s Bluetooth if it is in OFF condition Turn ON the Bluetooth Else press the Scan Device icon to initiate the search incase the app is not searching automatically The app ...

Page 48: ...peed or engine at idling or engine off condition Note On connecting with the smart phone successfully the instrument cluster displays Auto pairing happens in active connected rides only if the application is locked in the RAM in multitasking screen of the phone with manufacturer s customised OS Ex MI Vivo etc In case of Android phones with Android OS version above 8 0 for App to work seamlessly an...

Page 49: ...cept possible by doing a long press of info button Incoming calls alerts can be cancelled by pressing the Info switch on the handle bar Note Once the cluster is connected with the smart phone the cluster displays the signal strength of the network provider depending on OS version and the battery level of the smart phone Number of unread messages for that particular ride and number of missed calls ...

Page 50: ...ealer end Note TVS Motor Company Limited does not recommend usage of any type of Mobile Hand Held Devices and applications features whether installed or associated with the vehicle which deprives the rider s attention and focus while riding the Two Wheeler The customers and riders are strictly advised to understand the applicable laws road safety Rules and the local laws on usage of electronic dev...

Page 51: ...ter You can either accept or reject the assist request If you accept the request by pressing the Info switch on handle bar for about 3 secs the app will initiate navigation progress to the nearest fuel pump The customer also can chose to reject the request by pressing the Info switch on the handle bar for about 1 sec In which case the previous display will remain Clock auto sync Whenever the app i...

Page 52: ...assistant With help of the voice assist feature the rider will be able to access mobile application and instrument cluster through speech Once the mobile application is connected to the instrument cluster voice assist feature can be used There are two ways to invoke voice assist in your vehicle 1 By pressing the Info switch for 3s when the notification area is displaying customer window 2 By press...

Page 53: ...ts recognized by voice assist You can refer page no 51 for sample commands of each intent Greeting command Navigation command Reset trip meters Reset DTE Switch to DTE screen Nearest POI command Current location Last call Enable Disable High Speed Alert Ride start time Volume increase decrease Brightness increase decrease ...

Page 54: ...Voice Feedback 1 GREETING Hi buddie Hello _____ How are you doing Hi buddie Hey buddie Hello friend How u doing 2 NAVIGATION Go to Taking you to _____ Take me to Let s go to Navigate to Navigate me to Guide me to Show me Take to Directions to Show me Directions to ...

Page 55: ... Reset TRIP A Trip A Mode Reset Complete Reset TRIP A Data Reset Trip A Info Erase Trip A Clear Trip A Clear Trip A Data 4 RESET TRIP B MODE Reset TRIP B Trip B Mode Reset Complete Reset TRIP B Data Reset Trip B Info Erase Trip B Clear Trip B Clear Trip B Data ...

Page 56: ... my vehicle Range DTE Mode Activated Show my fuel range How far I can travel Switch to DTE Activate DTE mode Switch to DTE mode 6 RESET DTE MODE Reset DTE DTE Reset Complete Reset DTE Data Reset DTE Info Erase DTE Clear DTE Reset Range Clear Range Erase Range ...

Page 57: ... nearest _____ Near by Near to Nearest 8 CURRENT LOCATION My location You are around _____ What is the name of this place Where am i now What is my current location Show my location Show my current location Show current location Show location Where are we right now ...

Page 58: ...ecently Last caller Show my last caller Who is my last caller 10 RIDE START TIME When did I start my ride Ride Time _____ What time I start ride When did we start from home work Ride start time Show start time Show ride start time Start time of ride 11 VOLUME INCREASE Increase volume Volume Increased Volume up Increase sound ...

Page 59: ...ase sound Reduce volume 13 SETTING HIGH SPEED ALERT ENABLE Enable high speed alert High speed alert setting enabled 14 SETTING HIGH SPEED ALERT DISABLE Disable high speed alert High speed alert setting disabled 15 END NAVIGATION Cancel navigation Navigation ended End navigation Exit navigation Stop navigation ...

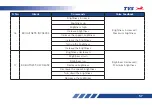
Page 60: ...ness high Increase brightness Increase the speedo brightness Increase the brightness Turn up the brightness Increase the brightness 17 BRIGHTNESS DECREASE Brightness decreased Brightness decreased Minimum brightness Brightness down Brightness low Decrease brightness Decrease the speedo brightness Turn down the brightness Decrease the brightness ...

Page 61: ...nd noise other vehicles noise etc 4 We recommend you to go through the sample command list before trying your intent 5 Kindly refer to the voice feedback of the detected place name when you provide voice command for navigation 6 Make sure you have the information tray of cluster displaying customer window when voice assist is invoked through vehicle switch 7 Ensure your safety while using voice as...

Page 62: ...ay in cluster 1 If the signal strength is poor Poor network POOR NETWORK 2 If the GPS signal is poor Low GPS signal GPS SIGNAL LOW 3 Fuel low warning Check fuel low WARNING FUEL LOW 4 If mobile data is required for a particular feature but if mobile data is not ON Turn on mobile data TURN ON MOBILE DATA 5 If Location access is not provided Need GPS permission NEED GPS PERMISSION 6 If location acce...

Page 63: ...e is for longer duration Break Time BREAK TIME 13 If the brightness of the cluster is maximum and increase brightness command is given Maximum brightness BRIGHTNESS XX 14 If the brightness of the cluster is minimum and decrease brightness command is given Minimum brightness BRIGHTNESS XX 15 If the volume of the mobile phone is maximum and increase volume command is given Maximum volume MAXIMUM VOL...

Page 64: ...elow QR code Android iOS TVS CONNECT APP Dedicated smart phone app is available in the Google Play and the Apple store for your TVS RONIN and it can be installed in your Android smart phones and iPhones To access the features of your TVS RONIN s connected instrument cluster like 1 Incoming call alerts in connected instrument cluster 2 Number of missed call alerts and unread messages in connected i...

Page 65: ...Move to the last screen where you will find the SIGN UP and LOGIN tab If you are already having login credentials then press login tab A screen with various login options opens up as shown TVS Motor Company Limited does not recommend usage of any type of Mobile Hand Held Devices and applications features whether installed or associated with the vehicle which deprives the rider s attention and focu...

Page 66: ... a tab for creating new account Using your social media logins you can create new login else press the CREATE AN ACCOUNT tab On pressing the CREATE AN ACCOUNT tab a screen opens with various input details Feed in your details and submit On submitting the details a screen opens with one time password OTP entry Enter the OTP which is received from TVS Motor Company Limited and submit On submitting t...

Page 67: ...to be renewed after 5 years of vehicle purchase and renewal can be done by contacting near by Dealer end Note Add vehicle Add vehicle tab allows you to add any of your TVS bikes by entering its chassis number You can have sample view of the frame number and also you can get help by chatting with us or by E mailing to us or by calling us ...

Page 68: ...nters CLOCK SETTING 2 Press Mode button twice till the display illumination 3 Press Set button to enter illumination setting 4 Now Press Mode button change the illumination from the range of 20 to 100 5 Press the Set button again to set the illumination and to come out from illumination setting ...

Page 69: ...s better heat management without compromising the engine performance LED HEAD LAMP TVS RONIN comes head lamp combined with front position lamp FPL FPL glows automatically once the igntion is turned ON and the head lamp glows on starting engine To always have best lighting performance always ensure to keep the head lamp and all other lamps outer lenses clean from dust or any other foreign particles...

Page 70: ...is not within the specified limit mentioned in the illustration get the head lamp focus adjusted atTVS Motor Company Authorised Main Dealer Authorised Dealer To check the head lamp beam focus 1 Place the vehicle as shown in the figure from the 5 meters screen wall 2 Mark the horizontal line on a screen around 720 20mm from the ground level and mark the vertical line in middle of the horizontal lin...

Page 71: ... a small drain hole and a pipe is provided in the fuel tank lid cavity so that the water entering through the lid is drained out through a hose 2 1 The fuel tank is not a measuring instrument and the capacity of the fuel tank may slightly vary from the indicated capacity Do not smoke while refueling Do not use cell phones while refueling Avoid spilling of fuel on the hot engine Refill fuel in well...

Page 72: ...tarting as well as improper running of the vehicle Whenever refueling the bike fill only the recommended quantity of fuel 12 liters approx including reserve Do not clean the vehicle by laying down on floor to avoid fuel entry into EVAP system Caution If there is any abnormal jerk startability issue are felt in the vehicle or noise due to sudden escape of gas during opening of fuel tank cap immedia...

Page 73: ...he vehicle Else the vehicle will get Switched OFF Warning STANDS TVS RONIN is equipped with a centre 1 and side stand 2 To place the vehicle on the centre stand hold the handle bar left grip with left hand and pillion handle with right hand Place your foot firmly on the centre stand extension 1a and press with adequate effort Ensure both the legs of centre stand are touching the ground before plac...

Page 74: ...he rear end and gently tapping it on the front end Re assembly There are four hooks to lock the seat with frame Ensure to locate these seat hooks into the frame guides and gently push the seat little foreword and press at rear end till you hear the click sound Make sure that the seat is locked securely in position Caution Failing to lock the seat hooks in the frame guides lead to shaking of seat w...

Page 75: ... seat as explained in page no 71 Tool kit consists of one number each of the following 1 Grip driver 2 Bit 3 12 x 14 open end spanner 4 Tool bag It is recommended to use the tool kit in case of any emergency only It is always advisable to take your vehicle to TVS Motor Company Authorised Main Dealer Authorised Dealer Caution Do not remove the tool kit and first aid kit from the vehicle Always ensu...

Page 76: ...ing manner 9 Remove the seat as explained in page No 71 10 Remove the mounting screws 1 2 Uplug the lugs at 3 4 and take out the cover frame Re assembly 1 Locate the lugs of the cover frame at the holes provided on the frame at 3 4 and install the mounting screws 1 2 Make sure that the cover frame is locked securely in position after installation Caution 4 ...

Page 77: ...igning the arrow mark on the lever to the number provided on the adjuster Front brake lever Adjustment TVS RONIN comes with an adjustable front brake lever There are three positions provided for you to adjust the lever to suit your palm size The lever can be adjusted by adjusting the position adjuster B provided in the lever itself Position 1 is the closest to throttle grip and Position 3 is the f...

Page 78: ...it properly DO s 1 Ensure that no water enters into the unit by closing the USB flap properly 2 Use the USB if approved standard USB cable used for charging mobile 3 Do make sure the flap is not damaged while opening inserting the USB cable DON Ts 1 Do not leave the USB charging flap open partially closed 2 Do not attempt to use charge any other device other than mobile phones Only one mobile phon...

Page 79: ...ge page no 86 Speedometer Performing self check Proper working of ABS warning lamp page no 11 Malfunction indicator Turned OFF after starting the engine page no 29 Steering Smooth movement No play or looseness Throttle Correct free play of cable Smooth operation Clutch Correct free play of cable page no 92 Smooth and progressive action Brakes Availability of brake fluid and proper working of brake...

Page 80: ...e throttle when the vehicle is parked It leads to overheating of engine and damage to the internal components Caution SETTINGTHE VEHICLE IN MOTION 1 Press the clutch lever and engage first gear by pressing the gearshift lever down 2 Open the throttle slowly and simultaneously release the clutch lever gently and gradually The vehicle starts moving forward 3 As the vehicle picks up speed shift to th...

Page 81: ... pressed disengaged as the road speed decreases Bring the engine to neutral position just before the vehicle stops 3 Turn the ignition OFF 4 Park the vehicle on a firm flat surface 5 Lock the steering Reduce speed to a safe limit before turning cornering Do not apply brake while turning cornering Do not disengage clutch before braking Since the engine and exhaust system becomes very hot make sure ...

Page 82: ...ormalities observed due to use of ethanol blended fuels customers are advised to use a different fuel station brand for standard E10 fuel or contact authorised service centres CHECKS AND TIPS FOR IMPROVING FUEL ECONOMY Regular checks Carry out the periodic maintenance checks as specified in this manual refer page no 83 Regular maintenance checks will save fuel ensuring trouble free enjoyable and s...

Page 83: ... the vehicle performance and fuel economy Caution Do not attempt to do any rectification as fuel lines are normally pressurized upto 3 5 bar and any activity by any untrained personnel may lead to un safe condition Caution Engine cum transmission oil Dirty or less engine cum transmission oil increases the friction between various parts of the engine and reduces the engine life thereby increases fu...

Page 84: ...eates a potentially dangerous traffic situation Fuel is wasted whenever the rider suddenly accelerate or apply brake Avoid unnecessary idling While waiting for someone or stopping in signals for long time if the engine is kept running at idle speed it causes unnecessary wastage of fuel Avoid frequent braking Anticipate corners and slopes as well as the traffic conditions Unnecessary and frequent b...

Page 85: ...nd require very special and careful servicing TVS Motor Company Limited strongly recommends that the jobs as per the maintenance schedule be performed by your TVS Motor Company Authorised Main Dealer Authorised Dealer Periodic inspections may reveal one or more parts that may need replacement Whenever replacing parts on TVS RONIN it is recommended that you use only the TVS Motor Company Genuine pa...

Page 86: ...ration play Inspect adjust and lubricate I I I I Adjust if required Lubricate every 24000 km Front fork oil Replace Replace every 36000 km if required in case of inefficiency in functioning or cases of oil leak Front and rear suspension Inspect for proper functioning I I I I All fasteners Inspect and tighten I TI I TI I TI I TI Drive chain Clean lubricate and adjust C L A C L A C L A C L A Chain g...

Page 87: ...t Lubricate L L L L Brake pad wear Brake fluid WSS cable clamps Brake hose Bundy tubes HECU mounting cushions Inspect I I I I Malfunction indicator lamp Check with Diagnostic tool Connect ride scan tool if MIL glows check and clear DTCs Wheel freeness Inspect I I I I Tyre pressure Inspect I I I I Centre side stand pivot Lubricate L L L L Swing arm bearings Clean and lnspect Clean and lubricate eve...

Page 88: ...ny TVS TRU4 FULLY SYNTHETIC oil SAE 10W30 API SL JASO MA2 Front fork oil RH front fork 500 2 cc LH front fork 525 cc SHOWA SS 47G Disc brake fluid TVS Girling DOT 3 DOT 4 Grease Bharat petroleum IOC Bechem MP Grease no 3 Servo Gem no 3 Bechem premium grade 3 Chain cleaner TVS Motor Company TRU SPRAY chain cleaner Chain lubricant TVS Motor Company TRU SPRAY ...

Page 89: ...er check the battery charge by shorting the terminals Always connect the positive terminal first red wire and then negative black wire to avoid sparking The inversion of the battery wires can damage the battery and the recharging system If the motorcycle is to remain unused for a long time a month or longer it is advisable to disconnect the battery cables or have the battery removed by skilled per...

Page 90: ... and after long storage of battery 1 Before Storage a Store the battery only after fully charging it b Battery fuse to be disconnected and stored safely This will reduce the sleep mode current and hence enhance storage life of battery c Alternatively battery connecting wires positive and negative wires can be disconnected and fasteners can be secured with battery terminals 2 During Storage a Store...

Page 91: ...lated area Unusable battery must be disposed in environment friendly manner Do not discard it with household thrash Handover the battery to the battery Dealers or to a recycle center that accept used battery Warning FUSE REPLACEMENT The electrical components of your motorcycle are protected by five fuses Out of which four fuses are housed inside a fuse box and located inside the cover frame near t...

Page 92: ...s to be removed to access the 60A Main fuse 2 Replace the blown fuse with a new one with the same rating extra fuse A is provided in the fuse holder itself 3 Turn ON the ignition lock and check for proper functioning of electrical lncase if the fuse fails again and to remove fuel tank consult the nearest TVS Motor Company Authorised Main Dealer Authorised Dealer Do not use vehicle by shorting the ...

Page 93: ...th a new one After cleaning and inspecting the gap reinstall the spark plug and tighten by hand to avoid cross threading Finally tighten using the spanner Do not over tight or cross thread the spark plug After reassembling the plug fix back the suppressor cap and ensure its proper fitment Always use only recommended make and type of spark plug Since the hook type spark plug is used it is not advis...

Page 94: ...to prevent dust accumulation and re fix the gauge Do not run the vehicle with insufficient without engine cum transmission oil as it will cause serious damage to the engine components Excessive oil filling will cause oil leak and other malfunctions Always use TVS TRU4 FULLY SYNTHETIC oil only SAE 10W30 API SL JASO MA2 Make sure that no foreign object gets in the crankcase while topping up the engi...

Page 95: ...gine oil at room temperature 8 13 mm 1 2 Too much or too less clutch lever free play will damage the clutch plates thereby affecting the performance of the vehicle Adjust the clutch lever free play only when the engine is cold After adjusting free play properly if there is a clutch slip or there is difficulty in shifting gear visit your TVS Motor Company Authorised Main Dealer Authorised Dealer fo...

Page 96: ... stiffness can be set to your convenience Contact your TVS Motor Company Authorised Main Dealer Authorised Dealer for setting the rear shock absorber load Note REAR SHOCK ABSORBER TVS RONIN is provided with dual rated 7 step adjustable gas filled rear shock absorber to meet different road and load The rear shock absorber contains highly compressed gas Do not try to open or disassemble it in any wa...

Page 97: ...ly 1 Check the master cylinder brake fluid level through the view piece glass A 2 Brake fluid level always should be above the LOWER mark B on the master cylinder when the master cylinder is parallel to the ground 3 If the brake fluid level is below the mark or while applying brake if you feel the brake is more spongy or ineffective due to air entry contact TVS Motor Company Authorised Main Dealer...

Page 98: ...per assembly 1 Remove the cover frame R refer page no 73 for removal procedure 2 Check the brake fluid level in the reservoir It should be between maximum and minimum level 3 If the brake fluid level is below minimum or while applying brake if you feel the brake is more spongy or ineffective due to air entry contact TVS Motor Company Authorised Main Dealer Authorised Dealer for topping up the brak...

Page 99: ...risk of accident If you notice any malfunction in brake system contact nearestTVS Motor Company Authorised Main Dealer Authorised Dealer Warning Brake pad wear indicator Visually check the brake pads for wear If the wear is found beyond the wear indicator groove as shown in the figure then replace the brake pads as a set with a new one Wear limit ...

Page 100: ... Check the tyre pressure atleast once in a week if not more frequently Insufficient air pressure in the tyres not only hasten tyre wear but also seriously affects the stability of the vehicle Under inflated tyres make smooth cornering difficult and over inflated tyres decreases the tyre contact with the ground which can lead to skidding and loss of control Be sure that the tyre pressure is within ...

Page 101: ...e it is advised to visit nearest tyre manufacturer Dealer or the tyre repair shops who know the repairing methods of tubeless tyre It is not necessary to remove the tyre from wheel rim always to attend the puncture Even though if there is a need of tyre removal it is strongly recommended to use a tyre removal fitment machine If at all tyre levers need to be used the levers should be free from shar...

Page 102: ...ouch the ground for more than week time Inflation pressure should check on cold condition maximum travel time should not exceed more than 1 km Weekly basis inflation pressure check helps to improve 10 of tread life fuel efficiency Tyre MaintenanceTips Inflation Pressure Check Condition R T Within 1 km Within 5 km Note ...

Page 103: ...ll Rotate the rear tyre so as the chain front and rear sprockets rotate along with it Apply TVS TRU SPRAY chain cleaner front and sideways Clean the chain using soft brush Repeat the steps if needed until the dust is removed completely Let the vehicle be parked for 10 15 mins to ensure the chain is dry Riding with improperly adjusted chain high slackness can cause the chain to come off the sprocke...

Page 104: ... or frequent starting stopping Caution 3 After the chain is completely dry apply TVS TRU4 Chain Lub by rotating the rear wheel by hand in forward direction 4 Now check the slackness of the drive chain as shown The slackness of the drive chain should not exceed the limit maximum 20 25 mm Excess slackness consumes more fuel 5 If the slackness is found more contactTVS Motor Company Authorised Main De...

Page 105: ...me to prevent vehicle from falling and lift the vehicle up 6 Carefully dislocate the disc from the caliper assembly and slide the wheel out 7 Reverse the procedure for reassembling 3 1 2 4 Ensure proper seating of disc in the caliper assembly while reassembling the wheel Ensure to re fix the right spacers at both the sides of the wheel Keep the toner ring upwards whenever the wheel is removed in o...

Page 106: ...void damages to the toner ring Damaged toner ring affects ABS function Warning Not applicable single channel ABS version REAR WHEEL REMOVAL AND REASSEMBLY 1 Remove the wheel hugger rear 2 Remove the axle nut 1 along with the washer and partially pull out the axle 2 3 Take out the caliper assembly along with the wheel speed sensor by dislocating it from the disc and the swing arm lug 4 Carefully ha...

Page 107: ... and feed in several drop of engine cum transmission oil through spark plug hole Crank the engine few times and reinstall the spark plug 5 Remove the battery store it away from direct sunlight and freezing temperatures 6 Place a suitable support at the bottom of the frame so that both the tyres are off the ground This will ensure better tyre life 7 Cover up the vehicle completely with a clean tarp...

Page 108: ...and ride out RECOMMENDED TIPS WHEN TAKING A LONG TRIP OF MORETHAN 500 KM A Please keep the following items for use in case of emergency 1 Complete tool kit first aid kit 2 Recommended spark plug one number 3 Throttle and clutch cables one number each B Precautions to be taken for the journey 1 Ensure engine cum transmission oil and brake oil level are up to the level 2 Adequate fuel in fuel tank C...

Page 109: ...ar brake functioning and rear brake lamp switch adjustment 10 Front fork for any abnormality 11 Spark plug cleanliness and condition of spark plug 12 Air filter element cleanliness 13 Lubrication of all items mentioned in the periodic maintenance schedule 14 Intactness of EVAP system hoses and canister 15 Any other job as necessary 16 Have your vehicle checked at any TVS Motor Company Authorised M...

Page 110: ...vent of replacement of parts the Company also reserves the right to use parts of the same brand as the affected parts or any other brand which is used by the Company in the course of manufacture All parts replaced under this warranty will become the property of the Company and must be returned to the company Limitations of Warranty This warranty shall not apply to following condition 1 Any natural...

Page 111: ...the cause for the reported problems produces to such Authorised Main Dealer Authorised Dealer the Service Handbook for the concerned vehicle for verification of relevant details 8 This is the only warranty given by the Company for the TVS RONIN No employee Dealer or other person is authorised to extend or enlarge this warranty Modifications to this vehicle not approved by the TVS Motor Company may...

Page 112: ...aesthetics Proprietary Items Battery tyres and tubes the warranty terms are subject to our agreement with proprietary OEM Battery warranty for MF type Maintenance Free is applicable for a period of 21 months from the date of charging or 18 months from the date of sale or 20 000 kms whichever is earlier Battery warranty for Lead Acid type is applicable for a period of 15 months from date of chargin...

Page 113: ...ce and instructions contained in this owner s manual Vehicles on which any warranty service including scheduled paid service is not availed when it falls due atTVS Motor Company Authorised Main Dealer Authorised Dealer Vehicles sold or transferred by original retail purchaser Vehicles used for racing or any competition or used otherwise than for ordinary personal transportation Vehicles attached w...

Page 114: ...pay service record sheet for your record and reference An OTP would be sent to customer s registered mobile number The same to be shared with the servicing Dealer on or before vehicle delivery Periodic maintenance always helps good perfor mance of an automobile and our services are planned to keep your TVS RONIN performing good Please note that carrying out the service for your vehicle at schedule...

Page 115: ...argeable to the customer Note Please remember that after the above schedule periodic servicing of your vehicle at appropriate intervals depending upon its extent of use will keep your vehicle at its best level of performance SL NO SERVICE TYPE KMS MONTHS 1 1st Service Free 750 1000 30 45 days 2 2nd Service Free 5500 6000 6 3 3rd Service Free 11500 12000 12 4 4th Service Pay 17500 18000 18 5 5th Se...

Page 116: ...113 113 EXPRESS SERVICE Facility available at selected Dealerships only Terms and conditions apply Get your vehicle serviced in 1 hour at no additional cost Contact your nearest Dealership for details ...

Page 117: ...ons apply Busy Life Easy Servicing Now service your bike anywhere anytime Service the vehicle at your door step Available for regular maintenance or breakdown service only Offered at nominal convenience charges Contact your nearest Dealership for details EXPERT ON WHEELS ...

Page 118: ... Service the vehicle at your door step Available for regular maintenance or breakdown service only Offered at nominal convenience charges Contact your nearest Dealership for details Facility available at selected Dealerships only Terms and conditions apply PICKUP AND DROP ...

Page 119: ... cooled OHC Cylinder bore 66 mm Stroke 66 mm Piston displacement 225 9 cm Compression ratio 10 14 0 5 1 Air filter Viscous Paper filter Oil filter Wire mesh and micronic paper filter Lubrication system Forced wet sump Maximum power in kW 15 01 kW 7750 rpm Maximum torque in Nm 19 93 3750 rpm Maximum speed 120 km h in 5th gear Engine idling rpm under warm condition 1300 200 rpm Starting system Elect...

Page 120: ...SSION Clutch Wet multiplate type Gear shift pattern 1 down and 4 up Primary transmission Helical gears Secondary transmission Chain and sprockets GEAR RATIO I gear 2 917 II gear 1 857 III gear 1 333 IV gear 1 050 V gear 0 880 Primary reduction 2 818 Secondary reduction 3 230 ...

Page 121: ... clearance unladen 181 mm Kerb weight with toolkit and 90 of fuel 159 kg 160 kg Pay load 135 kg Maximum laden weight 294 kg 295 kg Steering angle 35 both sides Caster angle 27 Frame Double Cradle Split Synchro STIFF DCSSS Front suspension USD front forks Rear suspension Gas charged Mono Shock with 7 step adjustable with elliptical swingarm Trail length 110 4 mm ...

Page 122: ...es Rules CMVR 1989 DESCRIPTION TVS RONIN Single channel ABS Dual channel ABS BRAKES Front Hand operated 300 mm petal disc Rear Foot operated 240 mm petal disc TYRE Front tyre size 110 70 17 Tubeless Rear tyre size 130 70 17 Tubeless Front tyre pressure 1 75 kg cm 25 psi Rear tyre pressure Solo 1 97 kg cm 28 psi Rear tyre pressure Dual 2 25 kg cm 32 psi ...

Page 123: ... Generator flywheel magneto 12V 335W Head lamp 12V LED Head lamp with AHO 30W 12W Position lamp 12V LED 2 5W x 1 Tail brake lamp 12V LED 0 8W 5W Turn signal lamps 12V LED 4W x 4 Number plate lamp 12V LED 1 5W x 1 Instrument panel LCD LED indicators Horn 12V DC x 1 Fuse Main 12V 60A x1 12V 25A x 1 ABS 12V 20A x 1 dual channel ABS 12V 15A x 1 single channel ABS DC Load 12V 15A x 1 EMS 12V 10A x 1 ...

Page 124: ...on oil qty 1300 ml after draining 1500 ml after disassembly Front fork oil grade SHOWA SS 47G Front fork oil capacity Leg L 525 2 cc Leg R 500 2 cc Brake fluid grade TVS Girling DOT 3 DOT 4 Specifications and competence are subject to change without notice Note The fuel tank is not a measuring instrument and the capacity of fuel tank may slightly vary from the indicated capacity Additional electri...

Page 125: ...lic place without a valid policy of insurance issued by an authorised insurer Driving a motor vehicle without any such insurance is an offense under Motor Vehicles Act To assist our Customers on their insurance requirements such as the prompt issue and renewal of policies as well as expeditious settlement of claims if any our preferred insurers are ...

Page 126: ......

Page 127: ...TVS Motor Company Limited P B No 4 Harita Hosur 635 109 Tamil Nadu India Tel 91 4344 276878 277311 http tvsmotor com tvs ronin ...

Reviews: