background image

Page 11 

Instructions for use

When a BI is removed from its position during incubation 

process, an audible alarm will sound to indicate that the 

tube should be returned to the corresponding position. 

If the indicator is not re-introduced into the reading 

position after 10 seconds of being withdrawn, the reading 

will be cancelled and the cancelation will be informed 

through the printing of a ticket.

Cancellation of a reading

The incubator contains an internal temperature control. 

If the temperature falls outside of the specified range 

(37±2) ºC or (60±2) ºC, the blue temperature led light will 

start to twinkle. 

Temperature can be externally monitored by using a 

thermometer. The auto-reader has a special hole for 

placing the thermometer which is located at the right 

side of the device.

Temperature monitoring

Care and cleaning

Replacement of the paper roll

Thermal paper specifications

Recommended paper: JUJO AF50KSE3 or similar.

Paper width : 58 mm

Maximum paper thickness: 60 g/m2

Maximum diameter size: 23 mm

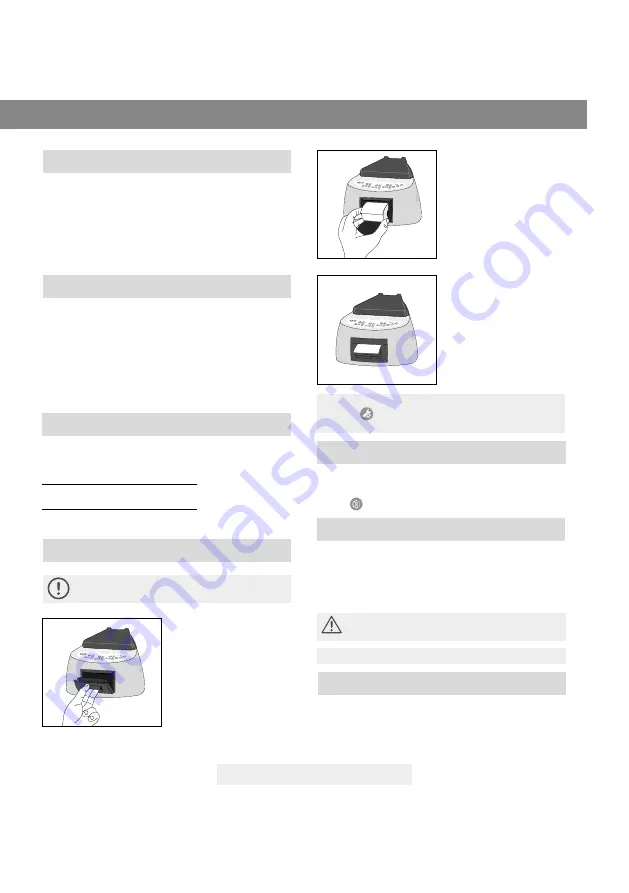
The printer uses thermal paper rolls.

1. To replace the paper 

roll, pull the handle of 

the printer’s door. Open 

the printer’s cover and 

remove the spent roll.

2. Place the new paper roll 

with the outer side up.

3. Close the printer cover 

by pressing on the sides 

of the lid.

NOTE:

 You can check the correct paper replacement by 

pressing  

, this button will force the advance of the 

paper a few centimeters.

The incubator allows reprinting of the last 3 results by 

fluorescence readout. For printing the results, press the 

button   

for 3 seconds.

Reprinting of results

Clean the outer surface of the incubator with a damp 

cloth moistened with a small amount of detergent. Do 

not clean interior components. If additional cleaning of 

the internal components of the equipment is required, 

contact your distributor or manufacturer. 

Always unplug the auto-reader and allow it to cool 

before cleaning. Do not immerse the unit in liquid. 

NOTA:

 The auto-reader does not need routine maintenance.

The auto-reader allows updating the firmware periodically 

(program that controls the device and defines its different 

features) through the use of a firmware update utility. 

This software verifies, by using the internet, the latest 

Firmware update

Summary of Contents for WTL198-0057

Page 1: ...Rev 0 October 2019 Warning this product contains dry natural rubber...

Page 2: ......

Page 3: ...p 8 Remaining incubation time 10 Positive Control 10 Interpretation of results 10 Disposal 10 Audible alarm 10 Cancellation of a reading 11 Temperature monitoring 11 Thermal paper specifications 11 Re...

Page 4: ......

Page 5: ...Simultaneous incubation of BIs for EO processes control along with BIs monitoring the other processes is not possible Use description Composition Six incubation programs are available 4 hours at 37 C...

Page 6: ...emit electromagnetic fields Do not use the equipment on vibrating surfaces Do not pour any liquid inside Do not immerse into any liquid Use indoors only Disconnect the power cord before cleaning Do no...

Page 7: ...se of glass fragments generated after the glass ampoule inside the BI tube is crushed Cool the BI during the indicated time before crushing the ampoule Do not handle the BI excessively since this migh...

Page 8: ...s guide in order to carry out readout 2 Turn on the incubator by connecting the end of the AC of the power supply to the power source and then connect the other end of the source plug on the rear of t...

Page 9: ...rol every time a processed indicator is incubated For more information refer to the Positive Control section of this user guide 7 Place the rapid BI in a reading position close the protective cover an...

Page 10: ...sults are not valid until the biological indicator used as positive control shows a positive result A processed BI with a positive result indicates a failure in the sterilization process A negative re...

Page 11: ...3 mm The printer uses thermal paper rolls 1 To replace the paper roll pull the handle of the printer s door Open the printer s cover and remove the spent roll 2 Place the new paper roll with the outer...

Page 12: ...o reader and press the Clock Sync button the auto reader will be synchronized with the PC s clock Synchronization can only be done as long as there is not an ongoing reading firmware version available...

Page 13: ...at position which becomes disabled The incubation temperature is not stable Ongoing reading Theprintercoverisnottightlylocked Printer without paper Paper roll is placed in the wrong direction Check th...

Page 14: ......

Page 15: ......

Page 16: ......

Reviews: