background image

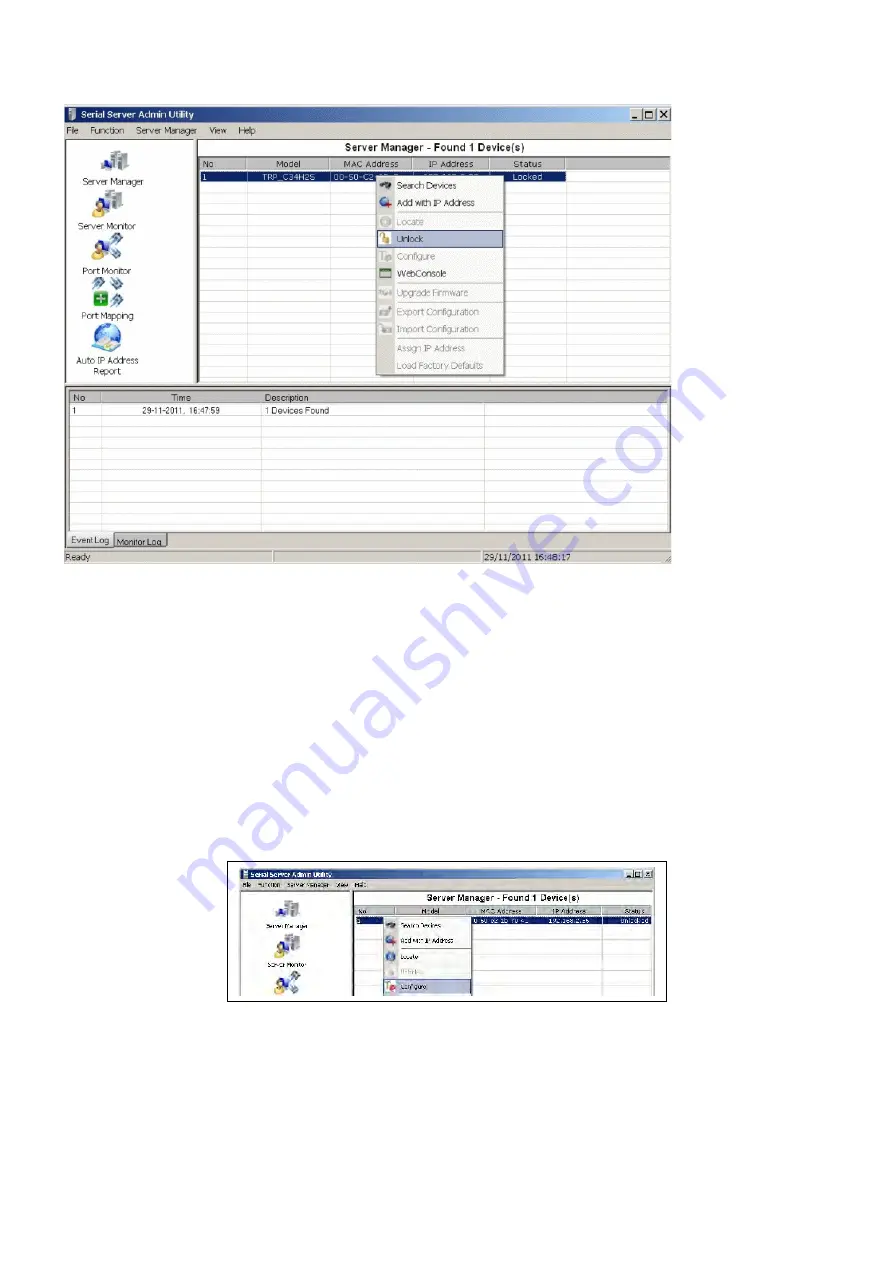
By default all the devices searched are locked and can be seen under the status column of the  
Server Manager Window in order to protect from unauthorized configuration changes. 

In order to configure the device, it has to be Unlocked first. Unlock password: 

 trycom

After   the   device   has   been   Unlocked,   the   device   can   be   configured   for   all   Network,   Serial, 
Operating settings. Select the device to be configured, Right Click on the selected device and 
click on configure to go to Configuration menu. (Double clicking on selected device can also 
open the Configuration menu).   

This invokes the Server Manager Configuration Dialog as shown below.

Summary of Contents for TRP-C34X

Page 1: ...out prior notice in order to improve reliability design and function and dosed not represent a commitment on the part of the manufacturer No part of this manual may be reproduced copied or transmitted...

Page 2: ...that work with Operating Systems WIN 32bit XP Vista 2003Server 2008 Server 32 bit 64 bit 2000 Server OS Win 7 32 bit 64 bit The driver establishes a transparent connection between host and serial devi...

Page 3: ...rossover detection and auto correction Each Port maximum connection 4 host PC at TCP Server and TCP Client Mode Maximum allowed bandwidth is 460 Kbps per Serial Port Supports Web Console Telnet Consol...

Page 4: ...le Supports Real COM mode using RFC 2217 protocol Protocol ICMP TCP IP UDP DHCP Boot Telnet DNS SNMP HTTP SMTP SNTP Power supply Screw terminal or standard external DC adapter Serial interface 15 KV E...

Page 5: ...hernet cable connection and data active TX RX LED COMA RS422 485 Transiting Receiving Indicator COMB RS232 Transiting Receiving Indicator DC Jack Power Input DC 10V to 30V Pleas use the 5 5 2 1mm DC J...

Page 6: ...IP setting...

Page 7: ...ill PWR LED ON STEP2 Connect TRP C34X with Ethernet port by RJ45 cable If the cable is properly connected the LINK LED will light up The TRP C34X Supports Auto MDIX A straight through or crossover RJ4...

Page 8: ...3 3 RS232 Wiring Refer to the Pin out table for connections 4 How to configure TRP C34X There are 3 ways to access the TRP C34X a Serial Server Admin Utility...

Page 9: ...b WEB Server c Telnet...

Page 10: ...rial CD find the TRP C34X s folder Utility and run PortSetup exe When Installation is completed the wizard creates a Serial Server Admin Utility shortcut on the Desktop as shown below Double Click on...

Page 11: ...as to be Unlocked first Unlock password trycom After the device has been Unlocked the device can be configured for all Network Serial Operating settings Select the device to be configured Right Click...

Page 12: ...On Basic page check the Modify check Box to change any of the Configuration details IP Setting...

Page 13: ...ter a IP address b Net Mask c Gateway d Click the IP Configuration drop down box to modify the parameter Static DHCP BOOTP e DNS Server 1 When the user wants to visit a particular website the computer...

Page 14: ...ly set to the street address where the TRP C34X is physically located Port Settings Page On the Port Settings page of the Server Manager dialog displays all the serial ports present on the Serial Serv...

Page 15: ...check box to modify the serial port settings viz Baud Rate Parity Data Bits Stop Bits Flow control Interface If Serial applications like Hyper Terminal opens a COM Port with any of above port Numbers...

Page 16: ...uble click or highlight and click Settings tab of the specific port to modify the operating mode Click the Operating Mode drop down box to set the Real Com Mode TCP Server Mode TCP Client Mode UDP Mod...

Page 17: ...eck Timeout Default setting is 7 min d Inactivity Timeout Default setting is 0 Disabled TCP Client Mode a Click the Connect Mode drop down box to set Startup Any character b Setting Destination IP add...

Page 18: ...data to multiple host computers b UDP Mode Setting Destination c Destination IP address 1 2 3 4 Accessible IP s Page Accessible IP settings allow you to add or remove legal remote host IP address to...

Page 19: ...5 0 Any host can access the TRP C34X Disable this function by unchecking the Enable Check Box Refer the following table for more details about the configuration example Allowable Hosts Input format An...

Page 20: ...Mail address boxes 1 2 3 4 to whom the acknowledgement has to be sent d If the Mail Server has to be authenticated check the Modify box and check the Mail Server authentication check box and then pres...

Page 21: ...authentication if required ii Give from ID To ID iii Select on what event you want to be notified by mail in Eventtype page To get Auto Warning Trap Messages i Key in the IP address of the Linux Mach...

Page 22: ...e reported to the assigned Host on the Network On IP address Report click the modify box to activate the parameter and set the IP address Port number and time period to Auto report to host The default...

Page 23: ...form prompting for password appears Login to the web console by entering the correct password and click submit Default Password is trycom 4 3 Telnet TRP C34X implements a Telnet Server and can be invo...

Page 24: ...nstalls Example Step1 Connect PC RJ45 TRP C34X RS232 422 485 Device Step2 Run Serial Server Admin Utility and Right Click on the selected device and click on configure to go to Configuration menu Step...

Page 25: ...Step4 Select Port Mapping then right clicks Add Device Step5 The Port Mapping will show below...

Page 26: ...Step7 Right Click select Apply Change...

Page 27: ...p7 The TRP C34X Real COM Mode setting OK Notice No matter how to change Add device or Remove Device its need to be run Apply change for save COM Port configuration Step8 plug in RS232 LOOP back connec...

Page 28: ...Demo exe and select setting Step10 Select Action then clicks Connect Step 11 User also test RS422 loop back Please same above step Demo setting RTS CTS item need to Disable for test RS422 5 2 TCP Ser...

Page 29: ...un Serial Server Admin Utility and Right Click on the selected device and click on configure to go to Configuration menu Step3 Be sure IP Setting Port Setting and Operating Mode is correct Step4 Selec...

Page 30: ...Step5 Connect PC COM Port link TRP C34X COMA COMB Step6 RUN Demo exe and select correct baud rate and data format Step7 RUN Telnet exe and input IP and Port 5 3 Paired Mode Example...

Page 31: ...the selected device and click on configure to go to Configuration menu Step3 Be sure IP Setting Port Setting and Operating Mode is correct Step4 TRP C34X Client setting Select Operating Mode and then...

Page 32: ...b Port 2 Setting Step5 TRP C34X Server setting Select Operating Mode and then double click Port1 Port2 item same below...

Page 33: ...a Port 1 Setting b Port 2 Setting...

Page 34: ...ll it completely boots PWR LED ON first Step8 Power ON the TRP C34X Client and wait till it completely boots PWR LED ON Step9 Connect PC COM Port link TRP C34X Client COMA COMB by Cable Step10 Plug in...

Page 35: ...Step9 Select Action then clicks Connect 6 TRP C34X Application Diagram...

Reviews: