background image

TRUST 610 LCD POWERC@M ZOOM

20

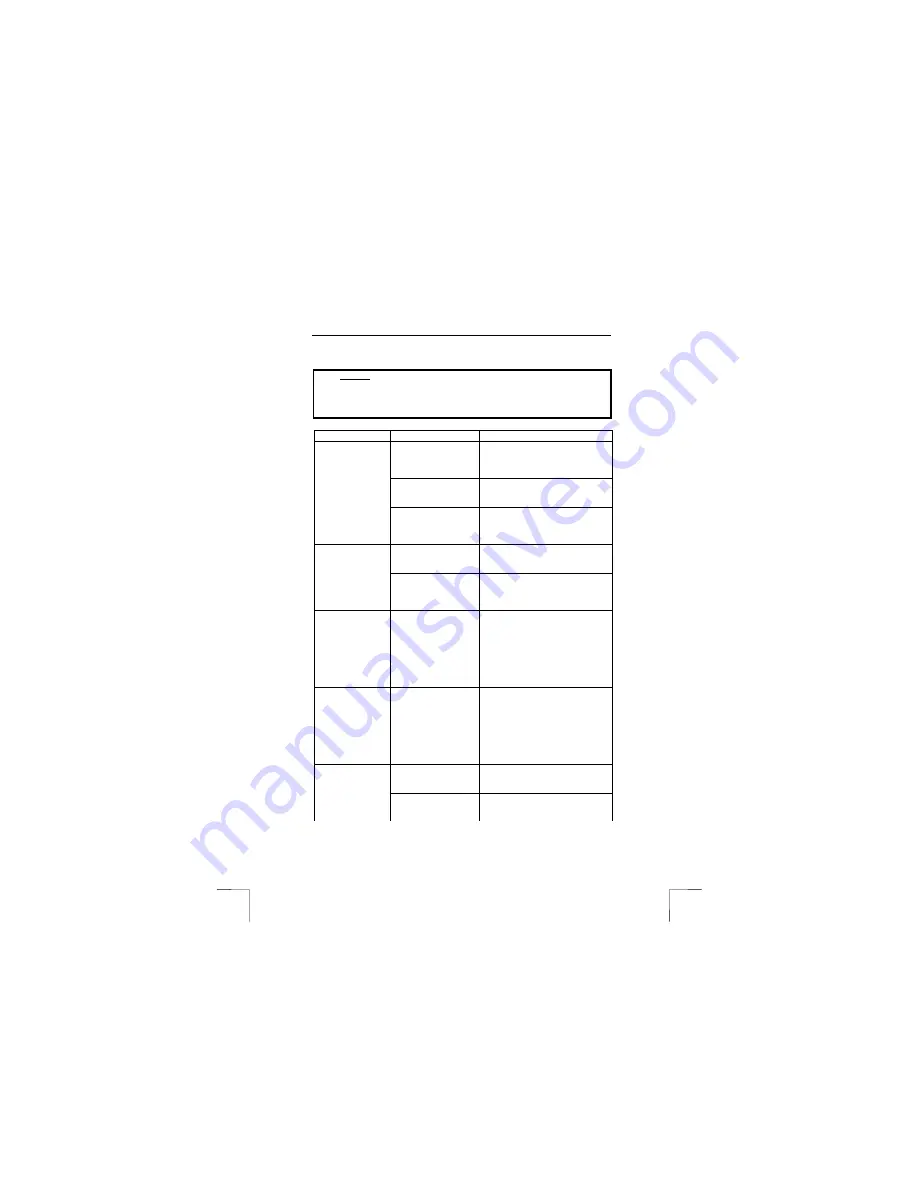
8 Troubleshooting

Method

1. 

Read the solutions given below.

2. 

Check for up-to-date FAQ’s, drivers and instruction

manuals on the Internet (www.trust.com/13288)

Problem

Cause

Possible solution

The computer's USB
port does not work.

Check the settings of your USB
port. For more information, see
www.trust.com/customercare/help/
usb. 

The camera has not
been connected to a
USB port.

Connect the camera to a USB port.

Windows does
not detect a new
device after
connecting the
camera.

The camera has been
connected to a USB
hub which does not
have a power supply.

Connect the camera to a USB hub
which has a power supply or to a
USB port on your computer.

The camera has not
been connected to a
USB port.

Connect the camera to a USB port.

Error message
‘Capture device
was not detected’
is displayed.

The camera has been
connected to a USB
hub which does not
have a power supply.

Connect the camera to a USB hub
which has a power supply or to a
USB port on your computer.

The TRUST 610
LCD
POWERC@M
ZOOM is marked
with an
exclamation mark
‘!’ in the Device
Manager.

The camera has been
connected to a USB
hub which does not
have a power supply.

Connect the camera to a USB hub
which has a power supply or to a
USB port on your computer.

The TRUST 610
LCD
POWERC@M
ZOOM does not
work in
combination with
the TV/capture
card.

There is a conflict
between the camera
and the TV card.

Carry out the following:
1) Remove the TV Capture card.
2) Install the TRUST 610 LCD
POWERC@M ZOOM.
3) Install the TV capture card.

The batteries have
been inserted
incorrectly.

Reinsert the batteries (see chapter
4.2).

The camera does
not do anything.

Camera is still
connected to your
computer.

Disconnect the USB cable. The
camera cannot be operated when it
is connected to a computer.

!

Summary of Contents for 610

Page 1: ...to clean the camera Do not use aggressive substances such as petrol or white spirit to clean the device These may harm the material Do not submerge the device in liquid This may be dangerous and will damage the device Do not use this device near water Do not repair the device yourself The flash uses a high voltage and there is a danger or receiving an electric shock Do not look through the viewfin...

Page 2: ... metres 3 Light meter This is used by the camera to determine the intensity of the surrounding light Do not cover this part of the camera The photograph will not be lit sufficiently if you accidentally cover it with your finger 4 Viewfinder For viewing the image to record You can also view the subject by looking at the built in LCD screen 5 Additional sensor Do not cover this part of the camera Th...

Page 3: ...o take a photograph This is particularly useful for action photographs 8 USB connection Connect the USB cable here 9 Wrist strap attachment Attach the wrist strap here 10 Up button When viewing a photograph this button is used to view the previous photograph In menus this button is used to move up a selection 11 Down button When viewing a photograph this button is used to view the next photograph ...

Page 4: ...th figure 4 Item Description Function 1 Preset Access to a selection of optimal settings for photographing difficult subjects such as cities at night 2 Photograph with a time delay Works the same as the Photo mode but the camera waits 10 seconds after the exposure button has been pressed before taking the photograph 3 Photograph mode You can take photographs in this mode 4 Display In this mode you...

Page 5: ...s Note Make a backup before using Windows Explorer in Windows XP This program may alter your photographs and this cannot be undone Note After taking a photograph wait at least 10 seconds before opening the battery compartment If the camera is still writing data to the card when the batteries are remove all the photographs on the card may be deleted Note Hold the Smart Media Card by the edges Avoid...

Page 6: ...uages You can alter the language as required 1 Select Language from the set up menu see 4 3 1 A list of possible languages will be displayed 2 Use the UP and DOWN buttons to scroll through the list until the desired language is selected You can choose from English French Spanish and German other languages may be available in the future 3 Press the EXPOSURE button to confirm the selection The menu ...

Page 7: ...optical viewfinder to direct the camera 4 4 2 Flash See figure 2 for this explanation The flash settings are automatic automatic red eye reduction or off Carry out the following to set the flash to automatic when there is insufficient light to take a good photograph 1 Turn the MODE switch 5 to the PHOTO position red symbol 2 Press the STROBE COPY 12 button 12 The LCD screen 15 will be temporarily ...

Page 8: ...x maximum Zoom out Press the left hand side of the ZOOM button 4 If this button is pressed first in the DISPLAY mode then 4 photographs will be displayed This is useful to quickly scroll through the photographs Use the zoom in and zoom out buttons alternately to get a good view of the photograph Note The use of this function when taking photographs will slightly reduce the quality Note The effect ...

Page 9: ...hoose between the internal memory and the Smart Media Card from the menu as follows 1 Open the Storage Media item from the set up menu see 4 3 1 You can choose from two different options Internal and External 2 Press the DOWN button until the Internal option is selected 3 Press the EXPOSURE button to confirm your choice The screen will flash and you will return to the main menu The selection has n...

Page 10: ...ires the use of a Smart Media Card This system works by adding extra information on the card which is recognized by the printer as instructions for printing the photographs 1 Select DPOF from the set up menu see 4 3 1 A list of the possible resolutions will be displayed 2 Select All images to give the instruction to print all the photographs Select Select Images to indicate for each photograph whe...

Page 11: ...ion Tip The image viewed through the viewfinder may be slightly different to what is recorded through the lens You can use the LCD for greater accuracy 4 6 2 Taking photographs using the automatic exposure function See figure 2 1 You can take a photograph of yourself using the automatic exposure function You can also use it to take photographs at night without affecting the sharpness of the image ...

Page 12: ... photograph The camera will be busy for a number of seconds whilst it deletes the photograph The next photograph will then be visible 6 Press the EXPOSURE button again to delete this photograph 7 Press the WB DELETE button when you have finished deleting the photographs you wish to delete You will now return to the DISPLAY mode 8 You have now completed deleting photographs You can turn the camera ...

Page 13: ...on your computer The storage system in the camera will be visible in Windows as a Removable Disk You will require drivers however for the webcam function The webcam function is not available for MAC systems Note Make sure all other programs are closed during the installation Note During installation in Windows XP you may receive a message saying that the driver has not been signed This does not ca...

Page 14: ...s being inserted into the camera 5 4 Checking after the installation After installing the device and the driver the following are installed on your computer and can be checked connect the camera and turn it on Start Settings Control Panel Double click on the System icon and select the Device Manager tab If used as a webcam Imaging device TRUST 610 LCD Powercam Zoom Dummy driver TRUST 610 LCD Power...

Page 15: ...s Photo Explorer is useful if you wish to download photographs and save them on your computer Follow the instructions below to install Photo Explorer 7 0 1 Start the Trust Software Installer see figure 9 2 Select Photo Explorer 3 Select the language you wish to use 4 Follow the on screen instructions 6 3 COOL 360 COOL 360 is an image editing program that can be used to change the photographs you h...

Page 16: ...phs to a suitable location on your hard disk for example C My Pictures 10 You can now edit these photographs as required 7 1 2 Webcam function This function is intended for recording live images and making short video clips with the aid of a computer 1 Turn the camera on but do not connect it to the computer 2 Turn the MODE switch to the SETUP position The set up menu will be displayed Once this m...

Page 17: ...ults 7 3 Ulead Photo Explorer You can use Ulead Photo Explorer 7 0 to easily download photographs onto your computer A short description of how to use Photo Explorer is given below For a detailed description of Photo Explorer see the program s Help function Follow the instructions below to use the Trust 610 LCD POWERC M ZOOM in Photo Explorer 1 Turn the MODE switch to the DISPLAY position green sy...

Page 18: ... time you use the program 5 Click on New Slide Show to create your first presentation A new window will appear in which you can select the photographs and background that you wish to use for the presentation see figure 12 6 Follow the on screen instructions and if necessary use the Help function F1 Pay attention to the size of the file the maximum size for a CD ROM is approximately 600 MB 7 Once y...

Page 19: ...w ready to make a NetMeeting connection Click on NetMeeting s telephone book icon A new window will appear 11 In the address bar type an ils server name for example ils worldonline nl and click on Enter 12 Double click on a person in the list A NetMeeting connection will be made The person may not wish to make a connection with you because this person may be communicating with somebody else If thi...

Page 20: ...ice was not detected is displayed The camera has been connected to a USB hub which does not have a power supply Connect the camera to a USB hub which has a power supply or to a USB port on your computer The TRUST 610 LCD POWERC M ZOOM is marked with an exclamation mark in the Device Manager The camera has been connected to a USB hub which does not have a power supply Connect the camera to a USB hu...

Page 21: ...era still or use the stand The distance to the subject is too small Increase the distance to the object to be photographed The recordings are not clear hazy There is insufficient light Improve the lighting The automatic exposure is still turned on Turn the automatic exposure off The memory is full The photograph indicator will flash 0 Transfer photographs to your computer and delete the memory You...

Page 22: ...ions on how to test the printer and solve any problems The photographs are coloured The paper used is unsuitable for printing photographs Use original paper from your printer manufacturer for the most reliable result The photographs are taken in dark surroundings Make sure there is sufficient light or use the flash There is noise in the photographs or the photographs are too dark The flash has bee...

Page 23: ...on at the back of this instruction manual Please have the following information available The article number This is 13288 A good description of what does not work A good description of when the problem occurs Information about your computer the Windows version and the language Information about other devices which have been installed or were previously installed such as scanners other cameras web...

Reviews: