11052019
15
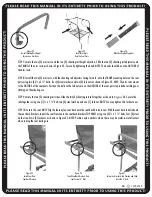
STEP 7: Locate the two (2) arm rests and the two (2) shooting rail height adjusters. Slide the two (2) shooting rail adjusters onto
the FRONT of the arm rests as shown in Figure 22. Secure by tightening the knob. NOTE: The knobs should be on the OUTSIDE of
the arm rests.
STEP 8: Install the two (2) arm rests, with the shooting rail adjusters facing forward, onto the FRONT mounting holes on the seat
posts using two (2) ¼ x 2 ¼” bolts, four (4) steel washers and two (2) locknuts as shown in Figure 23. NOTE: The arm rests mount
to the OUTSIDE of the seat posts. Position the bolts so the locknuts are on the OUTSIDE of the seat posts to preclude catching your
clothing on them during use.
STEP 9: Locate the two (2) shooting rail sides. Slide the two (2) shooting rest rails together as shown in
Figure
24. Secure the
rails together using one (1) ¼ x 1 ¼” bolt, two (2) steel washers and one (1) locknut. NOTE: You may tighten this locknut now.
STEP 10: Locate the seat. NOTE: Slip the loose nylon seat back onto the seat back brackets now. With the seat back installed onto
the seat back brackets, install the seat frame onto the seat back brackets TOP HOLES using two (2) ¼ x 1 ½” bolts, four (4) steel
washers and two (2) locknuts as shown in Figure 25. NOTE: Position nylon washers where there may be metal-to-metal contact
when raising the seat during use.
Figure 22
Install Shooting Rail Height
Adjusters on Arm Rests
Figure 23
Install Arm Rests
Onto the Seat Posts
Figure 24
Slide Shooting Rail Together
Figure 25
Install Seat Onto
Seat Back Brackets
Figure 26
Install Seat Back Brackets Onto
Seat Posts w/4” Bolt
Figure 27
Rotate the Arm Rests Into Position and Slide
Onto the 4” Bolt


