background image

11052019

17

Figure 37

Install Diagonal Braces

Onto Top Ladder Section

STEP 17: Locate the two-piece adjustable stand-off bar. Slide the bar with the “V” portion into the smaller bar with the holes. 

Secure using a spring pin as shown in Figure 33. You will install this two-piece adjustable stand-off bar during installation of the 

ladderstand onto the tree.

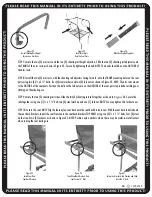
STEP 18: NOTE: The following assembly STEPS may be easier with the standing platform assembly on its side. Locate the two (2) 
diagonal braces. Install the one (1) end of the two (2) diagonal braces to the standing platform using two (2) ¼ x 2 ¼” bolts, 
four (4) steel washers and two (2) locknuts as shown in Figure 34. NOTE: The diagonal braces install to the INSIDE of the stand-
ing platform as shown in Figure 34. Repeat this STEP for installation of the opposing diagonal brace on opposite the side of the 
standing platform.

STEP 19: Locate the top ladder section. NOTE: The top ladder section has a drilled hole just below the top rung as shown in Figure 
35. Slip the male portion of the top ladder section into the top ladder section brackets and secure using two (2) ¼ x 1 ¼” bolts,
four (4) steel washers and two (2) locknuts as shown in Figure 36.

STEP 20: With the top ladder section installed, rotate the two (2) previously installed diagonal braces into place on the OUTSIDE
and attach them to the top ladder section using two (2) ¼ x 2 ¼” bolts, four (4) steel washers and two (2) locknuts as shown in 
Figure 37. ASSEMBLY TIP: The ladderstand assembly locknuts MUST be loose to allow the diagonals to be mounted. If the hardware 
is tight, the diagonal braces WILL NOT align.

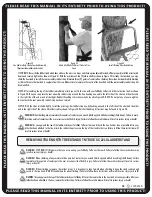
STEP 21: With the treestand laying on the ground and on its side, you may now install the remaining ladder sections. NOTE: The 
ladder sections install using two (2) spring pins per section. Locate the 2nd top ladder section. Slide the male end of the 2nd 
top ladder section into the 

female

 end of the top ladder section as shown in Figure 38. Secure using spring pins as shown in 

Figure 39. Repeat this STEP for the two-piece adjustable stand-off bar ladder section and the bottom ladder  sections.

Figure 34

Install the Diagonal Braces

on the INSIDE of the Standing Platform

Figure 35

Top Ladder Section w/ Drilled Hole

Figure 36

Install Top Ladder Section

Onto the Top Ladder Section Brackets

Figure 38

Slide Ladder Sections Together

Figure 39

Secure Ladder Section Using Spring Pins

Figure 40

Spring Pins Must Be Positively Engaged

Summary of Contents for TNT RISE SC 22LS

Page 1: ...Treestands Inc product has been designed engineered and manufactured to provide you with years of trouble free service TRUE NORTH TREESTANDS INC TNT RISE SC 22LS INSTRUCTION MANUAL WARNING You must us...

Page 2: ...ubstitution shall immediately void your factory warranty and may result in serious injury or death If you suspect that a part s is missing and or defective immediately contact True North Treestands In...

Page 3: ...rue North Treestands Inc product s setup installation and use at ground level you are now ready to use it at heights above ground level Failure to follow these instructions may result in serious injur...

Page 4: ...lf These include but are not limited to weather conditions which have the potential for producing winds lightning rain snow sleet and or any other atmospheric condition which may limit the user s abil...

Page 5: ...sold separately to compliment your new climbing system Only genuine authorized acces sories shall be used with your climbing treestand system Genuine replacement parts are also available online or vi...

Page 6: ...o whistle signal flare Personal Locator Device PLD etc in your possession and on your person in an operable condition This device must be within easy access should you experience the need to contact e...

Page 7: ...death For your personal safety please take a moment to carefully read this product Instruction Manual in its entirety before attempting to assemble set up install and or Otherwise use this True North...

Page 8: ...ess immediately should you experience a fall while wearing it Failure to follow these instructions may result in serious injury or death WARNING Falls from treestands can occur without warning Product...

Page 9: ...this may cut off circulation and cause an unsafe condition Failure to follow these instructions may result in serious injury or death STEP 4 With the waist belt comfortably snug locate the two 2 leg l...

Page 10: ...uckle as shown in Figure 11 Failure to do so may result is failure of the tree belt WARNING YOU MUST thread the tree belt buckle as shown in Figure 11 Failure to thread the buckle as shown will result...

Page 11: ...to follow full body fall arrest harness instructions could result in not being able to return to the stand and being suspended in a full body fall arrest harness after a fall Failure to follow this w...

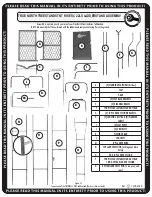
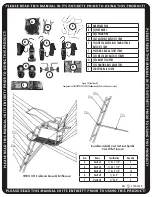
Page 12: ...Parts not shown ot scale A 2 STANDING PLATFORM 2 sides B SEAT C V BAR D 2 SEAT BACK BRACKETS E 2 DIAGONAL BRACES F TWO PIECE ADJUSTABLE STAND OFF BAR G 2 TOP LADDER SECTION BRACKETS H 2 SHOOTING REST...

Page 13: ...RS I 2 SHOOTING RAIL ADJUSTERS J SHOOTING RAIL COVER G Figure 15 Continued Components of the TNT RISE SC 22LS Ladderstand Parts not shown ot scale TNT RISE SC 22LS Ladderstand Assembly Bolt Placement...

Page 14: ...led standing platform using two 2 x 2 bolts four 4 steel washer and two 2 locknuts as shown on Figure 18 STEP 3 Locate the two 2 seat posts Install the seat posts onto the top ladder section brackets...

Page 15: ...Slide the two 2 shooting rest rails together as shown in Figure 24 Secure the rails together using one 1 x 1 bolt two 2 steel washers and one 1 locknut NOTE You may tighten this locknut now STEP 10 Lo...

Page 16: ...st onto the TOP hole on the top ladder section brackets using two 2 x 2 bolts four 4 steel washers and two 2 locknuts as shown in Figure 30 NOTE Position nylon washers where there may be metal to meta...

Page 17: ...olts four 4 steel washers and two 2 locknuts as shown in Figure 36 STEP 20 With the top ladder section installed rotate the two 2 previously installed diagonal braces into place on the OUTSIDE and att...

Page 18: ...ARNING Do not use this or any other product s if you have a history of heart problems back problems impaired vision equilibrium problems high blood pressure or any other physical impairment that may l...

Page 19: ...rious injury or death WARNING Never install set up or climb to your ladderstand with a weapon Use a pull up rope to carefully raise your unloaded weapon after full body fall arrest harness is secure a...

Page 20: ...round power generation e g transformers genera tors substations etc and or power transmission equipment Failure to follow these instructions will result in serious injury or death STEP 6 Have one 1 ad...

Page 21: ...tact as you ascend climb up and while descending climb down Failure to main tain three points of contact puts the user at serious risk of bodily injury Failure to follow these instructions will result...

Page 22: ...rect sunlight and out of any other harsh environmental condition s that may adversely affect its performance CARE AND MAINTENANCE WARRANTY STEP 1 With the help of two 2 other adults refer to Figure 42...

Reviews: