background image

3

Installation

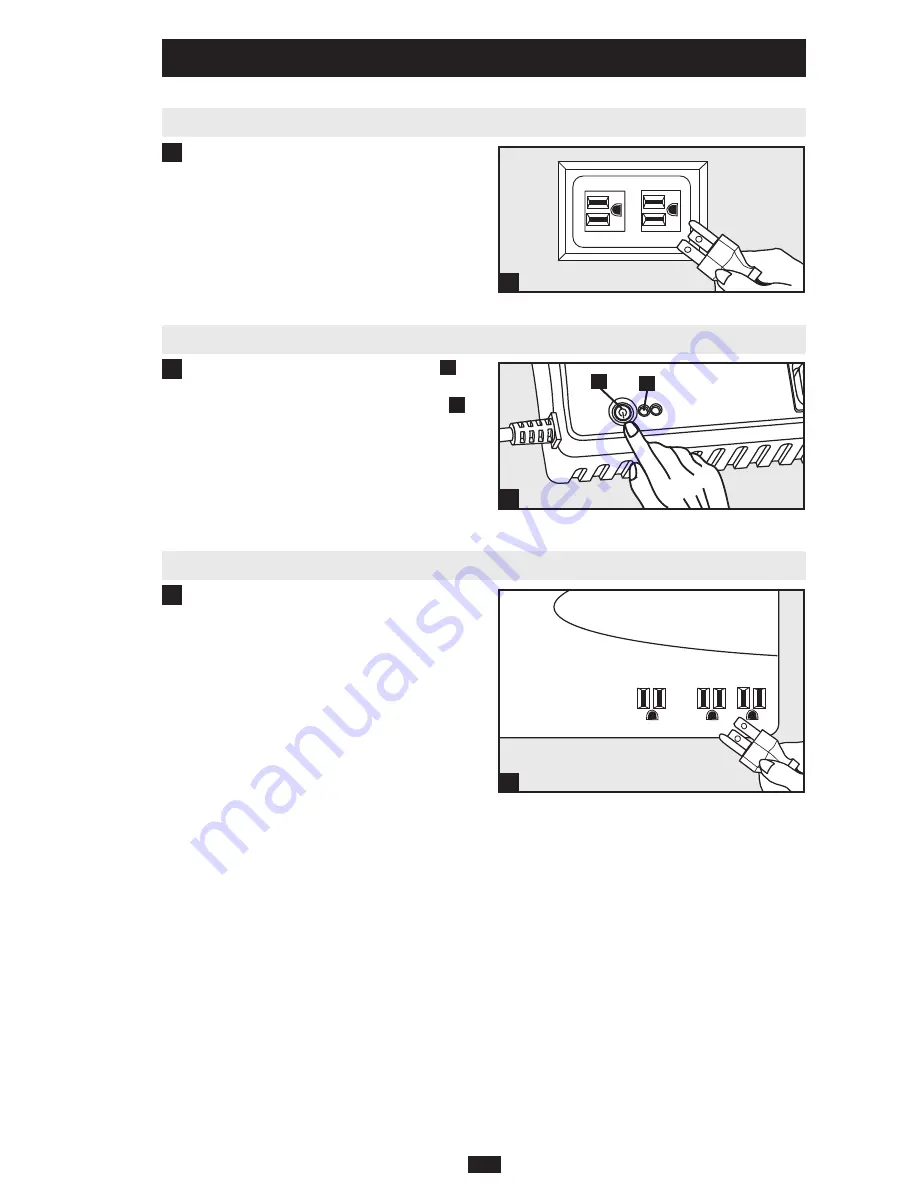
Input Connection


Connect the UPS to a grounded 120V AC 
outlet. Ensure that the outlet does not share 
a circuit with a heavy electrical load (e.g. air 
conditioner or refrigerator).

1

Power On


Press the ON/OFF/TEST/MUTE button 

A


for 1 second (the UPS will beep) to turn the 
UPS system on. The green ON/OFF light 

B


will illuminate when the UPS system is on.


Note: The UPS system will not begin to charge its battery 
until it has been turned on. Connected equipment will not 
be supported adequately during a power failure until the 
internal battery has charged for 4-6 hours. It will take up 
to 8 hours for the battery to charge completely.

2

Output Connections


Plug your equipment into the UPS outlets. 


Note: Laser printers, large household appliances or other 
equipment with very high power requirements should not 
be connected to the UPS. The UPS will become overloaded 
if the combined power requirement for all connected 
equipment exceeds the total output capacity of the UPS 
(550VA). The VA rating for each piece of equipment can 
be found by consulting the equipment’s documentation 
and/or nameplate. If amps are shown, multiply by 120V to 
determine VA (Volts x Amps = VA). 

3

3

2

1

A

B

Summary of Contents for OMNIPOWER PRO550

Page 1: ...Tripp Lite All rights reserved Important Safety Instructions 2 Installation 3 Basic Operation 4 Storage and Service 6 W a r r a n t y R e g i s t r a t i o n r e g i s t e r o n l i n e t o d a y f o...

Page 2: ...ailure of the life support equipment or to significantly affect its safety or effectiveness is not recommended Do not use this equipment in the presence of a flammable anesthetic mixture with air oxyg...

Page 3: ...adequately during a power failure until the internal battery has charged for 4 6 hours It will take up to 8 hours for the battery to charge completely 2 Output Connections Plug your equipment into th...

Page 4: ...em will switch to On Battery mode see On Battery Low Battery Overload section below in order to adjust the voltage to a safe level On Battery Low Battery Overload During a utility power failure or ext...

Page 5: ...is unavailable i e during a blackout press the ON OFF TEST MUTE button A for 1 second the UPS will beep when 1 second has elapsed to turn the UPS system ON The UPS will then provide power to its outp...

Page 6: ...ange to send you proper packaging Securely pack the UPS to avoid damage during shipping Do not use Styrofoam beads for packaging Any damages direct indirect special incidental or consequential to the...

Page 7: ...1234 www tripplite com Derechos de Autor 2008 Tripp Lite Todos los derechos reservados Instrucciones de Seguridad Importantes 8 Instalaci n 9 Operaci n B sica 10 Almacenaje y Servicio 11 English 1 Si...

Page 8: ...a del equipo de soporte de vida o significativamente afectar su seguridad o efectividad no es recomendado No use este equipo en presencia de una mezcla anest sica inflamable con aire oxigeno u oxido n...

Page 9: ...no estar soportado adecuadamente durante una falla de energ a hasta que la bater a interna se haya cargado de 4 a 6 horas Tomar hasta 8 horas a la bater a cargarse completamente 2 Conexiones de Salida...

Page 10: ...spaldo On Battery a fin de ajustar el voltaje a un nivel seguro Vea la secci n En Respaldo Bater a Baja Sobre Carga abajo En Respaldo Bater a Baja Sobre Carga Durante una falla de la energ a del servi...

Page 11: ...star iluminada Segundo desconecte el equipo conectado Tercero desconecte el cable de alimentaci n de corriente de la toma de corriente de la pared Si el sistema UPS ser almacenado por un periodo prolo...

Page 12: ...or el establecimiento que lo vendi junto con el producto en el lugar donde fue adquirido TRIPP LITE se compromete a reparar y en caso de que a su juicio no sea posible la reparaci n a cambiar el equip...

Reviews: