background image

30

10. Keyboard Port Operation

10.1.10 Restore Default Values 

This administrator-only hotkey restores the Console KVM Switch’s default values. See RESTORE DEFAULT VALUES. To restore 
the default values, key in the following hotkey combination: 
1.  Invoke hotkey mode with the [Num Lock] + [-] or [Ctrl] + [F12] combination. 
2.  Press [R]. 
3.  Press [Enter]. 
Once [Enter] is pressed, the command line displays RESET TO DEFAULT SETTING for three seconds; then the message 
disappears and the KVM switch automatically exits Hotkey mode.

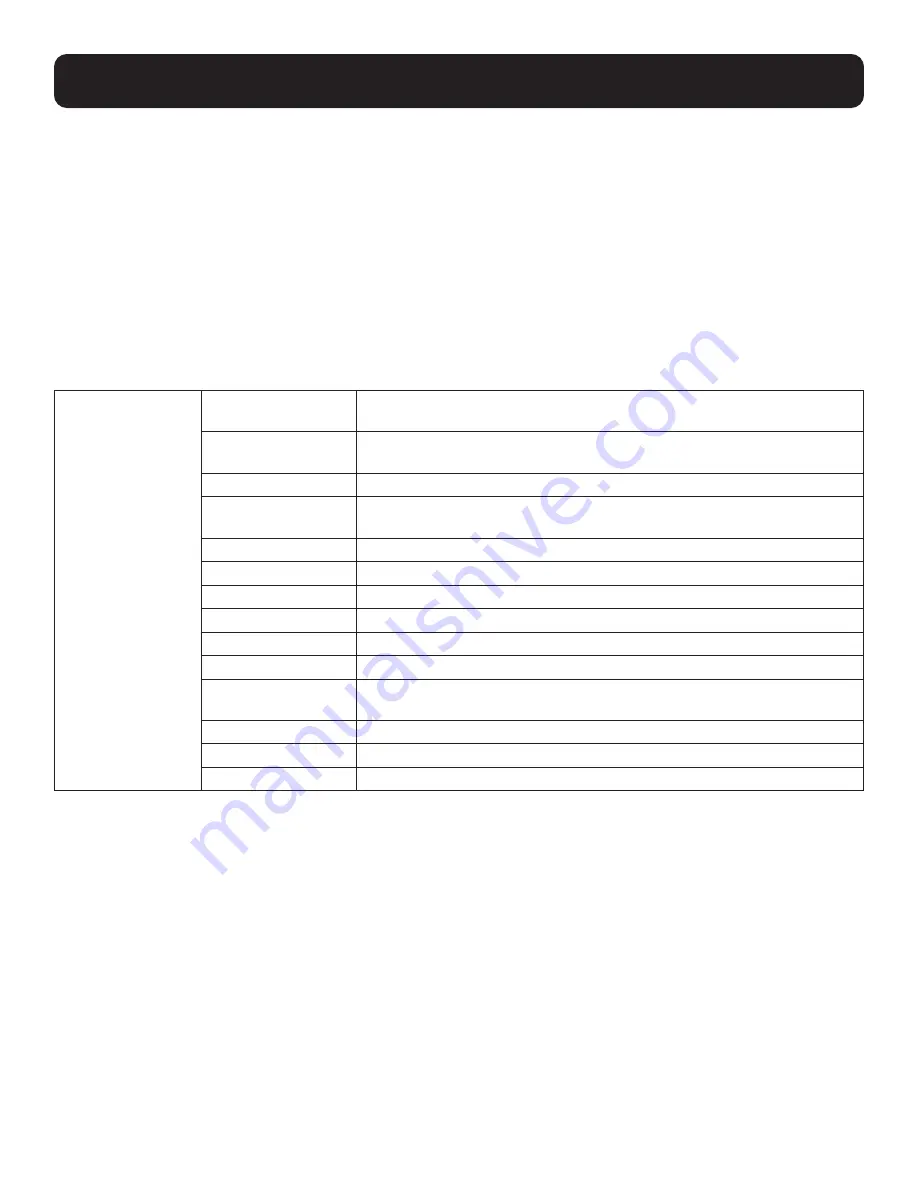
10.2 Hotkey Summary Table

HSM Mode 

[Num Lock] + [-] 
or 
[Ctrl] + [F12] 

[PN] [Enter] 

Switches KVM, Audio and USB focus directly to the computer that 

corresponds to that port ID. (PN = port number) 

[A] [Enter] 

Starts Auto Scan. The KVM focus cycles from port to port at the default 
5-second intervals. 

[A] [n] [Enter]

Starts Auto Scan at n-second intervals (n = 1–255 seconds). 

[H] 

Toggles between the default ([Num Lock] [-]) and alternate ([Ctrl] [F12]) 
Hotkey Settings Mode invocation keys. 

[T]

Toggles the OSD Hotkey between [Ctrl] [Ctrl] and [Scroll Lock] [Scroll Lock]. 

[F1]

Set the port OS to Windows. 

[F2]

Set the port OS to Mac. 

[F3]

Set the port OS to Sun. 

[F5] 

Performs a keyboard / mouse reset on the target computer. 

[B]

Enables / Disables the buzzer. 

[R] [Enter]

[R] [Enter] Resets hotkey settings to their default values. See RESTORE 
DEFAULT VALUES for details 

[←] 

Skips to the previous computer on the list, in Skip Mode. 

[←]

Skips to the next computer on the list in, Skip Mode.

[ESC] or [Spacebar] 

Exits Hotkey Settings Mode.

Summary of Contents for NetDirector B030-DP08-17D

Page 1: ...30 DP08 17D B030 DP16 17D 1111 W 35th Street Chicago IL 60609 USA tripplite com support Copyright 2020 Tripp Lite All rights reserved WARRANTY REGISTRATION Register your product today and be automatically entered to win an ISOBAR surge protector in our monthly drawing tripplite com warranty ...

Page 2: ...nd 19 Restarting 8 1 6 USB Peripheral Devices 19 8 1 7 Port Selection 19 9 KVM Operation 20 9 1 Local Console 20 9 1 1 Local Console Login 20 9 1 2 Local Console OSD 20 Hotkey Sequence 9 1 3 OSD Main Menu 21 9 1 3 1 OSD Main Menu 21 Headings 9 1 3 2 OSD Navigation 21 9 1 3 3 OSD Functions 21 10 Keyboard Port Operation 27 10 1 Hotkey Port Control 10 1 1 Invoke Hotkey Mode 27 10 1 2 Select the Activ...

Page 3: ...this equipment not expressly approved by Tripp Lite could void the user s authority to operate this equipment All information documentation and specifications contained in this manual are subject to change without prior notification by the manufacturer The manufacturer makes no representations or warranties either expressed or implied with respect to the contents hereof and specifically disclaims ...

Page 4: ...ll components are present and in good order If anything is missing or was damaged in shipping contact your dealer Read this manual thoroughly and follow the installation and operation procedures carefully to prevent damage to the switch or to any other devices on the installation Optional Accessories N201 Series Cat6 Gigabit Snagless Patch Cables P006 Series IEC C13 to NEMA 5 15P Power Cords P580 ...

Page 5: ... Console DisplayPort monitor USB keyboard and mouse 4 3 Computers The following equipment must be installed on each computer DisplayPort graphics card USB mouse and keyboard ports 4 4 Operating Systems OS Version Windows 2000 and higher Linux RedHat 9 0 and higher SuSE 10 and higher Debian 3 1 and higher Ubuntu 7 04 and higher UNIX AIX 4 3 and higher FreeBSD 5 5 and higher Sun Solaris 8 and higher...

Page 6: ...B keyboard DisplayPort monitor and USB mouse Console lock enables the console modules to remain securely locked away in position when not in use Graphical OSD and graphical toolbars for convenient user friendly operation Broadcast Mode support Keyboard commands can be broadcast to all available computers in the installation HDCP Support on Local Monitor and second Console Port Superior video quali...

Page 7: ...ng port 6 Keyboard Module Standard 99 key keyboard 7 Touchpad Standard mouse touchpad 8 USB Port The USB 1 1 hub port connects a USB peripheral device flash drive CD ROM drive etc to the console or a USB mouse for users who prefer to use an external mouse 9 Power LED Lights green to indicate that the unit is receiving power 10 Rack Mounting Tabs Rack mounting tabs are located at each corner of the...

Page 8: ...ker switch that powers the device on and off 3 External Console Section Supports an independent external KVM console for flexibility and convenience The external console s USB keyboard mouse and DisplayPort monitor plug in here 4 KVM Port Section Connects the device s ports to computers servers using DisplayPort and USB cables 5 Grounding Terminal The included grounding wire attaches here 4 4 2 2 ...

Page 9: ...tripped over If an extension cord is used with this device ensure the total ampere ratings of all products used on the extension cord do not exceed its rated ampere rating Also ensure all products plugged into the wall outlet does not exceed a total of 15 amperes Consideration should be given to the connection of equipment and the supply circuit as well as what effect overloading the supply circui...

Page 10: ...r and the full weight of the rack rests on the floor Install front and side stabilizers on a single rack or front stabilizers for joined multiple racks before working on the rack Always load the rack from the bottom up with the heaviest item loaded into the rack first When loading the rack avoid creating a hazardous condition due to uneven loading Ensure the rack is level and stable before extendi...

Page 11: ...sole into the two rear mounted brackets in the rack and secure the console in place with user supplied screws 7 2 2 Post Rack Mounting The Console KVM Switch can also be mounted in a 2 post rack installation using the optional 2 Post Rack Mount Kit Tripp Lite model B019 000 The mounting hardware allows the console to be opened with the drawer in any position Heavy duty 14 gauge steel provides stab...

Page 12: ... port on the KVM to the DisplayPort on a computer 4 Repeat steps 2 and 3 for each additional computer you are connecting to the KVM 5 Optional Add an external console to the KVM by connecting an DisplayPort monitor and USB keyboard and mouse to the console ports on the back of the device 6 Plug the included power cord into a Tripp Lite Surge Protector Power Distribution Device PDU Uninterruptible ...

Page 13: ...r or independently of one another This allows the LCD to be available for viewing while the keyboard touchpad module is not in use 7 5 1 Opening Separately 1 Release the console by sliding the front panel toward the center Then engage the catches and pull the top panel 1 2 inches toward you Once the console has been released release the catches 2 Pull the top panel all the way out until it clicks ...

Page 14: ...14 7 Installation 3 Rotate the top panel all the way back to expose the LCD screen 4 Reach underneath and pull out the keyboard module until it clicks into place ...

Page 15: ...atches 2 Pull the top panel out until it clicks into place 3 Rotate the top panel all the way back to expose the LCD screen 7 5 3 Opening Precautions The maximum load bearing capacity of the keyboard module is 65 lb Failure to heed the instructions below can result in damage to the keyboard module CORRECT Rest your hands and arms lightly on the keyboard module as you work INCORRECT DO NOT apply bo...

Page 16: ...g the Console 1 Engage the release catches located on either side of the keyboard to release the keyboard module then slide in the module slightly 2 Release the catches Using the front handle push the keyboard module all the way in ...

Page 17: ...17 7 Installation 3 Rotate the LCD module all the way down then engage the rear catches to release the LCD module 4 Using the front handle push the module all the way in ...

Page 18: ...t the Main Menu pressing this button exits the LCD OSD 8 1 2 Adjustment Settings LED OSD adjustment settings are described in the table below Setting Explanation Brightness Adjusts the background black level of the screen image Contrast Adjusts the foreground white level of the screen image Phase If pixel jitter or horizontal line noise is visible on the display the LCD may have the wrong phase se...

Page 19: ...uters should not be affected by this but should any of them should fail simply restart the affected computers 8 1 6 USB Peripheral Devices The USB 1 1 port on the keyboard module s front panel can connect a USB peripheral device such as a flash drive CD ROM drive or printer Any computer connected to the device can access the USB peripheral on a one by one basis When switching from one computer to ...

Page 20: ... prompt will appear only when a user logs out of the KVM After logging in for the first time using the default username and password the OSD Main Screen will appear in Administrator mode with access to all settings and functions 9 1 2 Local Console OSD Hotkey Sequence Once logged into the KVM switch and a connected computer use the local console OSD Hotkey sequence to re open the OSD Main Menu The...

Page 21: ...e list entries than what can appear on the main screen the screen will scroll To move up or down through the list one screen at a time click the up and down arrow symbols or use the Pg Up and Pg Dn keys If there are more list entries than what can appear on the main screen the screen will scroll To activate a port double click it or move the highlight bar to it and press Enter After executing any ...

Page 22: ...eparate profile for each is stored by the OSD and is activated according to the username that was provided during login To change a setting 1 Double click it or move the highlight bar to it then press Enter 2 After you select an item a submenu with further choices appears To make a selection either double click it or move the highlight bar to it then press Enter An icon appears before the selectio...

Page 23: ... the up and down arrow keys to move the highlight bar to it then press Enter After you select an item a submenu with further choices appears Double click an item or move the highlight bar to it then press Enter An icon appears before the selected item to indicate which one it is The settings are described in the following table Setting Function SET USER LOGIN This function is used to set usernames...

Page 24: ...original factory default settings see OSD Factory Default Settings except for the port name list username and password information which are saved CLEAR THE NAME LIST This function clears the port name list ACTIVATE BEEPER Choices are Y on or N off When activated the beeper sounds whenever a port is changed when activating the Auto Scan function see F7 SCAN or an invalid entry is made on an OSD me...

Page 25: ...e for skip mode switching is made with the Scan Skip mode setting under the F3 SET function When you are in skip mode o Press to switch to the previous computer in the list o Press to switch to the next computer in the list Note When you skip you only skip to the previous or next available computer that is in the Scan Skip mode selection If a port has been selected for Scan Skip mode when the focu...

Page 26: ... Scan mode is in effect the console will not function normally You must exit Auto Scan mode in order to regain control of the console While you are in Auto Scan mode you can pause the scanning in order to keep the focus on a particular computer either by pressing P or with a left click of the mouse See Invoking Auto Scan for details To exit Auto Scan mode press the Spacebar or Esc F8 LOUT Clicking...

Page 27: ...hen Hotkey mode is active A command line appears on the monitor screen The command line prompt is the word Hotkey in white text on a blue background and displays the subsequent hotkey information that you key in Ordinary keyboard and mouse functions are suspended only hotkey compliant keystrokes described in the sections that follow can be input Pressing Esc exits Hotkey mode 10 1 2 Select the Act...

Page 28: ... you to switch between computers in order to monitor them manually You can dwell on a particular port for as long as you like as opposed to auto scanning which automatically switches after a fixed interval To invoke Skip mode key in the following hotkey combination 1 Invoke hotkey mode with the Num Lock or the Ctrl F12 combination Key in Arrow where Arrow refers to one of the arrow keys After an a...

Page 29: ...tically exits Hotkey mode 10 1 8 Port Operating System Control A port s operating system can be changed to match that of the computer attached to the port To change a port s operating system key in the following hotkey combination 1 Invoke hotkey mode with the Num Lock or Ctrl F12 combination 2 Key in Function where Function refers to one of the function keys in the following table Key Description...

Page 30: ...omputer that corresponds to that port ID PN port number A Enter Starts Auto Scan The KVM focus cycles from port to port at the default 5 second intervals A n Enter Starts Auto Scan at n second intervals n 1 255 seconds H Toggles between the default Num Lock and alternate Ctrl F12 Hotkey Settings Mode invocation keys T Toggles the OSD Hotkey between Ctrl Ctrl and Scroll Lock Scroll Lock F1 Set the ...

Page 31: ...C compatible 101 104 key keyboard can emulate the functions of the Mac keyboard The emulation mappings are listed in the table below Note When using key combinations press and release the first key Ctrl then press and release the activation key ...

Page 32: ...yboard can emulate the functions of the Sun keyboard when the control key Ctrl is used in conjunction with other keys The corresponding functions are shown in the table below Note When using key combinations press and release Ctrl then press and release the activation key ...

Page 33: ...ecific for each device 12 2 Preparation To prepare for the firmware upgrade do the following 1 Use the firmware upgrade cable provided with the unit to connect a COM port on your computer to the firmware upgrade port on the switch 2 Shut down all the computers on the KVM installation 3 From your KVM switch console log into the OSD as the administrator and select F4 ADM function 4 Scroll down to FI...

Page 34: ... or by opening a command line and entering the full path to it The firmware upgrade utility welcome screen appears Note The screens shown in this section are for reference only The wording and layout of the actual screens put up by the Firmware Upgrade Utility may vary slightly from these examples 2 Read and agree to the license agreement enable the I Agree radio button ...

Page 35: ...res the device s firmware level with that of the upgrade files If it finds that the device s version is higher than the upgrade version a dialog box appears and gives you the option to continue or cancel If you did not enable Check Firmware Version the utility installs the upgrade files without checking if they are a higher level As the upgrade proceeds status messages appear in the Status Message...

Page 36: ...een appears to inform you that the procedure was successful Click Finish to close the firmware upgrade utility Upgrade Failed If the Upgrade Succeeded screen does not appear the upgrade failed to complete successfully See the following section Firmware Upgrade Recovery for how to proceed ...

Page 37: ...ecovery do the following 1 Power off the switch 2 Connect the firmware upgrade cable to the firmware upgrade port 3 Slide the firmware upgrade recovery switch to the Recover position 4 Power the switch on and repeat the upgrade procedure 5 After the switch has been upgraded successfully power it off and slide the firmware upgrade recovery switch back to the Normal position 6 If the switch is part ...

Page 38: ...1 Slide Additional USB Ports 1 USB 1 1 1 USB 1 1 Reset Button Yes Yes Port Selection Pushbuttons 8 16 Keyboard Mouse Emulation USB PC Mac Sun USB PC Mac Sun Max Video Resolution Local and 2nd Console 1920 x 1080 60 Hz DDC2B HDCP 1 4 1920 x 1080 60 Hz DDC2B HDCP 1 4 Operating Temperature Range 32 to 104 F 0 to 40 C 32 to 104 F 0 to 40 C Storage Temperature Range 4 to 140 F 20 to 60 C 4 to 140 F 20 ...

Page 39: ...e restrictions apply See website for details FCC Notice Class A This device complies with part 15 of the FCC Rules Operation is subject to the following two conditions 1 This device may not cause harmful interference and 2 this device must accept any interference received including interference that may cause undesired operation Note This equipment has been tested and found to comply with the limi...

Page 40: ...40 1111 W 35th Street Chicago IL 60609 USA tripplite com support 20 07 114 93 3CCA_RevA ...

Reviews: