background image

4

ASSEMBLY

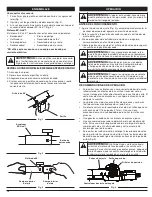
Removing the Attachment

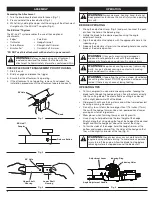
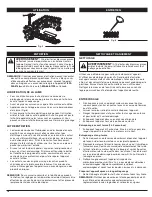
1. Turn the knob counterclockwise to loosen (Fig. 1).
2. Press and hold the release button (Fig. 2).
3. While firmly holding the upper shaft housing, pull the attachment

straight out of the EZ-Link™ coupler (Fig. 3).

The EZ-Link™ System

The EZ-Link™ system enables the use of these optional
attachments.

Edger*

•    Pole Saw

Cultivator

•    Hedge Trimmer*

Turbo Blower

•    Straight-shaft trimmer

Brushcutter*

•    Curved-shaft trimmer

*DO NOT use this attachment with an electric-powered unit.

WARNING:

Before you begin using any attachment,

read and understand the manual that came with the
attachment. Follow all safety information contained within.

CHECK FLEX SHAFT ENGAGEMENT PRIOR TO USING

1. Start the unit.
2. Briefly engage and release the trigger.
3. Ensure that the attachment is operating.
4. If the attachment is not operating, remove it and repeat the

installation procedure until the attachment operates correctly.

Fig. 1

90˚ Hole

Knob

Fig. 2

Release Button

EZ-Link™

Coupler

Fig. 3

90º Hole

Lower Shaft

Housing

Upper Shaft

Housing

OPERATION

BEFORE OPERATING

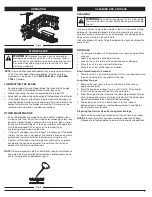
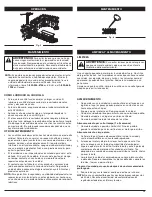
1. Grasp the adjustment lever (Fig. 4) and push to unseat the push

pin from the hole in the indexing ring.

2. Rotate the blade to the desired position using the angle

adjustment handle.

3. Align the adjustment handle pin with the appropriate hole in the

indexing ring.

4. Release the adjustment lever into the indexing hole to secure the

blade at the desired position.

WARNING:

Always wear eye, hearing, hand, foot and

body protection to reduce the risk of injury when operating
this unit.

WARNING:

If operating the unit on a slope, stand below

the cutting attachment. DO NOT operate on a slope or hilly
incline if there is any chance of losing footing.

OPERATING TIPS

To trim new growth, use a wide sweeping motion, feeding the
blade teeth through the hedge or twigs. Feed the stems directly
into the cutting blade. The most effective cutting is achieved
with a slight downward tilt of the blade.

Older growth will have thicker stems and will be trimmed easiest
by using a sawing movement.

Do not try to cut stems that are larger than 7/16 inches (11mm)
thick with the hedge trimmer. Use a non-powered hand saw or
pruning saw to trim large stems.

Wear gloves when trimming thorny or prickly growth.

Use a string to help determine the level height of the hedge.
Stretch a length of string along the top of the hedge at the desired
height and trim the hedge just above the level of the string.

To trim the sides of the hedge, hold the hedge trimmer at the
bottom and sweep upward. Trim the sides of the hedge so that
they will be slightly narrower at the top (Fig. 5).

WARNING:

If any parts are missing, damaged or

broken, do not operate the unit until they have been
replaced. Failure to do so could result in serious injury.

WARNING:

Keep hands and fingers away from moving

parts. Any part of body coming in contact with moving
parts could result in serious injury.

WARNING:

Do not clear away any cut material with the

engine running or blade turning. To avoid serious personal
injury, turn off the engine. Allow the blade to stop before
removing materials wrapped around the blade shaft.

Fig. 4

Adjustment Lever

Indexing Ring

Indexing Holes

Angle Adjustment Handle

Summary of Contents for AH721

Page 1: ...hts Reserved SAVE THESE INSTRUCTIONS For service call 1 800 345 8746 or 1 800 668 1238 in Canada to obtain a list of authorized service dealers near you For more details about your unit visit our website at www trimmerplus com If you have difficulty assembling this product or have any questions regarding the controls operation or maintenance of this unit please call the Customer Support Department...

Page 2: ...sandals or go barefoot Secure hair above shoulder level Make sure the attachment is not in contact with anything before starting the unit Use the unit only in daylight or good artificial light Use the right tool Only use this tool for its intended purpose Always hold the unit with both hands when operating Keep a firm grip on both handles or grips Do not overreach Always keep proper footing and ba...

Page 3: ...th water or any other liquid Keep handles dry clean and free from debris Clean after each use see Cleaning and Storage instructions Keep these instructions Refer to them often and use them to instruct other users If you loan this unit to others also loan them these instructions SAVE THESE INSTRUCTIONS WARNING DO NOT USE an extension boom with this product It is not designed to be used with an exte...

Page 4: ... risk of injury when operating this unit WARNING If operating the unit on a slope stand below the cutting attachment DO NOT operate on a slope or hilly incline if there is any chance of losing footing OPERATING TIPS To trim new growth use a wide sweeping motion feeding the blade teeth through the hedge or twigs Feed the stems directly into the cutting blade The most effective cutting is achieved w...

Page 5: ...rm maintenance or repairs while the unit is running Always allow the unit to cool before servicing or repairing the unit Disconnect the spark plug wire to prevent the unit from starting accidentally Fig 6 CLEANING Use a small brush to clean the outside of the unit Do not use strong detergents Household cleaners that contain aromatic oils such as pine and lemon and solvents such as kerosene can dam...

Page 6: ...PREUVE D ACHAT Tout entretien effectué sur cet appareil pendant et après la période de garantie doit être fait par un concessionnaire agréé uniquement TABLE DES MATIÈRES Service technique 6 Sécurité 7 Familiarisez vous avec votre appareil 8 Caractéristiques 8 Montage 8 Utilisation 9 Entretien 10 Nettoyage et rangement 10 Garantie 16 Toutes les informations illustrations et spécifications contenues...

Page 7: ... de bijoux de pantalons courts de sandales et ne marchez pas les pieds nus Relevez les cheveux au dessus des épaules Assurez vous que l accessoire n est pas en contact avec tout autre élément avant de démarrer l appareil Utilisez l appareil uniquement à la lumière du jour ou sous un éclairage artificiel satisfaisant Utilisez le bon outil N employez cet outil que pour son usage prévu Tenez toujours...

Page 8: ... humidifiez jamais l appareil avec de l eau ou tout autre liquide Conservez les poignées sèches et propres Nettoyez l appareil après chaque utilisation consultez les instructions de Nettoyage et rangement Conservez ces instructions Consultez les fréquemment et utilisez les pour donner des consignes aux autres utilisateurs Si vous prêtez cet appareil à quelqu un incluez également ces instructions C...

Page 9: ...MENT Si l appareil est utilisé dans une pente tenez vous plus bas que l accessoire de coupe N utilisez PAS l appareil dans une pente ou un endroit incliné s il y a un risque que vous perdiez pied CONSEILS D UTILISATION Pour tailler de nouvelles pousses utilisez un vaste mouvement de balayage en passant les dents de la lame sur la haie ou les brindilles Utilisez la lame de coupe directement sur les...

Page 10: ... fonctionnement Laissez toujours l appareil refroidir avant de le réparer Déconnectez le fil de la bougie pour vous assurer que l appareil ne se mette pas en marche accidentellement Fig 6 NETTOYAGE Utilisez une petite brosse pour nettoyer l extérieur de l appareil N utilisez pas de détergents agressifs Des produits d entretien ménagers contenant des huiles aromatiques telles que le pin ou le citro...

Page 11: ...ya sea durante o después del período cubierto por la garantía debe ser realizado solamente por un proveedor de servicios autorizado y aprobado INDICE DE CONTENIDOS Llamadas a apoyo al cliente 11 Seguridad 12 Conozca su unidad 13 Especificaciones 13 Ensamblaje 13 Instrucciones de operación 14 Instrucciones de mantenimiento y reparación 15 Limpieza y almacenamiento 15 Garantía 16 Toda la información...

Page 12: ...ta unidad Si la operación levanta polvo lleve puesta una máscara facial o contra el polvo Use pantalones largos y gruesos botas guantes y camisa de mangas largas No use ropa holgada alhajas pantalones cortos sandalias ni ande descalzo Asegure su cabello por encima del nivel de los hombros Antes de arrancar la unidad asegúrese de que la cuchilla no haga contacto con ningún objeto Use la unidad únic...

Page 13: ...d después de cada uso consulte las instrucciones de Limpieza y almacenamiento Guarde estas instrucciones Consúltelas con frecuencia y utilícelas para instruir a otros usuarios Si le presta esta unidad a alguien préstele también estas instrucciones GUARDE ESTAS INSTRUCCIONES ADVERTENCIA NO USE un brazo de extensión con este producto No está diseñado para ser usado con una extensión y si se utiliza ...

Page 14: ...alguna posibilidad de resbalar RECOMENDACIONES DE OPERACIÓN Para cortar nuevos brotes use un movimiento de barrido ancho introduciendo los dientes de la cuchilla a través del seto o ramas Coloque los tallos directamente en la cuchilla de corte El corte más efectivo se alcanza con una ligera inclinación hacia abajo de la cuchilla Los brotes más viejos tendrán tallos más gruesos y será más fácil de ...

Page 15: ...vitar lesiones graves no haga nunca ningún mantenimiento ni reparación con la unidad funcionando Siempre deje que la unidad se enfríe antes de darle mantenimiento o repararla Desconecte el cable de la bujía para evitar que la unidad arranque por accidente Fig 6 LIMPIEZA Use un cepillo pequeño para limpiar la unidad por fuera No utilice detergentes fuertes Los limpiadores caseros que contienen acei...

Page 16: ...tie de valeur marchande ou d adaptation à une fin particulière ne s applique après la période applicable de garantie expresse écrite ci dessus concernant les pièces qui sont identifiées Aucune autre garantie ou caution expresse écrite ou orale à l exception de celle mentionnée ci dessus accordée par toute personne ou entité y compris tout distributeur ou détaillant concernant tout produit n engage...

Reviews: