


PJ 3026
English
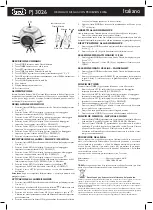
DESCRIPTION OF CONTROLS
1. MODE key: press it repeatedly to display the time (12/24 H), the hours/
minutes, the year, the month/day, the °C or °F degrees. Press it twice to set
the alarm
2. TIMER key: countdown function
3. SET key: adjustment settings
4. TIME key: melody length setting
5. DOWN key: hour/minutes setting
6. UP key: hour/minutes setting
7. SOUND key: melody thumbnail, display colour change
8. Battery compartment
9. Multi-colour alphanumeric display
10. Time Projectior
POWER SUPPLY
Insert 3 “AAA” batteries into the battery compartment (8) at the bottom of the
device. Pay attention to the given polarities. Remove the batteries if the device
is not used for a long period of time. Replace the batteries when the numbers
on the display (9) become hard to read.
CLOCK SETTING
When the “
” icon is displayed.
1. Press the UP key (6) to display the time either in the 12h or in the 24h
format.
2. Press the SET key (3): the hour will start blinking on the display.
-
Set the hour by using the UP (6) or DOWN (7) keys.
3. Press the SET key (3): the minutes will start blinking on the display.
-
Set the minutes by using the UP (6) or DOWN (7) keys.
4. Press the SET key (3): the year will start blinking on the display.
-
Set the year by using the UP (6) or DOWN (7) keys.
5. Press the SET key (3): the month will start blinking on the display.
-
Set the month by using the UP (6) or DOWN (7) keys.
6. Press the SET key (3): the day will start blinking on the display.
-
Set the day by using the UP (6) or DOWN (7) keys.
7. Press the SET key (3) again to confirm.
ALARM/SNOOZE/MELODY SETTING
Put the display on standard view, then set the alarm as follows.
1. Press the MODE key (1): the “ ” alarm icon will be displayed.
2. Keep the SET key (3) pressed for a few seconds: the hour will start blinking
on the display.
-
Set the hour by using the UP (6) or DOWN (7) keys.
4. Press the SET key (3): the minutes will start blinking on the display.
-
Set the minutes by using the UP (6) or DOWN (7) keys.
5. Press the SET key (3): the “
” SNOOZE icon will be displayed.
-
Set the SNOOZE time interval (between 1 and 60 minutes) by using the
UP (6) or DOWN (7) keys.
6. Press the SET key (3): the “ ” melody selection icon will be displayed.
-
Set one of the 6 melodies by using the UP (6) or DOWN (7) keys.
ALARM ACTIVATION
Put the display on standard view, then activate the alarm as follows.
1. Press the MODE key (1): the “ ” alarm icon will be displayed.
2. Press the UP key (6) once to activate the “ ” alarm icon.
3. Press the UP key (6) again to activate the “
” SNOOZE icon.
4. Press the UP key (6) again to deactivate the alarm.
SNOOZE/LIGHT FUNCTION
-
Make sure the “
” SNOOZE icon is displayed.
After activating the alarm, press any key to deactivate it temporarily.
-
The “
” SNOOZE icon will blink through the entire time interval set.
-
When time has elapsed, the alarm will start again.
TIME FORMAT SELECTION (12/24 H)
Make sure you put the display on standard view.
-
Press the UP key (6) repeatedly to display the time in either 12 or 24 hour
mode.
CELSIUS – FAHRENHEIT DEGREES SELECTION
Make sure you put the display on standard view.
-
Press the DOWN key (7) repeatedly to display temperature in Celsius °C
(European scale) or in Fahrenheit °F (British and American scale) degrees.
TIMER FUNCTION
Press the TIMER key (2) to activate the countdown function.
1. Press the SET key (3): the hour will start blinking on the display.
-
Set the hour by using the UP (6) or DOWN (7) keys.
2. Press the SET key (3): the minutes will start blinking on the display.
-
Set the minutes by using the UP (6) or DOWN (7) keys.
3. Press the SET key (3): the seconds will start blinking on the display.
-
Set the seconds by using the UP (6) or DOWN (7) keys.
4. Press the SET key (3) again to confirm.
5. Press the TIMER key (2) to start the countdown. A sound signal will be
heard at the end of the countdown.
6. Press any key to stop the sound signal.
7. Press the MODE key (1) to go back to the time view.
MELODY FUNCTION
1. Press the TIME key (4) repeatedly to select the melody length. You may
choose among 10, 20, 30, 40, 50 or 60 minutes.
2. Press the SOUND key (7) repeatedly to select the desired melody. You may
choose among: Poultry, Forest, Waterfall, Tropical Birds, Ocean and Medley
of all melodies.
-
At the end of the previously set interval, the melody will stop automatically.
CLOCK PROJECTION
This unit is capable of projecting the current time on wall of your room. To
see the projection is necessary that the room is dark. Maximum projection
distance is about 2 meters. Press the projector(10) to activate the projection,
adjust the position of the projector in the direction of the wall where you
want to see the time.
The projection has a duration about 7 seconds.
Power supply: ..................................... 3 “AAA” batteries
Size:
..................................... 100 x 100 x 90 mm
Precautions for correct disposal of the product.
The symbol shown on the equipment indicates that waste must be disposed of
in “separate collection” and so the product must not be disposed of together
with urban waste.
The user must take the product to special “separate waste collection centres”
provided by local government, or deliver it to the retailer against the purchase
of a new product.
Separate collection of waste and subsequent treatment, recycling and disposal
operations promotes the production of equipment with recycled materials and
limits negative effects on the environment and on health caused by improper
handling of waste.
Illegal disposal of the product leads to the enforcement of administrative penalties.
1
3
2
10
6
5
4
7
8
9
Time/Alarm
Mode
Snooze
Alarm
Temperature
Time
Date
ALARM CLOCK WITH TIME PROJECTION


